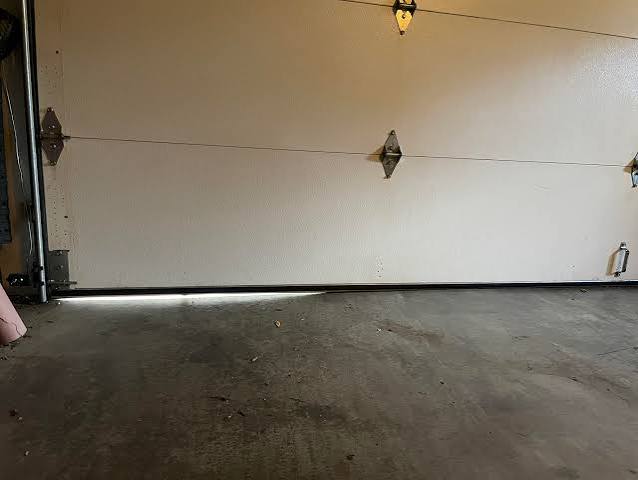
Is your garage door leaving an unsightly and problematic gap at the bottom? You’re not alone—this common issue affects millions of homeowners across the United States, leading to energy loss, pest intrusion, and potential security concerns. Learning how to fix gap at bottom of garage door doesn’t require professional help or expensive tools. With the right approach and some basic materials, you can restore your garage door’s proper seal in just a few hours.
Why Does a Gap Form at the Bottom of Your Garage Door?
Before diving into solutions, it’s essential to understand why this problem occurs. Several factors contribute to gaps forming beneath garage doors:
- Natural wear and tear: Over time, weatherstripping deteriorates due to exposure to extreme temperatures, UV rays, and moisture
- Improper installation: If the door wasn’t installed correctly initially, gaps may appear sooner than expected
- Foundation settling: Houses naturally settle over years, potentially misaligning the garage door track
- Damaged or warped door panels: Physical damage can prevent the door from sitting flush against the floor
- Incorrect door adjustment: Springs and cables that are too tight or loose affect door positioning
According to the International Association of Certified Home Inspectors, approximately 60% of homes have some form of garage door sealing issue within the first five years of ownership. Addressing these gaps promptly prevents more significant problems down the road.
What Tools and Materials Do You Need?
Gathering the right supplies before starting ensures a smooth repair process. Here’s what you’ll need:
Essential Tools:
- Tape measure
- Utility knife or scissors
- Screwdriver set (flathead and Phillips)
- Level
- Wrench set
- Safety glasses
- Work gloves
Materials:
- Replacement weatherstripping (rubber or vinyl)
- Garage door threshold seal
- Silicone-based lubricant
- Cleaning solution (mild soap and water)
- Adhesive sealant (if needed)
Optional but Helpful:
- Power drill
- Caulking gun
- Replacement bottom panel (for severely damaged doors)
The total cost for basic repairs typically ranges from $20 to $100, depending on materials quality and garage door size. This represents significant savings compared to professional repair services, which can cost $150-$400.
Step-by-Step Guide: How To Fix Gap At Bottom Of Garage Door
Step 1: Assess the Current Situation
Begin by thoroughly inspecting your garage door. Close the door completely and examine the gap from both inside and outside the garage. Measure the gap width at multiple points along the door’s bottom edge.
Key measurements to take:
- Gap width at center point
- Gap width at left edge
- Gap width at right edge
- Overall door width
Document these measurements with photos for reference. Consistent gaps larger than 1/4 inch typically indicate alignment issues, while uneven gaps suggest structural problems.
Step 2: Clean the Area Thoroughly
Remove all debris, dirt, and old weatherstripping residue from the door bottom and floor contact area. Use a stiff brush and cleaning solution to ensure surfaces are completely clean and dry.
Cleaning tips:
- Remove old adhesive with rubbing alcohol
- Allow surfaces to dry completely (minimum 30 minutes)
- Check for rust or corrosion on metal components
- Inspect concrete floor for cracks or unevenness
A clean surface ensures proper adhesion of new weatherstripping and helps identify underlying issues.
Step 3: Replace or Install Weatherstripping
Weatherstripping is the most common solution for minor to moderate gaps. Follow these detailed steps:
- Remove old weatherstripping: Carefully pull out existing strips, removing any remaining adhesive
- Measure accurately: Cut new weatherstripping to match your door’s exact width
- Apply adhesive: Use high-quality outdoor-rated adhesive if the strip isn’t self-adhesive
- Install carefully: Press firmly along the entire length, ensuring even contact
- Allow curing time: Wait 24 hours before operating the door
Choose weatherstripping based on your climate:
- Rubber seals: Best for extreme temperatures (-40°F to 200°F)
- Vinyl seals: Cost-effective for moderate climates
- Brush seals: Ideal for uneven floors
Step 4: Adjust Door Alignment
If weatherstripping alone doesn’t solve the problem, your door may need realignment:
Check spring tension:
- Disconnect the opener
- Manually lift the door halfway
- It should stay in place without support
- Adjust springs if the door falls or rises unexpectedly
Inspect tracks and rollers:
- Look for bends or damage in tracks
- Ensure rollers move smoothly
- Tighten loose bolts and brackets
- Lubricate moving parts with silicone spray
Level the door:
- Place a level across the bottom edge
- Adjust track height using mounting brackets
- Make small adjustments (1/8 inch increments)
- Test door operation after each adjustment
Step 5: Install a Threshold Seal
For persistent gaps or uneven floors, consider adding a threshold seal:
- Measure the garage entrance width
- Choose appropriate seal height (typically 1-2 inches)
- Clean the floor surface thoroughly
- Apply construction adhesive to seal bottom
- Position seal against door when closed
- Secure with concrete screws if necessary
Threshold seals provide additional protection against water, pests, and drafts while compensating for floor irregularities.
Common Mistakes to Avoid
Many DIY enthusiasts make these errors when fixing garage door gaps:
| Mistake | Consequence | Solution |
|---|---|---|
| Using wrong weatherstripping type | Premature failure | Match material to climate conditions |
| Skipping surface preparation | Poor adhesion | Clean and dry surfaces thoroughly |
| Over-tightening adjustments | Door binding | Make incremental changes only |
| Ignoring root causes | Recurring problems | Address underlying issues first |
| Working without safety gear | Injury risk | Always wear protective equipment |
When to Call a Professional
While many gap issues are DIY-friendly, certain situations require expert assistance:
- Structural damage: Cracked or severely warped door panels
- Spring problems: Broken or dangerously worn springs
- Electrical issues: Opener malfunction or wiring problems
- Major misalignment: Tracks bent beyond simple adjustment
- Safety concerns: Door that doesn’t reverse properly
Professional garage door technicians have specialized tools and training to handle complex repairs safely. The Garage Door Manufacturers Association provides guidelines for when professional service is recommended.
FAQ Section
Q: How much does it cost to fix a gap at the bottom of a garage door?
A: Basic weatherstripping replacement costs $20-$50 in materials. More extensive repairs involving threshold seals or professional alignment range from $100-$300. Complete door replacement starts around $800-$1,500.
Q: Can I use regular household caulk to seal garage door gaps?
A: No, standard caulk isn’t suitable for garage doors. It lacks the flexibility needed for door movement and won’t withstand temperature extremes. Use specialized garage door weatherstripping or threshold seals designed for this purpose.
Q: How often should I check my garage door for gaps?
A: Inspect your garage door seasonally, particularly before winter and summer. Look for signs of wear, test the seal by checking for light penetration, and listen for unusual noises during operation. Annual professional maintenance is also recommended.
Q: Will fixing the gap improve my home’s energy efficiency?
A: Absolutely. A properly sealed garage door can reduce energy loss by up to 15%, according to Department of Energy studies. This translates to noticeable savings on heating and cooling bills, especially if your garage is attached to your home.
Q: What’s the best weatherstripping material for cold climates?
A: Rubber weatherstripping performs best in extreme cold, maintaining flexibility down to -40°F. Look for EPDM rubber compounds specifically rated for low-temperature applications. Avoid vinyl in regions with harsh winters, as it becomes brittle below 20°F.
Q: How long does new weatherstripping typically last?
A: Quality weatherstripping lasts 5-10 years under normal conditions. Factors affecting longevity include climate severity, door usage frequency, and maintenance practices. Regular cleaning and inspection can extend its lifespan significantly.
Conclusion
Learning how to fix gap at bottom of garage door empowers you to maintain your home’s security, energy efficiency, and appearance without breaking the bank. By following this comprehensive guide, you’ve gained the knowledge to diagnose problems, choose appropriate materials, and execute repairs confidently.
Remember that prevention is key—regular maintenance and seasonal inspections prevent small issues from becoming major problems. Share this guide with friends and family who might benefit from these practical tips. Together, we can help more homeowners maintain safe, efficient, and well-sealed garages.
Have you successfully fixed a garage door gap using these methods? Share your experience in the comments below or on social media to help others tackle this common home maintenance challenge!
Leave a Reply