Is your garage letting in cold drafts, water, or pests? A worn-out bottom seal is often the culprit, and knowing how to replace the bottom seal on a garage door can save you hundreds in energy costs and prevent costly water damage. This simple DIY project takes less than an hour and requires minimal tools, making it perfect for homeowners of all skill levels.
Why Your Garage Door Bottom Seal Matters More Than You Think
Most homeowners overlook the rubber strip at the bottom of their garage door until problems arise. However, this small component plays a crucial role in protecting your home. According to the U.S. Department of Energy, proper weatherization can reduce heating and cooling costs by up to 30%. Your garage door seal is a critical part of this weatherization strategy.
The bottom seal serves multiple essential functions:
- Prevents water intrusion during heavy rain or snow melt
- Blocks pests including insects, rodents, and small animals
- Improves energy efficiency by stopping air leaks
- Reduces noise from outside traffic and neighborhood activities
- Protects stored items from moisture damage and dust
When this seal deteriorates, you may notice increased energy bills, water pooling in your garage, or unexpected visitors like mice and spiders. Addressing these issues promptly prevents more serious problems down the road.
Signs It’s Time to Replace Your Garage Door Seal
Before diving into the replacement process, let’s identify whether your seal actually needs replacing. Look for these common warning signs:
| Sign | What It Means | Urgency Level |
|---|---|---|
| Visible cracks or tears | Seal material has degraded | High |
| Gaps between seal and floor | Improper fit or compression loss | Medium-High |
| Water entering garage | Seal no longer waterproof | High |
| Drafts felt near door bottom | Air infiltration occurring | Medium |
| Pest activity in garage | Entry points exist | High |
| Seal feels hard or brittle | Material has aged out | Medium |
If you notice two or more of these signs, replacement is recommended. Most garage door seals last 5-10 years depending on climate conditions and usage frequency.
Tools and Materials You’ll Need
Gathering the right supplies before starting ensures a smooth replacement process. Here’s your complete shopping list:
Essential Tools:
- Tape measure
- Utility knife or sharp scissors
- Screwdriver (flathead and Phillips)
- Pliers
- Ladder (if needed for visibility)
- Clean rags
- Mild detergent solution
Materials:
- New garage door bottom seal (measure first!)
- Silicone lubricant (optional but recommended)
- Replacement screws or fasteners (if old ones are damaged)
Pro Tip: Take photos of your current seal installation before removal. This reference helps ensure proper reinstallation, especially for first-timers.
Step-by-Step Guide: How to Replace the Bottom Seal on a Garage Door
Follow these detailed instructions for a professional-quality result:
Step 1: Measure Your Existing Seal Accurately
Measure the width of your garage door from edge to edge. Standard residential garage doors are typically 8, 9, 16, or 18 feet wide. Also measure the height of your current seal—common sizes range from 1 to 4 inches. Note the seal type: T-style, bulb-style, or flat-bottom. Taking accurate measurements prevents costly returns and ensures proper fit.
Step 2: Purchase the Correct Replacement Seal
Visit your local hardware store or order online using your measurements. Quality seals cost $15-$40 depending on size and material. Look for durable rubber or vinyl compounds rated for your climate zone. For extreme temperatures, choose seals specifically designed for cold or hot weather resistance.
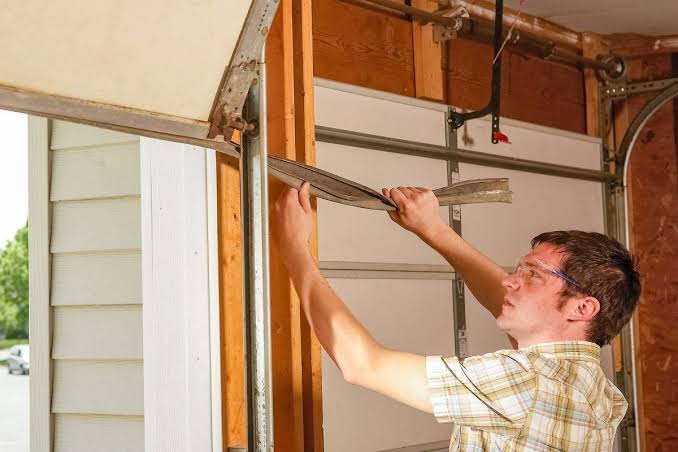
Step 3: Remove the Old Seal Safely
Open your garage door completely and secure it in place. Locate the retainer channel holding the seal—this is usually an aluminum or steel track along the door’s bottom edge. Using your screwdriver, remove any screws securing the retainer. Carefully pull out the old seal, working from one end to the other. If the seal is stuck, gently use pliers to loosen it without damaging the retainer channel.
Step 4: Clean the Retainer Channel Thoroughly
Mix warm water with mild detergent and scrub the retainer channel with a clean rag. Remove all debris, rust, and old adhesive residue. For stubborn buildup, use a wire brush gently. Allow the channel to dry completely before proceeding. A clean surface ensures proper seal adhesion and longevity.
Step 5: Install the New Seal Properly
Starting from one end, insert the new seal into the retainer channel. Work gradually along the entire length, ensuring even placement. The seal should sit snugly without gaps or bunching. For T-style seals, make sure the T-profile faces downward toward the ground. If your seal uses screws, space them evenly every 6-8 inches for secure attachment.
Step 6: Test and Adjust as Needed
Close the garage door slowly and observe how the seal contacts the ground. It should compress slightly without excessive resistance. Check for gaps by shining a flashlight from inside the garage at night—if light escapes, adjustments are needed. Apply silicone lubricant to the seal’s contact surface for smoother operation and extended life.
Common Mistakes to Avoid When Replacing Garage Door Seals
Even experienced DIYers make these errors:
Buying the Wrong Size: Always measure twice before purchasing. An ill-fitting seal compromises effectiveness.
Skipping Cleaning: Installing over dirty surfaces leads to premature failure and poor sealing.
Over-Tightening Screws: This damages both the seal and retainer channel. Snug is sufficient.
Ignoring Weather Conditions: Install seals in moderate temperatures (50-80°F) for optimal flexibility and adhesion.
Forgetting Regular Maintenance: Inspect your seal quarterly and clean it monthly to maximize lifespan.
Choosing the Right Seal Type for Your Climate
Different seal designs work better in specific conditions:
T-Style Seals: Best for uneven floors and general use. Provides excellent compression and durability.
Bulb-Style Seals: Ideal for very uneven surfaces. The rounded profile adapts well to irregularities.
Flat-Bottom Seals: Works best on smooth, level concrete. Offers maximum contact area for superior sealing.
According to Wikipedia’s article on weatherstripping, proper seal selection based on application requirements significantly impacts performance and longevity. Consider your local climate, floor condition, and door usage patterns when choosing.
Maintenance Tips to Extend Your Seal’s Lifespan
Preventive care keeps your new seal performing optimally:
- Clean monthly with mild soap and water to remove dirt and debris
- Inspect quarterly for wear, cracks, or compression loss
- Lubricate annually with silicone-based products (avoid petroleum-based lubricants)
- Check alignment after extreme weather events
- Replace proactively every 7-10 years even if no visible damage exists
FAQ Section
How long does it take to replace a garage door bottom seal?
Most homeowners complete the replacement in 30-60 minutes. First-timers may need up to 90 minutes including measurement and cleanup time. The actual installation process takes only 15-20 minutes once you have the correct materials.
Can I replace just a section of the seal instead of the entire length?
While technically possible, replacing the entire seal is strongly recommended. Partial replacements create weak points where water and air can penetrate. Additionally, aged seal material becomes brittle and may crack during partial removal, causing more problems than it solves.
What’s the difference between cheap and expensive garage door seals?
Premium seals use higher-grade rubber compounds that resist UV degradation, temperature extremes, and ozone exposure. They maintain flexibility longer and provide better compression recovery. Budget seals may harden, crack, or lose shape within 2-3 years, while quality seals last 7-10 years or more.
Should I hire a professional or do this myself?
Replacing a garage door bottom seal is one of the easiest DIY garage projects. Unless your door has unusual modifications or you’re uncomfortable working with basic tools, professional help isn’t necessary. Save the professional service call for spring adjustment or cable issues.
Will a new seal really reduce my energy bills?
Yes, significantly. The EPA estimates that proper weatherization reduces energy consumption by 15-30%. While individual savings vary based on climate and garage usage, most homeowners notice reduced heating costs in winter and cooler garage temperatures in summer. The seal also protects vehicles and stored items from temperature extremes.
How do I know if my garage door needs adjustment after seal replacement?
Test by closing the door and checking for even contact along the entire seal length. If one side touches before the other, or if the door seems to bind, adjustment may be needed. Look for gaps exceeding 1/8 inch anywhere along the seal. Minor adjustments can often be made by modifying the retainer channel position.
Conclusion
Learning how to replace the bottom seal on a garage door empowers you to protect your home, save money, and improve comfort. This straightforward DIY project delivers immediate benefits including better insulation, pest prevention, and water protection. With the right tools, proper measurements, and careful installation, you’ll achieve professional results in under an hour.
Don’t wait for problems to worsen—inspect your garage door seal today and take action if needed. Your future self will thank you for the improved energy efficiency and peace of mind.
Found this guide helpful? Share it with friends and neighbors who might benefit from this money-saving tip! Follow us on social media for more practical home improvement advice and DIY tutorials that make house maintenance easier and more affordable.
Leave a Reply