Introduction
There are few things more frustrating than standing in your garage with a broken part in hand, ready to order a replacement, only to realize you have absolutely no idea which specific unit you own. If you are currently staring at your ceiling motor wondering how to find model number on LiftMaster garage door opener, please know that you are not alone; this is one of the most common hurdles homeowners face during maintenance. Identifying your exact unit is the critical first step toward ensuring safety, compatibility, and getting your garage door back to smooth operation without wasting money on incorrect parts.
Where Is the Model Number Located on a LiftMaster Opener?
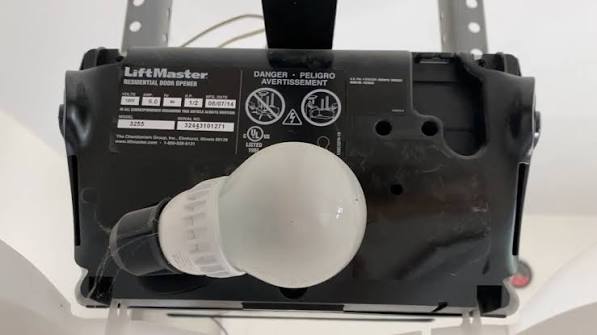
The primary answer to how to find model number on LiftMaster garage door opener queries lies in knowing exactly where to look based on your unit’s age and design. LiftMaster has manufactured openers for decades, and while designs have evolved, the placement of identification data remains relatively consistent.
1. The Motor Unit Housing (Primary Location)
For 95% of LiftMaster units, the model number is printed on a white or silver product identification label attached directly to the motor housing.
- Chain Drive & Belt Drive Units: Check the side panel opposite the chain/belt rail. You may need a stepladder and a flashlight.
- Wall-Mount / Jackshaft Openers: Look on the bottom edge or the side facing the interior of the garage. These are often easier to read without climbing.
- Older Square Rail Units: The label is typically located on the back panel, near the light lens cover.
Pro Tip: Do not confuse the model number with the serial number. The model number usually starts with a digit (e.g., 8500W, 84505R) and identifies the product type. The serial number is unique to your specific device and is used for warranty registration.
2. Under the Light Lens Cover
If the exterior label is faded, painted over, or missing, remove the plastic light lens cover. Manufacturers often place a secondary identification sticker inside the housing near the bulb socket as a backup reference point. Always disconnect power before removing covers to prevent electrical shock or accidental activation.
3. Original Documentation and Packaging
If the physical unit is illegible, check these secondary sources:
- The original owner’s manual front cover.
- Purchase receipts or contractor invoices.
- Warranty registration emails or cards.
- The myQ app if the unit was previously connected and registered.
Why Finding the Correct Model Number Matters for Safety and Repairs
You might wonder why such precision is necessary. According to industry safety standards outlined by organizations referenced on Wikipedia, garage door openers are classified as potentially hazardous mechanical devices that must meet strict entrapment protection regulations.
Using an incompatible part or misidentifying your unit can lead to:
| Risk Factor | Consequence of Wrong Model ID | Correct Identification Benefit |
|---|---|---|
| Safety Sensors | Old sensors may not pair with new logic boards | Ensures compliant auto-reverse function |
| Gear Assembly | Incorrect gear ratio causes motor burnout | Extends opener lifespan by 5–7 years |
| Remote Frequency | 315MHz vs. 390MHz incompatibility | Guarantees reliable signal range |
| Warranty Status | Voided coverage due to improper repair | Maintains manufacturer protection |
Expert technicians emphasize that “the model number is the DNA of your opener.” Without it, you are essentially guessing, and in garage door mechanics, guessing compromises household safety.
Step-by-Step Guide: Reading Your LiftMaster Label Safely
Follow this concrete process to accurately capture your model information without risking injury.
- Prepare Your Equipment: Gather a sturdy stepladder (never use chairs or boxes), a LED flashlight, and your smartphone camera. Wear safety glasses to protect against dust accumulation on the motor housing.
- Disconnect Power (Optional but Recommended): Unplug the opener or turn off the circuit breaker if you plan to touch the housing closely. This prevents accidental activation while you are positioned directly beneath the moving rail.
- Position the Ladder: Place the ladder perpendicular to the motor unit, ensuring stable footing. Never overreach; reposition the ladder instead. Maintain three points of contact at all times.
- Locate and Photograph: Shine the flashlight at an angle across the label to reveal embossed or faded text. Take multiple photos from different angles. Zoom in digitally later rather than risking balance issues while trying to read tiny print up close.
- Record Both Numbers: Write down the Model Number (e.g., 8500W) AND the Serial Number. Some parts catalogs require both for cross-referencing manufacturing date codes.
- Verify Legibility: Before descending, confirm your photo clearly shows all characters. Blurry images defeat the purpose and force a second climb.
Decoding LiftMaster Model Numbers: What Do They Mean?
Understanding the format helps verify you’ve recorded the correct information. LiftMaster uses structured naming conventions:
- First Digit(s): Indicate series/generation (8 = newer Security+ 2.0, 4 = older Security+, 3 = legacy).
- Middle Digits: Specify drive type and features (500 = belt drive, 450 = chain drive, 00W = wall-mount with Wi-Fi).
- Suffix Letters: Denote revisions or regional variants (R = retail package, P = professional installer version).
Example: Model 84505R translates to Series 8 (Security+ 2.0), Belt Drive with Wi-Fi, Retail packaging revision.
Common Challenges When Labels Are Damaged or Missing
Faded or Peeling Stickers
Use UV light or hold the flashlight at extreme raking angles. Sometimes pressing gently with a clean cloth reveals indentations where ink has worn away.
Painted-Over Labels During Renovation
Carefully scrape paint edges with a plastic spudger. Never use metal tools that could damage underlying circuitry if the label sits near electronic components.
Completely Absent Identification
Contact a certified LiftMaster dealer with photos of the unit’s physical characteristics (rail shape, motor size, button configuration). Experienced professionals can often identify models visually based on chassis design alone.
FAQ: Answers to Your Most Pressing Questions
Q1: Can I use the remote control to find my LiftMaster opener model number?
Generally, no. Remotes display their own model/FCC ID, which corresponds to compatible frequencies but does not identify the specific overhead motor unit. However, newer myQ-enabled remotes paired via the app may display linked opener details within the device settings menu.
Q2: Is the model number the same as the FCC ID?
No. The FCC ID identifies the radio transmitter compliance certification and is shared across thousands of identical units. The model number specifies your exact hardware configuration, manufacturing batch, and feature set. Always prioritize the labeled model number for parts ordering.
Q3: My label shows two different numbers—which one is the model?
Look for the designation explicitly marked “MODEL” or “MOD.” Adjacent numbers labeled “SER,” “S/N,” or “DATE CODE” are supplementary. If unlabeled, the shorter alphanumeric code beginning with digits is typically the model number, while longer strings are serial identifiers.
Q4: Does the installation year affect which model number I need?
Yes. LiftMaster frequently updates internal components mid-production run without changing external appearance. Providing the serial number alongside the model allows suppliers to pinpoint your exact manufacturing date, ensuring compatibility with revised circuit boards or gear assemblies introduced during production transitions.
Q5: Can smart home apps like myQ help identify my model?
Absolutely. If your opener is Wi-Fi enabled and registered, navigate to Device Settings > About within the myQ app. The displayed model and firmware version eliminate guesswork entirely and represent the most accurate digital record available.
Q6: What if my LiftMaster is too old to have a readable label?
Units manufactured before 1993 may lack modern labeling standards. In these cases, photograph distinctive features (motor shape, rail attachment style, safety sensor design) and consult a certified technician. Many pre-1993 units also lack mandatory auto-reverse sensors, making professional assessment essential for safety compliance regardless of identification success.
Conclusion: Get Back to Smooth Operation with Confidence
Knowing how to find model number on LiftMaster garage door opener transforms a confusing repair situation into a straightforward solution. By following safe inspection practices, understanding label formats, and leveraging digital tools when available, you ensure every replacement part fits perfectly and every safety feature functions as designed. Remember, taking five extra minutes to verify your model number today prevents hours of frustration and potential safety risks tomorrow.
Found this guide helpful? Share it with fellow homeowners on Facebook, Pinterest, or Nextdoor who might be struggling with their own garage door mysteries. A simple share could save someone from ordering the wrong part or climbing unsafely. Together, we build safer, smarter garages—one correctly identified opener at a time! 🔧🏠
Leave a Reply