Introduction
Is your garage door struggling to open smoothly, or worse, has it suddenly become too heavy to lift manually? You’re not alone—thousands of homeowners face this frustrating issue every year, and more often than not, the culprit is a worn-out or incorrectly sized torsion spring. Knowing how to determine the correct garage door torsion spring is essential for ensuring your door operates safely, efficiently, and without unnecessary strain on your opener. In this comprehensive guide, we’ll walk you through everything you need to know to identify the right spring for your specific garage door setup.
Why Getting the Right Torsion Spring Matters
Before diving into the technical details, it’s crucial to understand why precision matters when replacing a torsion spring. Garage doors typically weigh between 130 and 400 pounds, and the torsion spring system is responsible for counterbalancing that weight. An incorrect spring can lead to:
- Premature wear on your garage door opener
- Safety hazards from improper tension
- Increased energy consumption
- Complete system failure
According to the International Door Association, improperly installed or sized springs account for nearly 30% of all garage door service calls. This statistic underscores the importance of getting it right the first time.
Understanding Torsion Spring Basics
What Is a Torsion Spring?
A torsion spring is a tightly wound metal coil mounted above your garage door opening. When the door closes, the spring winds up and stores mechanical energy. When you open the door, that stored energy releases, helping to lift the heavy door with minimal effort. Unlike extension springs that stretch along the sides of the door, torsion springs rotate around a central shaft.
Key Components to Identify
To determine the correct replacement, you need to identify several critical specifications:
- Wire Size: The thickness of the spring wire, measured in inches
- Inside Diameter (ID): The diameter of the spring’s inner circle
- Length: The total length of the spring when relaxed
- Wind Direction: Whether the spring is left-wound or right-wound
- Cycle Rating: The number of open/close cycles the spring is designed to withstand
Step-by-Step Guide: How to Measure Your Torsion Spring
Step 1: Ensure Safety First
Warning: Torsion springs are under extreme tension and can cause serious injury if handled improperly. Before attempting any measurements:
- Disconnect your garage door opener
- Close the door completely
- Wear safety glasses and heavy-duty gloves
- Consider hiring a professional if you’re uncomfortable with the process
Step 2: Measure the Wire Size
The wire size is perhaps the most critical measurement. Here’s how to get it right:
- Use a caliper or micrometer for accuracy
- Measure the diameter of the actual wire (not the entire spring)
- Common wire sizes range from 0.207 inches to 0.262 inches
- Record the measurement to three decimal places
Pro Tip: If you don’t have precise measuring tools, take the old spring to a hardware store where they can measure it professionally.
Step 3: Determine the Inside Diameter
The inside diameter (ID) must match your existing spring cone and shaft system:
- Standard IDs are typically 1.75″, 2.0″, or 2.25″
- Measure across the center of the spring’s inner circle
- Ensure you’re measuring the inside, not the outside diameter
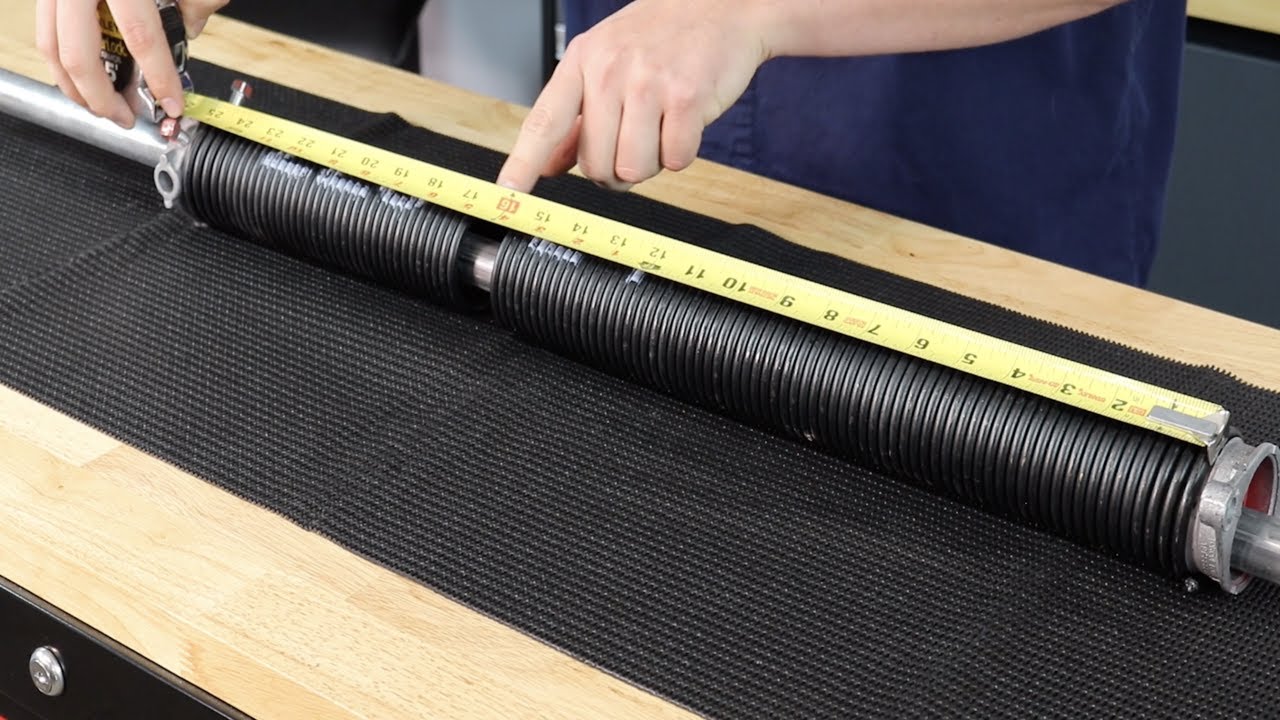
Step 4: Measure the Spring Length
Measure the total length of the spring when it’s in its relaxed state:
- Common lengths include 18″, 20″, 22″, 24″, 26″, 28″, 30″, and 32″
- Measure from end to end, excluding the cones
- Round to the nearest inch
Step 5: Identify the Wind Direction
This step is often overlooked but absolutely critical:
- Right-wound springs tighten when turned clockwise
- Left-wound springs tighten when turned counterclockwise
- Most residential doors use one of each (a pair)
- Look at the direction the coils wrap around the shaft
For more detailed information about spring mechanics, you can refer to the Wikipedia article on torsion springs, which provides excellent technical background on how these components work.
Calculating the Correct Spring Weight
Understanding Door Weight Requirements
The spring must be rated to handle your specific door’s weight. Here’s a general guideline:
| Door Type | Typical Weight | Recommended Spring Rate |
|---|---|---|
| Single steel door | 130-180 lbs | 180-220 lbs per spring |
| Double steel door | 250-350 lbs | 250-300 lbs per spring |
| Wood door (single) | 150-250 lbs | 200-280 lbs per spring |
| Insulated door | 200-400 lbs | 250-350 lbs per spring |
The Formula for Precision
For those who want exact calculations, use this formula:
Spring Rate = (Door Weight ÷ 2) × Drum Radius Factor
Most residential systems use a 4-inch drum, which has a factor of approximately 1.0. For example:
- A 300-pound door would need springs rated at approximately 150 pounds each
- Always round up to the nearest available spring rating
Common Mistakes to Avoid
When learning how to determine the correct garage door torsion spring, many homeowners make these critical errors:
1. Guessing the Wire Size
Even a small difference in wire size (0.001 inches) can significantly affect performance. Never estimate—always measure precisely.
2. Ignoring Cycle Ratings
Standard springs last 10,000 cycles, while high-cycle springs last 25,000+ cycles. If you use your garage door frequently, invest in higher-rated springs.
3. Mixing Old and New Springs
Always replace both springs as a pair, even if only one appears broken. Mismatched springs create uneven tension and premature failure.
4. Overlooking Temperature Effects
Metal expands and contracts with temperature changes. Springs installed in extreme climates may need adjustment seasonally.
When to Call a Professional
While knowing how to determine the correct garage door torsion spring is valuable, some situations warrant professional help:
- If you’re unsure about any measurements
- When dealing with commercial or oversized doors
- If your door has custom modifications
- When safety concerns arise during inspection
Professional installers typically charge $150-$350 for spring replacement, which includes proper sizing, installation, and safety testing. Considering the potential risks and complexity, this investment often proves worthwhile.
Tools You’ll Need
Gather these essential tools before starting:
- Steel tape measure (minimum 25 feet)
- Digital caliper or micrometer
- Safety glasses
- Heavy-duty work gloves
- Ladder (if needed for access)
- Notepad and pen for recording measurements
FAQ Section
Q1: How long do garage door torsion springs typically last?
A: Standard torsion springs last approximately 10,000 cycles (open/close combinations), which translates to 7-10 years for average household use. High-cycle springs can last 25,000+ cycles or 15-20 years. Factors affecting lifespan include frequency of use, climate conditions, and proper maintenance.
Q2: Can I replace just one torsion spring instead of both?
A: While technically possible, it’s strongly discouraged. Springs wear at similar rates, and replacing only one creates imbalance that stresses both the remaining old spring and your garage door opener. Always replace springs in pairs for optimal performance and safety.
Q3: What happens if I install the wrong size torsion spring?
A: Installing an incorrect spring can cause multiple problems: the door may be too heavy to lift easily, the opener motor may burn out prematurely, cables may snap due to excessive tension, or the door might slam shut dangerously. In worst-case scenarios, improper springs can cause complete system failure and property damage.
Q4: How can I tell if my torsion spring needs replacement?
A: Look for these warning signs: visible gaps in the spring coils, rust or corrosion, loud popping noises during operation, difficulty opening the door manually, or the door falling rapidly when released. If you notice a gap larger than 1/4 inch between coils, replacement is likely necessary.
Q5: Are aftermarket torsion springs as good as OEM parts?
A: Quality aftermarket springs from reputable manufacturers can perform equally well as original equipment manufacturer (OEM) parts, often at lower costs. However, ensure they meet industry standards and match your door’s specifications exactly. Cheap, no-name brands may use inferior materials that fail prematurely.
Q6: Do I need special tools to measure torsion springs accurately?
A: While basic measurements can be taken with a standard tape measure, accurate wire diameter measurement requires a digital caliper or micrometer. These tools cost $20-$50 and provide the precision necessary for proper spring selection. Many hardware stores also offer free measurement services if you bring in your old spring.
Conclusion
Learning how to determine the correct garage door torsion spring empowers you to maintain your garage door system effectively and avoid costly mistakes. By carefully measuring wire size, inside diameter, length, and wind direction, you can confidently select the right replacement spring for your specific needs. Remember, precision matters—taking accurate measurements and understanding your door’s weight requirements will ensure smooth, safe operation for years to come.
If you found this guide helpful, please share it with friends and family who might be facing similar garage door challenges. Proper knowledge saves money, prevents injuries, and keeps your home running smoothly. Don’t forget to bookmark this page for future reference, and feel free to leave comments below if you have additional questions about garage door maintenance!
Leave a Reply