How To Determine Correct Torsion Spring For Garage Door
Is your garage door slamming shut or struggling to open? A worn-out or incorrectly sized torsion spring is almost always the culprit — and figuring out how to determine correct torsion spring for garage door systems can feel overwhelming if you’ve never done it before. Whether you’re a first-time homeowner tackling a DIY repair or simply want to understand what your technician is doing, this comprehensive guide will walk you through every measurement, calculation, and safety precaution you need to get it right.
Why Getting the Right Torsion Spring Matters
Your garage door’s torsion spring is the unsung hero of daily operation. It counterbalances the weight of the door, making it possible to lift hundreds of pounds with minimal effort. According to the International Door Association (IDA), over 70% of garage door failures are linked to spring-related issues. Choosing the wrong spring doesn’t just cause inconvenience — it creates a serious safety hazard. An undersized spring will snap prematurely, while an oversized one puts excessive stress on cables, rollers, and the opener motor.
“A properly matched torsion spring should allow your garage door to stay in place when lifted halfway. If it falls or rises on its own, the spring balance is off.” — Garage Door Repair Industry Standard
Understanding Torsion Springs: The Basics
Before diving into measurements, let’s clarify what a torsion spring actually does. Mounted horizontally above the garage door opening on a steel shaft, a torsion spring stores mechanical energy by twisting (torquing) when the door closes and releases that energy when the door opens. This is fundamentally different from extension springs, which stretch along the horizontal tracks. You can learn more about the physics behind torsion springs on Wikipedia.
Key components of a torsion spring system:
- Spring(s): One or two coiled steel springs
- Winding cones: Attached to each end of the spring
- Steel shaft: Runs through the center of the spring
- Cable drums: Located at each end of the shaft
- Lift cables: Connect the drums to the bottom corners of the door
Step-by-Step: How To Determine Correct Torsion Spring For Garage Door
Follow these steps carefully. You’ll need a tape measure, a caliper (or ruler), and a notepad. Safety first: disconnect your garage door opener and ensure the door is fully closed before inspecting any spring components.
Step 1: Measure the Wire Size
The wire size refers to the thickness of the steel wire used to make the spring coil. This is the single most important measurement because even a small deviation changes the spring’s lifting power dramatically.
How to measure:
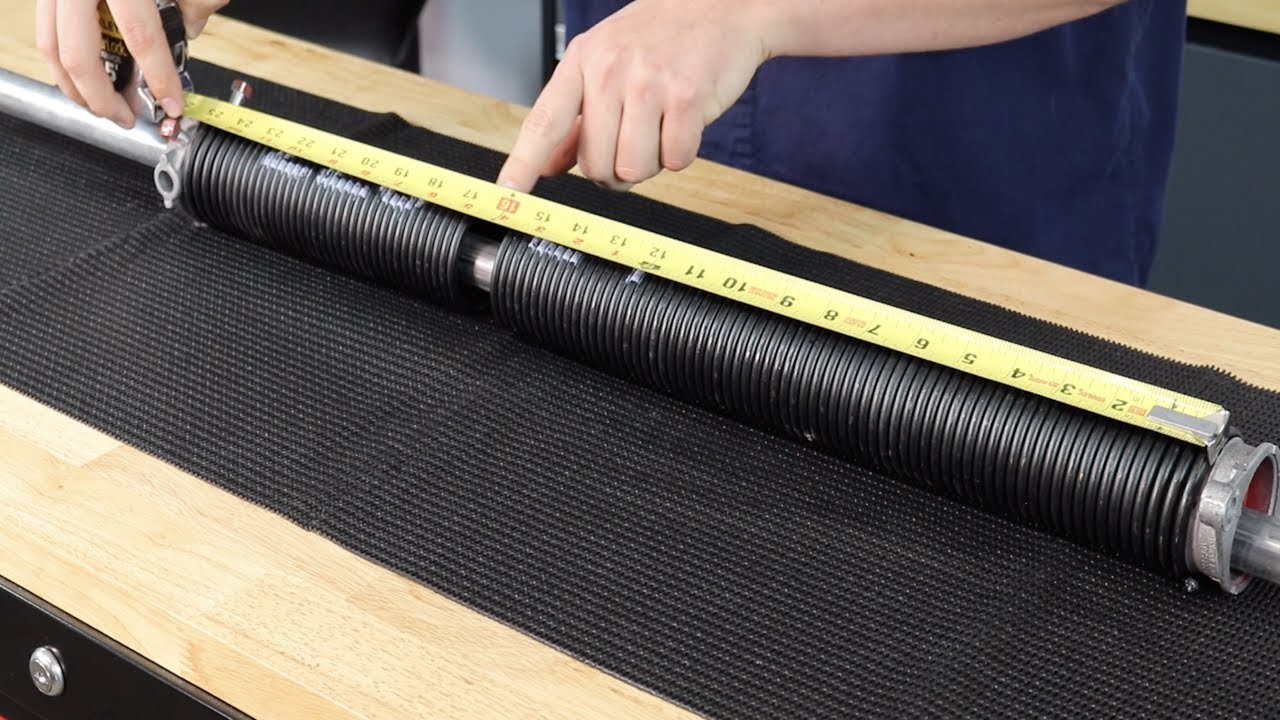
- Take your existing spring and count 20 consecutive coils.
- Measure the total length of those 20 coils using a tape measure.
- Divide that measurement by 20 to get the wire size.
| Total Length of 20 Coils | Wire Size |
|---|---|
| 4.50 inches | 0.225″ |
| 4.90 inches | 0.245″ |
| 5.00 inches | 0.250″ |
| 5.40 inches | 0.270″ |
| 5.80 inches | 0.290″ |
Pro tip: Use a digital caliper for the most accurate reading. Measure in multiple spots since springs can wear unevenly.
Step 2: Measure the Inside Diameter (ID)
The inside diameter is the distance across the hollow center of the spring coil.
- Place your tape measure or caliper across the inside of the coil.
- Common IDs are 1-3/4″, 2″, and 2-5/8″.
- Record this measurement precisely.
Step 3: Measure the Overall Length
This is the total length of the spring from end to end, excluding the winding cones.
- Lay the spring flat on a surface.
- Measure from the inside edge of one end coil to the inside edge of the other.
- Do not include the stationary cone or winding cone in this measurement.
Step 4: Determine the Wind Direction
Torsion springs are either left-wound or right-wound. Installing a spring with the wrong wind direction will cause immediate failure.
How to identify:
- Look at the end of the spring where the winding cone sits.
- If the last coil points to the left, it’s a left-wound spring (typically painted red).
- If the last coil points to the right, it’s a right-wound spring (typically painted black).
Note: Most single-spring setups use a left-wound spring. Dual-spring systems use one of each.
Step 5: Identify the Number of Springs
Check whether your system uses one or two springs. Two-spring systems distribute weight more evenly and generally last longer. If one spring has broken, experts recommend replacing both simultaneously, even if the second appears intact, because they share equal wear cycles.
Matching Your Measurements to a Replacement Spring
Once you have all four data points — wire size, inside diameter, overall length, and wind direction — you can cross-reference them with manufacturer charts or online torsion spring calculators.
Quick reference checklist:
- ✅ Wire size matches exactly (never round up or down)
- ✅ Inside diameter is identical
- ✅ Overall length is within 1/4 inch tolerance
- ✅ Wind direction corresponds to installation side
- ✅ Cycle rating meets or exceeds 10,000 cycles (standard residential)
Torsion Spring vs. Extension Spring: Which Does Your Door Use?
Not sure if you even have a torsion spring? Here’s a fast comparison:
| Feature | Torsion Spring | Extension Spring |
|---|---|---|
| Location | Above door on horizontal shaft | Along horizontal tracks on both sides |
| Mechanism | Twists to store energy | Stretches to store energy |
| Safety | Safer (contained on shaft) | Higher risk (can snap outward) |
| Durability | 10,000–20,000+ cycles | 5,000–10,000 cycles |
| Common In | Modern residential doors | Older or lighter doors |
If your door uses extension springs, this guide’s measurements won’t apply — consult a separate extension spring sizing resource.
Safety Warnings You Cannot Ignore
Working with torsion springs involves handling components under extreme tension. A single mistake can cause severe injury. Please observe these critical precautions:
- Never attempt to unwind or wind a spring without proper winding bars. These are hardened steel rods specifically designed for the task. Screwdrivers and rebar are not substitutes.
- Always wear safety glasses and heavy gloves.
- Secure the door with C-clamps on the tracks below the bottom roller before touching any spring component.
- If you feel unsure at any point, stop and call a licensed professional. The average cost of professional torsion spring replacement ranges from $200 to $400 — far less than a hospital visit.
Frequently Asked Questions (FAQ)
Q1: How long do garage door torsion springs last?
Most standard residential torsion springs are rated for 10,000 cycles (one cycle = one open and close). If you use your garage door 3–4 times daily, expect a lifespan of approximately 7 to 9 years. High-cycle springs rated for 25,000+ cycles can last 15 years or more.
Q2: Can I replace just one torsion spring in a dual-spring system?
Technically yes, but it’s strongly discouraged. When one spring fails, the other has endured the same number of cycles and is likely near failure too. Replacing both ensures balanced lifting force and prevents premature wear on your opener and cables.
Q3: What happens if I install a torsion spring that’s too strong?
An overly powerful spring will cause the door to rise too quickly, putting dangerous strain on cables, drums, and the opener. It can also make the door difficult to close manually and may cause the opener’s safety sensors to malfunction.
Q4: How do I know if my torsion spring needs replacing?
Watch for these warning signs:
- The door feels unusually heavy to lift manually
- The door doesn’t stay open when raised halfway
- Loud banging or snapping noises during operation
- Visible gap or separation in the spring coil
- The opener strains or reverses unexpectedly
Q5: Is it safe to adjust torsion spring tension myself?
Minor adjustments (adding or removing quarter turns) can be done by experienced DIYers with proper tools. However, full spring replacement is best left to professionals due to the extreme forces involved. Improper winding is the leading cause of spring-related injuries.
Q6: How much does a replacement torsion spring cost?
The spring itself typically costs between $30 and $100, depending on size and cycle rating. Professional installation adds $150 to $300 in labor. Investing in high-cycle springs may cost more upfront but saves money over time by reducing replacement frequency.
Conclusion
Knowing how to determine correct torsion spring for garage door systems empowers you to make informed decisions, communicate effectively with technicians, and potentially save hundreds of dollars on unnecessary repairs. By carefully measuring the wire size, inside diameter, overall length, and wind direction, you can confidently source the exact replacement your door needs. Remember: precision matters, safety comes first, and when in doubt, calling a certified professional is always the smartest move.
Found this guide helpful? Share it with friends, family, or neighbors who might be struggling with their garage door! Post it on Facebook, Twitter/X, or Pinterest to help others avoid costly mistakes and keep their homes running smoothly. 🔧🏠
Leave a Reply