Introduction
There is nothing quite as frustrating as pulling into your driveway in the rain, only to realize you still have to dig for a plastic remote or wait for a smartphone app to load. If you are searching for how to connect Tesla Model 3 to garage door opener, you are likely ready to upgrade your daily routine with true keyless convenience. This guide will walk you through the native HomeLink system, ensuring you can open your garage with a simple tap on your touchscreen or automatically upon arrival.
Understanding Tesla HomeLink Technology
Before diving into the buttons, it is crucial to understand what makes Tesla’s system different from traditional car visor remotes. The Tesla Model 3 does not use a physical button; instead, it utilizes HomeLink, a universal transceiver integrated directly into the vehicle’s software and hardware.
According to Wikipedia, HomeLink is a radio frequency (RF) transceiver that allows vehicles to control RF devices such as garage doors, gates, and home lighting. In the Model 3, this technology is paired with GPS geofencing, meaning the car knows where your garage is and can trigger the signal based on location rather than just a manual press.
Why Native Integration Matters
Many new owners attempt to use third-party OBD-II dongles or phone-based solutions. While these work, they lack the reliability of native HomeLink. Native integration offers:
- Zero Latency: Instant response via the touchscreen.
- Auto-Open/Close: Geofenced automation that third-party apps often struggle with due to background process restrictions.
- Security: Encrypted rolling codes that prevent signal cloning.
Prerequisites: Check Your Hardware Before Starting
Not every Tesla Model 3 comes with HomeLink out of the box. This is the most common point of failure for new owners attempting to learn how to connect Tesla Model 3 to garage door opener.
| Model Year | HomeLink Status | Action Required |
|---|---|---|
| 2019–2020 | Often Optional | Check Service Menu or Purchase Module |
| 2021–2023 | Standard (Most Trims) | Ready to Program |
| 2024+ Refresh | Standard | Ready to Program |
Expert Tip: If your Model 3 lacks the module, you can purchase the official Tesla HomeLink Module from the Tesla Shop. Installation typically takes less than 15 minutes and plugs into the vehicle’s computer behind the glovebox or under the dash, depending on the year. Always verify compatibility with your specific VIN before purchasing.
Step-by-Step: Programming Your Garage Door
Once you have confirmed your vehicle has HomeLink, follow this precise tutorial. Ensure your car is parked outside the garage but within range of the opener motor.
Step 1: Access the HomeLink Menu
On your Model 3 touchscreen, navigate to Controls > HomeLink. Tap “Create New HomeLink Device.” You will be prompted to name the device (e.g., “Main Garage”).
Step 2: Initiate Pairing Mode
The screen will display instructions. Select “Start” to begin the training process. The car will now listen for a signal from your existing garage door remote.
Step 3: Train the Receiver
Hold your original garage door remote 1–3 inches away from the front bumper or the side mirror area of the Model 3. Press and hold the button on your remote until the headlights flash or the touchscreen confirms signal reception.
- Note: The receiver location varies by model year. For most Model 3s, the primary antenna is near the front license plate or lower grille. If the first attempt fails, try the side mirrors.
Step 4: Complete the Rolling Code Sync
If your garage opener uses rolling code technology (most post-1996 models do), the car will prompt you to press the “Learn” or “Smart” button on the actual garage motor unit.
- Locate the learn button on your garage ceiling motor (usually yellow, purple, or red).
- Press it once (the LED should blink).
- Return to the car within 30 seconds and tap “Continue” on the touchscreen.
- Test the connection immediately.
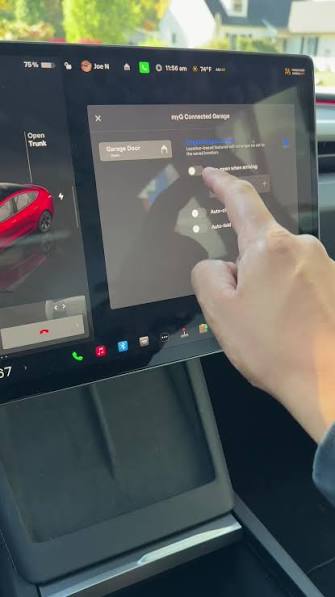
Step 5: Configure Auto-Open and Auto-Close
This is where Tesla shines. After successful pairing, toggle “Auto-Open when Arriving” and “Auto-Close when Leaving.” Set the distance slider carefully; starting at 20 feet prevents accidental triggers if you park on the street near your garage.
Troubleshooting Common Connection Issues
Even with perfect execution, RF interference can disrupt the process. Here are data-backed solutions for frequent hurdles:
- Signal Not Detected: Move the remote closer to the front emblem. Some LED bulbs in garage fixtures emit RF noise that blocks HomeLink signals. Try turning off garage lights during programming.
- Works Manually But Not Auto: Recalibrate the GPS fence. Drive away at least 100 feet and return slowly to allow the system to map the exact trigger point.
- Gate vs. Garage Door: Gates often require a longer “hold” time. In the HomeLink menu, adjust the pulse duration if your gate opens partially or reverses.
- Older Fixed-Code Openers: If your opener predates 1996, you may need a compatibility bridge. Modern Teslas prioritize rolling code security, making legacy fixed-code pairing difficult without an adapter.
Pros and Cons of Tesla HomeLink vs. Smart Remotes
Understanding the trade-offs helps manage expectations.
Pros:
- Seamless integration with Navigation and Driver Profiles.
- No batteries to replace (powered by vehicle).
- Visual feedback on touchscreen reduces guesswork.
- Supports up to three distinct devices (garage, gate, community entry).
Cons:
- Dependent on vehicle software updates (occasional bugs require re-pairing).
- Cannot be transferred between vehicles easily.
- Requires functional OEM remote for initial training.
- Auto-close safety sensors must be perfectly aligned to prevent liability.
Frequently Asked Questions (FAQ)
Can I connect my Tesla Model 3 to a Chamberlain MyQ opener?
Yes, but indirectly. HomeLink communicates via RF, not Wi-Fi. You program the Tesla to mimic a standard remote, which then triggers the MyQ-enabled motor. You do not need the MyQ app inside the Tesla; the native HomeLink handles the physical actuation.
Does connecting HomeLink drain my Tesla battery?
No. The HomeLink module draws negligible power and only activates when the vehicle is awake or within the geofence zone. It does not contribute to phantom drain in any measurable way.
What if I lost my original garage door remote?
You cannot program HomeLink without a transmitting signal. You must either locate the “Learn” button on the motor to clone a new remote first, or hire a locksmith/garage technician to generate a compatible RF signal for the Tesla to capture.
Is HomeLink secure against hackers?
Yes. Tesla uses encrypted rolling code technology that changes the access code after every use. This makes it significantly more secure than older fixed-code remotes and resistant to replay attacks.
Can I set different HomeLink settings for different drivers?
Absolutely. HomeLink devices are tied to Driver Profiles. When you switch profiles via the touchscreen or key fob, the auto-open distances and linked devices adjust automatically to that driver’s preferences.
Why did my HomeLink stop working after a software update?
Tesla occasionally resets HomeLink configurations during major over-the-air updates for safety recalibration. Simply re-run the pairing process described above. Keep your original remote in the glovebox as a backup for these rare instances.
Conclusion
Mastering how to connect Tesla Model 3 to garage door opener transforms your arrival experience from a chore into a seamless ritual. By leveraging native HomeLink technology, you gain reliability, security, and the futuristic convenience that defines EV ownership. Remember to verify your hardware, follow the precise training steps, and always test auto-close functions in a safe environment.
Found this guide helpful? Share it with fellow Tesla owners on X (Twitter), Reddit’s r/TeslaMotors, or your local EV Facebook group! Helping others achieve frictionless home access strengthens our entire community. Safe driving and happy automating!
Leave a Reply