Introduction
There is nothing quite as frustrating as pulling into your driveway after a long day, only to realize you still have to dig through your center console or grab a separate remote just to open your garage. If you are a new owner wondering how to connect my Tesla to my garage door opener, you are not alone; this is one of the most common questions asked by drivers transitioning from traditional vehicles to electric mobility. The good news is that Tesla’s built-in Homelink system makes this integration seamless, secure, and incredibly convenient once you understand the specific programming sequence.
In this comprehensive guide, we will walk you through every step of syncing your vehicle with your existing garage hardware, ensuring you can enjoy true keyless entry without compromising security or functionality.
What Is Tesla Homelink and How Does It Work?
Before diving into the buttons, it is essential to understand the technology bridging your car and your home. Tesla does not use proprietary garage tech; instead, it utilizes Homelink, an industry-standard wireless communication protocol found in millions of vehicles across the United States.
According to Wikipedia, Homelink is a radio frequency transmitter integrated into vehicles that allows users to operate garage doors, gates, lights, and other RF-controlled devices. When you program your Tesla, you are essentially cloning the signal from your original handheld remote into your car’s onboard transmitter.
Key Technical Specifications
- Frequency Range: 300–400 MHz (US Standard)
- Compatibility: Works with rolling-code and fixed-code openers manufactured after 1995
- Capacity: Stores up to 3 distinct device frequencies
- Security: Uses encrypted rolling codes to prevent signal theft
Understanding this foundation helps explain why certain older or non-US standard openers might require additional adapters, which we will cover later.
Pre-Programming Checklist: Before You Start
To ensure the process of learning how to connect my Tesla to my garage door opener goes smoothly, complete these preparatory steps. Skipping them is the #1 cause of programming failure.
- Locate Your Original Remote: You must have the functioning handheld remote for your garage door. The Tesla cannot pair directly to the motor unit without this initial handshake (unless using the “Receiver Learn” method described below).
- Check Battery Health: Replace the battery in your handheld remote before starting. A weak signal is the most common reason pairing fails midway.
- Clear Previous Settings (Optional but Recommended): If you bought the Tesla used or previously programmed a different door, clear the old memory first to avoid frequency conflicts.
- Positioning Matters: Park outside the garage, facing the door, at least 5 feet away. Do not attempt programming while inside the garage; signal bounce-back causes errors.
- Safety First: Ensure no people, pets, or obstacles are in the path of the door. The door will cycle during testing.
⚠️ Safety Warning: Never program your Homelink while the vehicle is in motion or while standing directly under a moving garage door. Always keep your eyes on the door mechanism during the sync process.
Step-by-Step: How to Program Tesla Homelink
This is the core tutorial section. Follow these instructions precisely. The entire process typically takes 2–5 minutes.
Method A: Standard Remote Programming (Most Common)
Use this method if you have a working handheld remote.
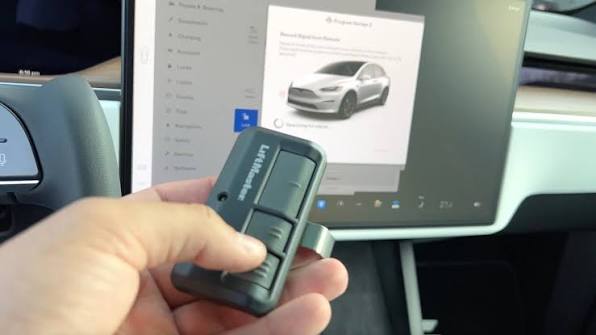
- Navigate to Controls: On your Tesla touchscreen, tap Controls > Settings > Homelink.
- Create New Device: Tap Create Homelink Device. Enter a recognizable name (e.g., “Home Garage,” “Office Gate”).
- Initiate Pairing Mode: Tap Start. The screen will prompt you to hold your handheld remote.
- Hold Remote Near Bumper: Stand outside the vehicle. Hold your handheld remote 1–3 inches away from the front bumper (centered near the license plate area where the receiver is located). Press and hold the button on your handheld remote.
- Watch for Feedback: Keep holding until the Tesla headlights flash or the touchscreen displays “Device Programmed.” This usually takes 5–10 seconds. Release the button immediately upon confirmation.
- Test the Connection: Tap the newly created device icon on your touchscreen. The garage door should activate. Test it 3 times to confirm reliability.
Method B: Receiver Learn Button (No Remote Available)
If you lost your remote but have access to the garage door motor unit:
- Select Create Homelink Device on the touchscreen.
- Choose Receiver Learn Mode instead of standard programming.
- Go to your garage door motor unit and press the physical “Learn” or “Smart” button (usually located on the back or side panel, often colored yellow, purple, or orange).
- Return to your Tesla within 30 seconds and tap Search on the touchscreen.
- The vehicle will scan for the active learning signal. Once detected, it will auto-program.
Troubleshooting Table: When Things Don’t Work
| Symptom | Likely Cause | Solution |
|---|---|---|
| Headlights never flash | Weak remote battery or wrong position | Replace battery; hold remote closer to center bumper |
| Programs but won’t open | Frequency mismatch or rolling code issue | Clear memory and reprogram; check opener compatibility |
| Works intermittently | Signal interference or range issue | Reprogram at different angle; remove nearby LED bulbs |
| “Device Not Found” error | Opener too old or non-US frequency | Verify opener supports Homelink; consider universal adapter |
| Door opens but doesn’t close via Tesla | Safety sensor misalignment | Check photo-eye sensors at floor level; realign if needed |
Advanced Features: Auto-Open and Geofencing
Once you master how to connect my Tesla to my garage door opener, unlock the automation features that truly elevate the experience.
Setting Up Auto-Homelink
Your Tesla can automatically open the door when approaching and close it when departing.
- Go to Controls > Homelink > [Your Device].
- Toggle Auto-Homelink ON.
- Set your preferred activation distance (typically 15–30 feet).
- Important: The first few uses require manual confirmation on-screen as the system learns your GPS coordinates. After 3–5 successful cycles, it becomes fully automatic.
Security Considerations for US Owners
While convenient, auto-open features require responsible configuration:
- Disable for Shared Driveways: If you share a driveway or live in a dense neighborhood, disable auto-open to prevent accidental activation.
- PIN Protection: Enable PIN-to-Drive so unauthorized users cannot trigger your garage even if they gain vehicle access.
- Regular Audits: Review your Homelink devices quarterly and delete any entries for addresses you no longer occupy.
Compatibility: Which Garage Openers Work With Tesla?
Not all openers are created equal. Here is what US owners need to know:
✅ Fully Compatible
- Chamberlain/LiftMaster (Manufactured 1997+)
- Genie Intellicode (Rolling code models)
- Craftsman (Post-1997 models)
- Sommer Direct Drive
- Most modern Wi-Fi enabled smart openers (MyQ, Aladdin Connect)
⚠️ May Require Adapter
- Openers manufactured before 1995 (fixed-code dip switches)
- European/Asian frequency models imported to US
- Some commercial-grade operators
❌ Generally Incompatible
- Non-RF gate systems (infrared-only)
- Proprietary apartment complex systems without individual remotes
- Damaged or malfunctioning opener units
💡 Expert Tip: If your opener predates 1997, consider upgrading to a modern Chamberlain or Genie unit ($200–$350 installed). Beyond Tesla compatibility, newer units offer battery backup, quieter operation, and enhanced security—valuable upgrades regardless of your vehicle.
Frequently Asked Questions (FAQ)
Q1: Can I connect my Tesla to multiple garage doors?
Yes! Tesla Homelink stores up to 3 separate devices. You can program your home garage, office parking gate, and a parent’s house simultaneously. Each device gets its own icon and auto-open settings on the touchscreen.
Q2: Why did my Homelink stop working after a software update?
Tesla OTA updates occasionally reset or corrupt Homelink memory. Simply reprogram the device using the standard method above. If issues persist across multiple updates, contact Tesla Service via the app—they can remotely diagnose receiver hardware issues.
Q3: Does connecting my Tesla to my garage door opener drain the car battery?
Negligibly. Homelink uses minimal power, comparable to your phone’s Bluetooth standby. Even with auto-open enabled, the impact on range is unmeasurable. Your 12V auxiliary battery powers the receiver, not the main traction pack.
Q4: Can someone hack my Tesla Homelink to open my garage?
Modern rolling-code systems make this extremely difficult. Each transmission uses a unique encrypted code that cannot be replayed. However, always maintain physical security best practices: enable PIN-to-Drive, keep your key fob secure, and never leave your vehicle unlocked in public spaces.
Q5: My Tesla recognizes the signal but the door doesn’t move. What now?
This usually indicates a rolling code desynchronization. Clear the Homelink entry from your Tesla AND reset the opener’s memory (using the learn button on the motor unit). Then reprogram from scratch. Also verify that your garage door’s safety sensors aren’t blocked or misaligned—this prevents remote operation even when signals are valid.
Q6: Do I need a Tesla-specific garage door opener?
No. Tesla uses the universal Homelink standard. Any opener compatible with Homelink works with Tesla. You do not need proprietary Tesla hardware or subscriptions for basic garage integration.
Conclusion: Enjoy Seamless Entry Every Day
Learning how to connect my Tesla to my garage door opener transforms daily convenience from a luxury into an expectation. Within minutes, you eliminate fumbling for remotes, gain automated entry through intelligent geofencing, and integrate your vehicle seamlessly into your smart home ecosystem. Remember to prioritize safety during setup, maintain your opener hardware, and leverage advanced features like auto-open responsibly.
The freedom of true keyless living starts with this simple connection—and once experienced, you’ll never want to go back.
Found this guide helpful? Share it with fellow Tesla owners on X (Twitter), Facebook Groups, or Reddit’s r/TeslaMotors! Tag us and let us know which feature transformed your daily routine. Safe driving and smooth entries ahead! 🚗⚡🏠
Leave a Reply