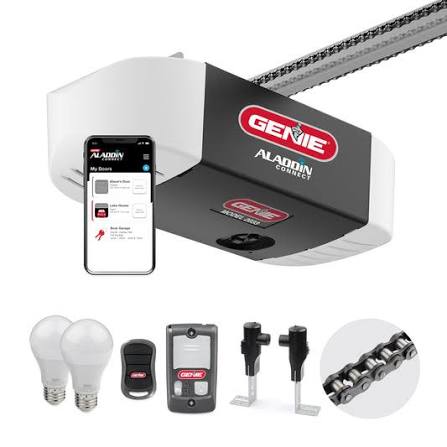
Have you ever pulled into your driveway, only to realize you left the garage door open? Or perhaps you’ve wondered if your family remembered to close it before leaving for vacation? These common anxieties are exactly why so many homeowners are asking how to connect my garage door opener to wifi. By integrating your garage door with your home network, you gain peace of mind, remote control capabilities, and enhanced security features that traditional openers simply cannot offer.
In this comprehensive guide, we will walk you through the process of transforming your standard garage door into a smart device. Whether you have a brand-new smart-ready opener or an older model that needs a retrofit, we have the solutions for you.
Why Should You Connect Your Garage Door to WiFi?
Before diving into the technical steps, it is essential to understand the value proposition. Connecting your garage door opener to wifi is not just a tech gimmick; it is a practical upgrade for modern living.
Enhanced Security and Monitoring
The primary benefit is real-time monitoring. With a smart connection, you can check the status of your garage door from anywhere in the world using your smartphone. If you forget to close it, you can do so with a single tap. According to recent home security studies, garages are one of the most common entry points for burglars. A smart opener adds a layer of digital security, sending alerts whenever the door is opened or closed.
Convenience and Integration
Smart garage openers integrate seamlessly with other smart home ecosystems like Amazon Alexa, Google Assistant, and Apple HomeKit. Imagine saying, “Alexa, close the garage door,” while you are already in bed. This level of convenience streamlines your daily routine. Furthermore, you can grant temporary access to delivery drivers or house sitters without handing over physical keys or remotes.
Maintenance Alerts
Many smart systems monitor the health of your garage door mechanism. They can alert you if the door is struggling to open, if the sensors are misaligned, or if maintenance is due. This proactive approach can save you from costly repairs down the line.
Prerequisites: What You Need Before Starting
To successfully learn how to connect my garage door opener to wifi, you must ensure you have the right hardware and environment. Not all garage door openers are created equal, and preparation is key to a smooth installation.
1. Check Your Opener’s Compatibility
First, identify the make and model of your current garage door opener. Look for a label on the motor unit, usually located on the ceiling of your garage.
- Newer Models (Post-2015): Many modern openers from brands like Chamberlain, LiftMaster, and Genie come with built-in WiFi modules or have specific compatible add-ons.
- Older Models: If your opener is older than 10–15 years, it may not have native smart capabilities. In this case, you will need a universal smart garage door controller (retrofit kit).
2. Stable WiFi Signal
Your garage is often the furthest point from your router. A strong WiFi signal is crucial for reliable operation.
- Test Signal Strength: Use your smartphone to check the WiFi bars in your garage. If the signal is weak, consider installing a WiFi extender or a mesh network node near the garage.
- Frequency Band: Most smart home devices operate on the 2.4 GHz band because it travels through walls better than 5 GHz. Ensure your router broadcasts a 2.4 GHz network.
3. Smartphone and App
Download the manufacturer’s app before starting the installation. Common apps include MyQ (for Chamberlain/LiftMaster), Genie Intellicode, or third-party apps like RatGDO for DIY enthusiasts. Create an account and ensure your phone’s Bluetooth and Location services are enabled, as these are often required for the initial pairing process.
Step-by-Step Guide: How To Connect My Garage Door Opener To Wifi
The method varies depending on whether you have a built-in smart module or are using a retrofit device. Below, we cover both scenarios.
Scenario A: Connecting a Native Smart Garage Door Opener
If your opener has built-in WiFi capability (often indicated by a WiFi symbol or a “Learn” button with a yellow or purple color), follow these steps:
- Locate the WiFi Button: On the motor unit, find the WiFi button. It is usually located near the antenna wire or the light lens.
- Activate Pairing Mode: Press and hold the WiFi button for about 10 seconds until the LED indicator starts blinking. This indicates the opener is searching for a network.
- Open the App: Launch the manufacturer’s app on your smartphone. Select “Add Device” or “Connect New Opener.”
- Follow On-Screen Instructions: The app will guide you through connecting to your home WiFi network. You will need to enter your WiFi password.
- Confirm Connection: Once connected, the LED on the motor unit will stop blinking and stay solid. Test the connection by opening and closing the door via the app.
Scenario B: Using a Universal Smart Retrofit Kit
If your opener is not natively smart, you can use a universal smart controller. These devices physically connect to your existing opener’s terminals.
- Power Down: For safety, unplug your garage door opener or turn off the circuit breaker.
- Mount the Controller: Attach the smart controller box to the wall or ceiling near the opener motor. Ensure it is within reach of the opener’s terminal block.
- Wire the Connections:
- Identify the “Common” and “Open/Close” terminals on your garage door opener. Refer to your opener’s manual for the specific diagram.
- Connect the wires from the smart controller to these terminals. Usually, this involves two low-voltage wires.
- Note: Do not touch the high-voltage lines. Only connect to the low-voltage control terminals.
- Install the Sensor: Most kits include a contact sensor that attaches to the garage door track. This sensor tells the app whether the door is open or closed. Mount it so that the magnet aligns when the door is closed.
- Power Up and Connect: Plug the opener back in. Power on the smart controller (usually via USB or batteries). Follow the app’s instructions to connect the controller to your WiFi network.
Troubleshooting Common Connection Issues
Even with careful planning, you might encounter hurdles. Here are solutions to common problems when figuring out how to connect my garage door opener to wifi.
| Issue | Possible Cause | Solution |
|---|---|---|
| Device Not Found | Weak WiFi Signal | Move router closer or install a WiFi extender. |
| Connection Fails | Wrong Password | Double-check your WiFi password. Ensure you are using the 2.4 GHz network. |
| App Shows Offline | Router Glitch | Restart your router and the garage door opener. |
| Door Doesn’t Respond | Wiring Error | Check the terminal connections. Ensure wires are secure and not reversed. |
For more detailed technical specifications on WiFi protocols used in smart home devices, you can refer to Wikipedia’s page on Smart Home Technology.
Security Best Practices for Smart Garage Doors
Connecting your garage to the internet introduces potential cybersecurity risks. However, these can be mitigated with proper practices.
- Use Strong Passwords: Ensure your WiFi network and your smart home app account use unique, complex passwords.
- Enable Two-Factor Authentication (2FA): Most reputable smart garage apps offer 2FA. Enable this to add an extra layer of security to your account.
- Keep Firmware Updated: Manufacturers regularly release updates to patch security vulnerabilities. Enable automatic updates in your app settings.
- Secure Your WiFi Network: Use WPA3 or WPA2 encryption on your router. Avoid using public or guest networks for your smart home devices.
FAQ Section
1. Can I connect any garage door opener to WiFi?
Not every opener has built-in WiFi, but almost any automatic garage door opener can be made smart using a universal retrofit kit. These kits bridge the gap between older mechanical systems and modern smart home networks.
2. Is it safe to connect my garage door to WiFi?
Yes, it is safe provided you follow security best practices. Use strong passwords, enable two-factor authentication, and keep your device firmware updated. Reputable brands encrypt data transmission to prevent unauthorized access.
3. What happens if my WiFi goes down?
If your WiFi goes down, you will lose remote access via the app. However, your physical remote controls and wall-mounted buttons will still work normally. The garage door opener itself does not rely on WiFi for basic operation.
4. Do I need a hub to connect my garage door to WiFi?
It depends on the device. Some smart garage controllers connect directly to your WiFi router. Others may require a dedicated hub (like Samsung SmartThings or Apple HomePod) to communicate with your network. Check the product specifications before purchasing.
5. How far does the WiFi signal need to reach?
The smart controller or opener needs to be within range of your WiFi router. Ideally, the signal strength should be at least two bars. If your garage is far from the router, consider using a WiFi extender or a mesh network system to ensure consistent connectivity.
Conclusion
Learning how to connect my garage door opener to wifi is a straightforward process that yields significant benefits in security, convenience, and peace of mind. Whether you are upgrading a new model or retrofitting an old one, the steps outlined above will help you achieve a seamless integration.
By taking control of your garage door remotely, you eliminate the anxiety of wondering if you left it open. You also unlock the potential for deeper smart home automation, making your life easier and more efficient. Remember to prioritize security by using strong passwords and keeping your software updated.
If you found this guide helpful, please share it with your friends and family on social media. Helping others secure their homes is a great way to build a safer community. Have you already connected your garage door? Share your experience in the comments below!
Leave a Reply