Introduction
There is nothing quite as unsettling as realizing your home’s first line of defense might be compromised, whether you have just moved into a new house, lost a keypad, or simply want to refresh your security credentials. If you are wondering how to change the garage door code on a LiftMaster opener, you are taking a proactive step toward protecting your family and property. This guide will walk you through the process with empathy and precision, ensuring you can secure your home without the frustration of confusing technical manuals or expensive service calls.
Why Resetting Your LiftMaster Code Matters for Home Security
Before diving into the buttons and LEDs, it is vital to understand why this maintenance task is non-negotiable for modern homeowners. According to crime statistics, garages are frequently targeted entry points because homeowners often neglect their security compared to front doors. Changing your code eliminates the risk of previous owners, contractors, or neighbors retaining access to your home.
Furthermore, LiftMaster openers utilize rolling code technology, which changes the transmission signal every time the door is used. However, the physical PIN on your exterior keypad remains static until you manually update it. Regularly updating this PIN aligns your physical security with the digital encryption standards of your opener. For a broader understanding of how these security protocols evolved, you can refer to the history of garage door openers on Wikipedia, which details the transition from fixed codes to modern rolling code systems that prevent code grabbing.
Identifying Your LiftMaster Keypad Model
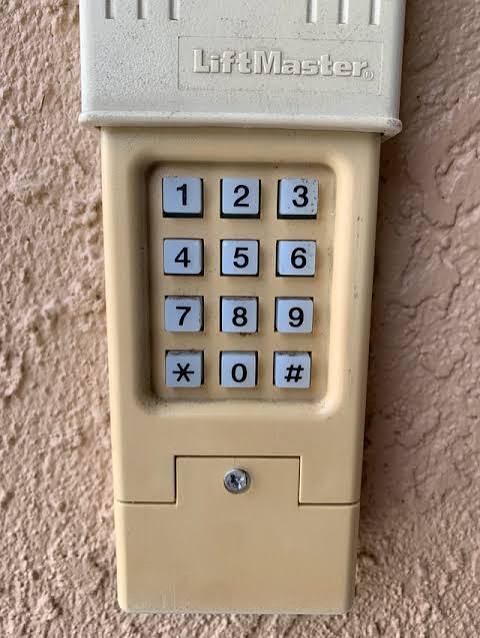
Not all LiftMaster keypads are created equal. Before you climb a ladder or start pressing buttons, identify which unit you have. This prevents the common frustration of following instructions meant for a different generation of hardware.
| Model Series | Key Identifier | Typical Learn Button Color | Reset Method |
|---|---|---|---|
| 877MAX / 977LM | Slim profile, flip-up cover | Purple, Orange, Red, or Yellow | Standard Program Sequence |
| 387LM / 597LM | Older, bulkier design | Green or Orange | Legacy Program Sequence |
| Wireless Keyless Entry | No wires, battery-operated | Varies by year | Battery Check Required First |
| Smart Garage Hub | Wi-Fi enabled, app control | N/A | App-Based Reset |
Note: Always check the battery compartment for a model number sticker if the exterior casing is faded.
Step-by-Step: How To Change The Garage Door Code On A LiftMaster
This is the core solution for users searching for how to change the garage door code on a LiftMaster. Most modern LiftMaster keyless entry systems (including the popular 877MAX) follow a universal programming logic. Please read all steps before beginning to ensure safety and accuracy.
Step 1: Locate the Learn Button on the Motor Unit
Grab a sturdy stepladder. Locate the motor head of your garage door opener mounted on the ceiling. Find the “Learn” button. It is typically located near the antenna wire or under the light lens. The color of this button (Yellow, Purple, Orange, Red, or Green) dictates the specific timing, but the general sequence below applies to 95% of units manufactured after 2011.
Step 2: Initiate Programming Mode
Press and release the Learn button on the motor unit. You will see an LED indicator light turn on or begin blinking. You now have exactly 30 seconds to complete the next steps at the keypad. If the light goes out, simply press the Learn button again.
Step 3: Enter Your New PIN at the Keypad
Go to your exterior keypad. Enter your desired 4-digit PIN. Choose a code that is memorable for you but difficult for others to guess; avoid sequential numbers like “1234” or birth years. After entering the four digits, press and hold the ENTER button.
Step 4: Confirm the Sync
Continue holding the ENTER button while watching the motor unit lights. The opener lights should flash, or you may hear two distinct clicks. This confirms the new code has been accepted. Release the ENTER button immediately after this confirmation.
Step 5: Test the New Code Immediately
Never assume the process worked without verification. Wait five seconds, then enter your new 4-digit PIN and press ENTER. The door should activate smoothly. If it does not, repeat Steps 2–4, ensuring you are within the 30-second window.
⚠️ Safety Warning: Never stand directly under the garage door while testing. Keep children and pets clear of the door path during programming to prevent accidental injury from moving mechanical parts.
Troubleshooting: When the Keypad Won’t Accept the New Code
Even professionals encounter hiccups. If you have followed the steps above and still cannot figure out how to change the garage door code on a LiftMaster, consult this diagnostic checklist before calling a technician.
- Battery Failure: This is the #1 cause of programming failure. Even if the keypad lights up, the voltage may be too low to transmit the signal. Replace with a fresh 9V lithium battery.
- LED Blink Patterns: Count the blinks when you press ENTER. Three rapid blinks usually indicate a wrong PIN format; continuous blinking suggests a communication error with the motor.
- Memory Full: Some older units have a limit on stored remotes/keypads. You may need to perform a factory reset by holding the Learn button for 10 seconds until the LED turns off, clearing all devices, and then reprogramming everything.
- Interference: LED bulbs in the opener can sometimes interfere with radio frequencies. Try temporarily removing the bulb to test if programming succeeds.
- Weather Damage: Inspect the keypad for water intrusion or corroded contacts. Extreme temperatures can degrade internal circuitry over time.
Pros and Cons of DIY Code Changes vs. Professional Service
Deciding whether to handle this yourself involves weighing cost against convenience. Here is an honest breakdown to help you decide.
DIY Approach
- Pros: Zero cost, immediate security update, builds homeowner confidence, no scheduling wait times.
- Cons: Risk of locking yourself out if done incorrectly, potential safety hazards with ladders, time-consuming troubleshooting.
Professional Technician
- Pros: Guaranteed correct configuration, full system safety inspection, warranty on labor, identification of underlying mechanical issues.
- Cons: Service call fees ($75–$150+), scheduling delays, dependency on third-party availability.
Expert Insight: “For standard code changes, DIY is perfectly safe and recommended,” says certified garage door technician Mark Reynolds. “However, if your opener is over 15 years old or shows signs of mechanical wear, use the code change as an opportunity for a professional safety audit.”
FAQ: Common Questions About LiftMaster Keypad Codes
1. How often should I change my garage door code?
Security experts recommend changing your garage door code at least once per year or immediately after any life event that compromises security (lost keypad, tenant move-out, contractor completion). Treat it like changing your Wi-Fi password—regular rotation minimizes long-term vulnerability.
2. Can I program multiple PINs on one LiftMaster keypad?
Most standard LiftMaster keypads support only one active PIN at a time. Entering a new code overwrites the previous one. If you need separate codes for family members or service workers, consider upgrading to a smart garage controller that supports unique user credentials via smartphone app.
3. What happens if I forget my new code after changing it?
You will need to repeat the full programming sequence outlined above. There is no “forgot password” recovery option for standalone keypads due to security design. Keep your PIN recorded in a secure password manager, never written on the keypad itself or nearby surfaces.
4. Does changing the keypad code affect my remote controls?
No. The keypad and remote controls operate independently within the opener’s memory. Changing the keypad PIN does not erase or alter your car visor remotes or wireless wall buttons. Only a full factory reset of the Learn button clears all devices simultaneously.
5. Why does my keypad work intermittently after changing the code?
Intermittent operation usually indicates weak batteries, poor mounting surface conductivity, or RF interference. Ensure the keypad is mounted on wood or masonry, not metal siding, which can block signals. Replace batteries with high-quality alkaline or lithium cells, avoiding rechargeable options which have lower voltage output.
6. Is there a master override code for LiftMaster keypads?
No. LiftMaster does not include universal master codes for consumer keypads. Each unit must be programmed individually to its paired motor. Any website claiming to provide “universal LiftMaster codes” is misleading and potentially unsafe. Always use the legitimate Learn button method described in this guide.
Conclusion
Learning how to change the garage door code on a LiftMaster is one of the simplest yet most impactful home security tasks you can perform. By following the step-by-step process above, you have taken ownership of your home’s safety without unnecessary expense or complexity. Remember to test your new code thoroughly, replace batteries annually, and treat your garage entry with the same security seriousness as your front door.
Did this guide help you secure your home? Share it with friends, family, or neighbors who might be struggling with their own garage door security. Post this article on Facebook, Pinterest, or your neighborhood Nextdoor group to help others protect what matters most. Together, we can build safer communities—one garage door code at a time! 🔒🏡
Leave a Reply