
Have you ever worried that someone might have copied your remote or guessed your entry code? It is a common concern for homeowners who want to keep their families and belongings safe. Knowing how to change the code on the garage door opener is one of the simplest yet most effective ways to boost your home security instantly.
In this guide, we will walk you through the process clearly and safely. Whether you have an older model or a modern smart opener, these steps will help you regain control over who enters your garage.
Why You Should Change Your Garage Door Code Regularly
Many people set their garage door code once and never think about it again. However, security experts recommend updating your access codes periodically. This is especially true if you have recently moved into a new home, hired service workers, or lost a remote control.
According to recent home security studies, garages are among the most common entry points for burglars because they are often less secured than main doors. By changing your code, you invalidate any old remotes or keypads that might be in the wrong hands.
Think of it like changing your Wi-Fi password. It takes only a few minutes, but it provides peace of mind for months or even years.
Identifying Your Garage Door Opener Model
Before you start pressing buttons, you need to know what type of opener you have. The method for changing the code varies significantly between brands and ages of devices.
Most openers fall into two categories:
- Fixed Code Systems: Older models that use a set sequence of switches or dials.
- Rolling Code Systems: Modern units that generate a new code every time you use the remote, making them much harder to hack.
Look for a label on the motor unit hanging from your ceiling. It usually lists the brand (such as LiftMaster, Chamberlain, Genie, or Craftsman) and the model number. You can also check your user manual if you still have it. If not, don’t worry; many manufacturers provide digital copies online.
For a deeper understanding of how these security protocols work, you can read more about radio frequency identification and security standards on Wikipedia.
Step-by-Step Guide: How To Change The Code On The Garage Door Opener
While every brand is slightly different, the general process follows a similar pattern. Below is a universal guide that works for most major brands. Always refer to your specific manual for unique instructions.
Step 1: Locate the “Learn” Button
Find the motor unit inside your garage. Look for a small button labeled “Learn,” “Program,” or “Smart.” It is often located near the antenna wire and may be yellow, purple, red, or green depending on the brand.
- Yellow/Light Purple: Usually indicates Security+ 2.0 technology.
- Red/Orange: Often found on older Security+ models.
- Green: Common in very old units or specific brands like Genie.
Step 2: Clear the Old Memory
To ensure no old remotes work anymore, you should clear the opener’s memory.
- Press and hold the “Learn” button for about 6–10 seconds.
- Wait until the indicator light turns off or blinks rapidly.
- Release the button. All previously programmed remotes and keypads are now deleted.
Step 3: Program Your New Remote
Now, let’s add your remote back with a fresh connection.
- Press the “Learn” button briefly (do not hold it). The LED light should turn on or blink.
- Within 30 seconds, press and hold the button on your remote that you want to use.
- Keep holding until the lights on the motor unit flash or click. This confirms the code has been accepted.
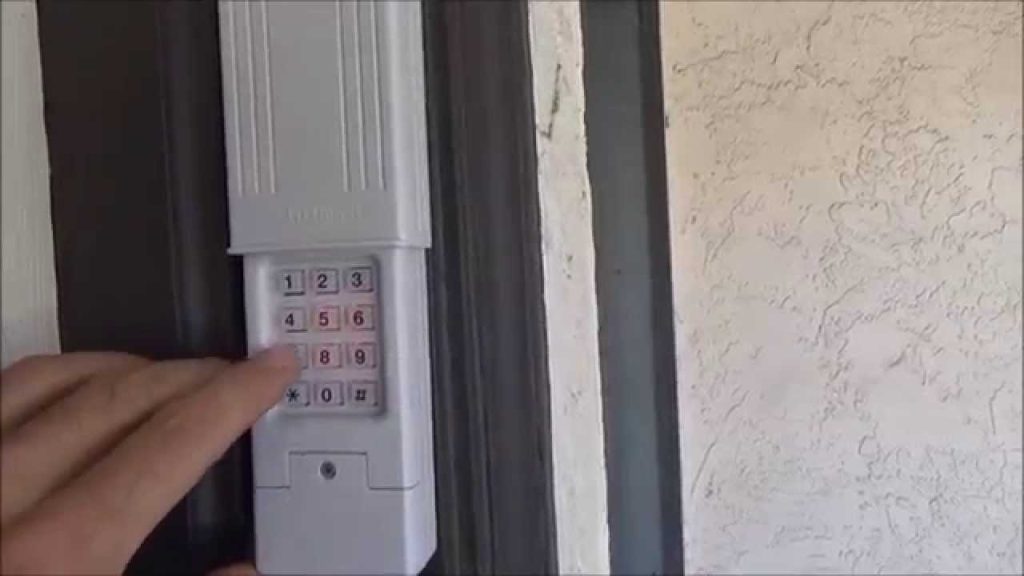
Step 4: Set a New Keypad Code (If Applicable)
If you have an external keypad, you need to sync it separately.
- Enter your desired new PIN (usually 4 digits) on the keypad.
- Press and hold the “Enter” or “Send” button.
- While holding it, press the “Learn” button on the motor unit.
- Release both buttons when the light flashes. Test the new code immediately.
Step 5: Test All Devices
Walk out of the garage and test every remote and keypad. Ensure the door opens and closes smoothly. If a device fails, repeat Step 3 for that specific remote.
Troubleshooting Common Issues
Even with careful steps, things can go wrong. Here are some common problems and solutions.
| Issue | Possible Cause | Solution |
|---|---|---|
| Remote not working | Dead batteries | Replace batteries with fresh alkaline ones. |
| Light blinks but doesn’t save | Interference | Unplug other electronics nearby; try again. |
| Keypad code rejected | Wrong sequence | Ensure you press “Learn” within 30 seconds. |
| Door reverses unexpectedly | Sensor alignment | Check safety eyes at the bottom of the tracks. |
Pro Tip: If your opener uses dip switches (small toggle switches inside the remote and motor), you must match the switch positions exactly. Change them to a random pattern that is not all up or all down for better security.
Security Best Practices for Your Garage
Changing the code is just the first step. To truly secure your garage, consider these additional tips:
- Never share your code digitally: Avoid sending your garage code via text or email.
- Use a unique PIN: Do not use your birth year, address number, or “1234.” Choose a random combination.
- Disable wireless features if unused: If you don’t use smart home integration, turn it off to reduce hacking risks.
- Inspect physical locks: Ensure the manual lock on the door track is functional for times when the power is out.
FAQ Section
1. How often should I change my garage door code?
It is recommended to change your code at least once a year. However, you should change it immediately if you lose a remote, move into a new house, or suspect unauthorized access.
2. Can I change the code without the remote?
Yes, if you have an external keypad, you can program a new PIN directly using the “Learn” button on the motor unit. However, you will still need to reprogram any existing remotes if you cleared the memory.
3. What if I lost my user manual?
Most manufacturers offer PDF manuals on their official websites. Search for your brand and model number online. Alternatively, look for a sticker on the motor unit which often has basic programming instructions printed on it.
4. Is it safe to reset the code myself?
Absolutely. Resetting the code is a standard maintenance task designed for homeowners. As long as you follow the steps carefully and keep your ladder stable, there is no risk involved.
5. Why does my garage door opener have a blinking light?
A blinking light usually indicates that the unit is in programming mode or that there is an error. If it blinks continuously without stopping, check the safety sensors for obstructions or misalignment.
6. Can hackers intercept my garage door signal?
Older fixed-code systems are vulnerable to interception. Modern rolling-code systems change the code with every use, making them extremely difficult to hack. Upgrading to a newer opener is the best defense if you have an old model.
Conclusion
Learning how to change the code on the garage door opener is a vital skill for every homeowner. It takes less than 15 minutes but significantly enhances your home’s security profile. By following the steps above, you ensure that only trusted individuals have access to your property.
Don’t wait for a security breach to take action. Take control of your home safety today. If you found this guide helpful, please share it with your friends and family on social media. Spreading awareness about simple security measures helps keep our communities safer for everyone.
Leave a Reply