Losing access to your garage or worrying about unauthorized entry can be stressful. Whether you have moved into a new home, lost a remote, or simply want to upgrade your home security, knowing how to change the code on a Chamberlain garage door is an essential skill for every homeowner. This guide will walk you through the process safely and efficiently, ensuring your home remains secure without the need for expensive professional help.
Why You Should Update Your Garage Door Code Regularly
Many homeowners overlook their garage door security until it is too late. However, your garage door is often the largest entry point to your home. According to security experts, outdated or default codes are one of the most common vulnerabilities in residential security systems.
Changing your code is not just about fixing a broken remote; it is a proactive measure to protect your family and belongings. If you have recently purchased a used home, the previous owners may still have access. Similarly, if you have lent your remote to a neighbor or contractor who no longer needs access, updating the code ensures that old remotes are deactivated.
By taking control of your Chamberlain garage door opener settings, you enhance your peace of mind. Modern Chamberlain openers use rolling code technology, which changes the access code every time you use the remote. However, the base PIN or the pairing mechanism still requires manual management when adding or removing users.
Identifying Your Chamberlain Opener Model
Before diving into the programming steps, it is crucial to identify which type of Chamberlain opener you have. Chamberlain has manufactured various models over the years, and while the core principles are similar, the button locations and colors may differ.
Most Chamberlain openers fall into two main categories based on their “Learn” button:
- Yellow Learn Button: Typically found on older models (pre-2011). These units often use DIP switches or simpler programming protocols.
- Purple, Red, Orange, or Green Learn Button: Found on newer Security+ 2.0 models. These use advanced rolling code technology and require a specific sequence to program.
To find your model number, look for a label on the motor unit hanging from your garage ceiling. It is usually located on the back or side of the unit. Writing down this model number can be helpful if you need to consult the specific manual later. For more detailed technical specifications on garage door opener safety standards, you can refer to Wikipedia’s entry on Garage Door Openers, which provides historical context and technical evolution of these devices.
Step-by-Step Guide: How to Change the Code on a Chamberlain Garage Door
Changing the code involves two main phases: clearing the old memory (optional but recommended for security) and programming the new remote or keypad. Below is the universal method that works for most modern Chamberlain openers with a colored “Learn” button.
Step 1: Locate the Learn Button
Climb a sturdy ladder to reach the motor unit. Look for the “Learn” button. It is typically located near the hanging antenna wire. The button is usually square and colored (purple, yellow, red, or orange). There may also be a small LED light next to it.
Step 2: Clear Old Codes (Recommended)
If you want to ensure that no old remotes work anymore, you should clear the opener’s memory.
- Press and hold the Learn button for about 6–10 seconds.
- Release the button when the indicator LED turns off.
- Note: This action deletes all previously paired remotes and keypads. You will need to reprogram every device you wish to use.
Step 3: Program Your New Remote Control
Once the memory is cleared (or if you are simply adding a new remote without clearing the old ones), follow these steps:
- Press and release the Learn button on the motor unit. The LED light will turn on or blink, indicating it is in programming mode. You have approximately 30 seconds to complete the next step.
- Within 30 seconds, go to your handheld remote control.
- Press and hold the button you wish to use to operate the door. Hold it for 3–5 seconds.
- Watch the motor unit’s LED light. It will blink or turn off to confirm that the code has been accepted.
- Test the remote by pressing the button again to see if the door operates.
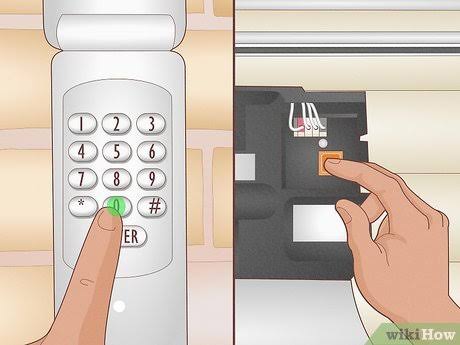
Step 4: Programming a Wireless Keypad
If you use an external keypad, the process is slightly different but equally straightforward.
- Enter your desired new PIN (usually 4 digits) on the keypad.
- Press and hold the Enter button on the keypad.
- While holding Enter, press and release the Learn button on the motor unit.
- Release the Enter button on the keypad.
- The motor unit’s light should blink, confirming the new PIN is set.
- Test the keypad by entering your new PIN and pressing Enter.
Troubleshooting Common Programming Issues
Even with clear instructions, things can go wrong. Here are some common issues and how to resolve them.
| Issue | Possible Cause | Solution |
|---|---|---|
| LED does not light up | Power issue or faulty button | Check if the opener is plugged in. Ensure the circuit breaker hasn’t tripped. |
| Remote not pairing | Out of range or dead battery | Replace the remote’s battery. Stand closer to the motor unit during programming. |
| Keypad not accepting code | Incorrect sequence | Ensure you press the Learn button while holding the Enter key on the keypad. |
| Door moves but reverses | Safety sensor misalignment | Check the photo-eye sensors near the floor. Ensure nothing is blocking the beam. |
Important Safety Note
Always keep your hands and body clear of the door tracks and moving parts during testing. Garage doors are heavy and under high tension. If the door feels unbalanced or makes unusual noises, stop using it and contact a professional technician.
Understanding Security+ 2.0 Technology
Modern Chamberlain openers utilize Security+ 2.0 technology. This system uses a unique code that changes with every use, making it nearly impossible for thieves to “capture” your code using electronic scanners.
When you learn how to change the code on a Chamberlain garage door, you are essentially syncing your remote’s internal algorithm with the opener’s receiver. This is why holding the button for a few seconds is crucial—it allows the two devices to exchange the necessary encryption keys.
Unlike older fixed-code systems, where a thief could guess your code by trying combinations, Security+ 2.0 offers billions of possible combinations. This significantly enhances your home’s security profile. However, this technology relies on proper programming. If a remote is not synced correctly, it will not communicate effectively with the opener, leading to intermittent operation.
Frequently Asked Questions (FAQ)
1. Can I change the code without climbing a ladder?
No, you must physically access the motor unit to press the “Learn” button. This is a security feature designed to prevent unauthorized individuals from changing your code remotely. If you cannot reach the unit safely, consider hiring a professional installer.
2. How do I know if my Chamberlain opener uses rolling codes?
Check the color of the Learn button. If it is purple, red, orange, or green, it likely uses rolling code technology (Security+ or Security+ 2.0). Yellow buttons often indicate older fixed-code or DIP switch models. You can also check the manufacturing date; units made after 1997 generally use rolling codes.
3. What should I do if I lose my remote?
If you lose your remote, it is highly recommended to clear the opener’s memory (as described in Step 2) and reprogram all remaining remotes. This ensures that the lost remote can no longer open your garage. You can then purchase a universal Chamberlain-compatible remote and program it as a replacement.
4. Can I use a universal remote with my Chamberlain opener?
Yes, most universal remotes are compatible with Chamberlain openers, especially those made in the last 20 years. Ensure the universal remote supports the frequency and coding type (e.g., Security+ 2.0) of your specific model. Follow the universal remote’s instruction manual for the specific button-holding sequence.
5. Why does my keypad work intermittently?
Intermittent issues are often caused by weak batteries in the keypad or interference from nearby electronic devices. Try replacing the batteries first. If the problem persists, reprogram the keypad to ensure the code was saved correctly. Also, check if the antenna wire on the motor unit is hanging freely and not wrapped around metal objects.
Conclusion
Learning how to change the code on a Chamberlain garage door is a simple yet powerful way to take charge of your home security. By following the steps outlined above, you can easily program new remotes, update keypads, and ensure that only authorized individuals have access to your garage.
Remember to identify your model type, locate the Learn button, and follow the programming sequence carefully. Regularly updating your codes and clearing old memories from the system will keep your home safe from potential intruders.
Did you find this guide helpful? Share it with your friends and family on social media to help them secure their homes too! If you have any further questions or experiences to share, leave a comment below. Stay safe and secure!
Leave a Reply