Introduction
There is nothing quite as frustrating as pressing your garage door remote and hearing silence instead of the familiar hum of your opener. If you are currently standing in your driveway wondering how to change the battery on LiftMaster garage door opener units, take a deep breath; this is one of the most common and easily fixable homeowner issues. In this comprehensive guide, we will walk you through every step of the replacement process with empathy and precision, ensuring you get back into your home safely and quickly without needing an expensive service call.
Understanding Your LiftMaster Power Source
Before grabbing a screwdriver, it is vital to understand that “changing the battery” can refer to two very different components in the LiftMaster ecosystem. Confusing these two is the primary reason DIY attempts fail.
- Remote Control/Keypad Batteries: These power the handheld transmitter or the exterior keypad. They are typically coin-cell or small alkaline batteries.
- Backup Battery System: This is a sealed lead-acid or lithium-ion unit inside the main motor head that allows the door to operate during a power outage.
According to technical documentation referenced on Wikipedia, modern residential openers utilize varying voltage systems depending on whether they are chain-drive, belt-drive, or wall-mount jackshaft models. Identifying which battery system requires attention is the first step toward a successful repair.
How To Change The Battery On LiftMaster Garage Door Opener Remotes
For 90% of users, the issue lies with the remote control. Here is the exact procedure for the most common LiftMaster remotes (models 891MAX, 893MAX, and similar).
Tools Required
- Small flathead screwdriver or coin
- Replacement CR2032 3V Lithium Coin Battery (verify model number on old battery)
- Clean microfiber cloth
Step-by-Step Replacement Guide
- Locate the Battery Compartment: Flip the remote over. Most newer LiftMaster remotes have a sliding cover or a small notch designed for a coin. Older models may require removing a tiny Phillips-head screw.
- Open the Housing: Insert your coin or flathead into the notch and twist gently. Do not force it. If there is a screw, turn counter-clockwise until loose. Slide the back panel down or lift it off.
- Remove the Old Battery: Note the orientation before removal. The positive (+) side usually faces up. Use a non-metallic tool if possible to avoid shorting the contacts.
- Clean the Contacts: This is the expert tip most guides skip. Corrosion causes false failures. Wipe the metal contacts with your microfiber cloth. If you see white/green crust, use a cotton swab dipped in white vinegar, then dry thoroughly.
- Insert New Battery: Place the new CR2032 with the + side facing up. Press down firmly until it clicks into place.
- Reassemble and Test: Snap the cover back on. Stand within 5 feet of the door and press the button. The LED should light up brightly, and the door should respond instantly.
⚠️ Safety Warning: Never mix old and new batteries, and never use rechargeable batteries unless explicitly specified by LiftMaster. Voltage differences can damage the remote’s logic board.
Replacing the Backup Battery in the Motor Unit
If your remote works fine but the door won’t open during a blackout, or if the motor unit emits a continuous beeping sound, you need to replace the internal backup battery.
Compatibility Check
| Model Series | Battery Type | Part Number | Avg. Lifespan |
|---|---|---|---|
| 8500W / 8550WLB | 485LM Battery Pack | 485LM | 1–2 Years |
| 8160W / 8360W | 475LM Battery | 475LM | 1–2 Years |
| Older AC Chain Drive | 12V Sealed Lead Acid | Generic 12V 5Ah | 2–3 Years |
Detailed Installation Steps
- Disconnect Power: Unplug the opener from the ceiling outlet. This is non-negotiable. Working on live electrical components risks shock and logic board damage.
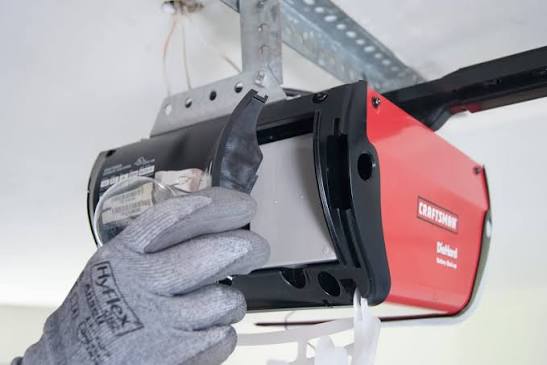
- Access the Battery Compartment: Remove the lens cover (usually held by tabs or screws). Locate the black battery pack connected via red/black wires.
- Disconnect Wiring Harness: Squeeze the plastic clip on the wire connector and pull straight out. Never pull by the wires themselves, as this can break the internal solder joints.
- Remove Old Battery: Unclip the battery from its mounting bracket. Dispose of it at a certified recycling center—lead-acid batteries are hazardous waste.
- Install New Battery: Secure the new pack in the bracket. Reconnect the wiring harness until you hear an audible click. Ensure no wires are pinched against moving parts.
- Restore Power and Reset: Plug the unit back in. You may need to reprogram the travel limits. Consult your specific manual for the “battery reset” sequence, as some models require holding the learn button for 10 seconds after replacement.
Troubleshooting: Why Is My Door Still Not Working?
You followed the steps perfectly, yet nothing happened. Before calling a pro, check these three overlooked factors:
- Logic Board Lockout: After 20+ battery cycles, some LiftMaster boards enter a protective lockout mode. Unplug the unit for 60 seconds to perform a hard reset.
- Photo-Eye Misalignment: A dead battery isn’t always the culprit. Check the safety sensors at floor level. If the amber/green lights are blinking or off, realign them. The door will not close (and sometimes won’t open) if the beam is broken.
- Corroded Remote Internals: Even with a fresh battery, acid leakage from previous batteries can permanently damage the circuit traces. Inspect the remote board under bright light for blue/green corrosion.
Expert Maintenance Tips for Longevity
Industry data suggests that proactive maintenance extends opener lifespan by up to 40%. Follow these best practices:
- Replace Proactively: Don’t wait for total failure. Swap remote batteries annually and backup batteries every 18 months.
- Use Quality Brands: Stick to Energizer, Duracell, or OEM LiftMaster batteries. Dollar-store generics often have inconsistent voltage that confuses sensitive electronics.
- Temperature Matters: Extreme cold reduces battery efficiency. If your garage drops below freezing, consider insulating the space or using lithium-based batteries rated for low temperatures.
- Test Monthly: Use the manual release cord quarterly to ensure mechanical components aren’t binding, which forces the battery to work harder.
Frequently Asked Questions (FAQ)
Q1: How do I know when my LiftMaster backup battery needs replacing?
Most units provide clear warnings. Listen for intermittent beeping from the motor head, watch for a flashing yellow/orange LED near the learn button, or check if the wall console displays a “battery” icon. Some smart models send push notifications via the myQ app. When you notice any of these signs, plan a replacement within two weeks.
Q2: Can I use regular AA batteries instead of a CR2032 in my remote?
No. LiftMaster remotes are engineered for specific voltage and physical dimensions. Using incorrect battery types can cause overheating, permanent circuit damage, or void your warranty. Always match the exact specification printed inside the battery compartment or listed in your owner’s manual.
Q3: Do I need to reprogram my remote after changing the battery?
Typically, no. Battery replacement does not erase stored codes. However, if you removed the battery for more than five minutes or cleaned corroded contacts extensively, you might need to re-sync. Press the learn button on the motor unit, then press your remote button once. The LED should flash to confirm pairing.
Q4: Why does my new battery drain so quickly?
Rapid drain usually indicates an underlying problem, not a bad battery. Common culprits include stuck buttons creating constant draw, damaged circuit boards causing parasitic drain, or excessive door resistance forcing the backup system to overwork. Have a technician inspect the unit if batteries last less than six months.
Q5: Is it safe to change the backup battery myself?
Yes, provided you disconnect power first and follow manufacturer instructions. The backup battery system operates at low voltage (12V DC) and poses minimal shock risk. However, if you’re uncomfortable working on ceiling-mounted equipment or identifying wiring harnesses, hiring a certified LiftMaster dealer ensures compliance with safety standards and preserves warranty coverage.
Q6: Where can I recycle old garage door opener batteries?
Never dispose of lead-acid or lithium batteries in household trash. Auto parts stores, home improvement centers, and municipal hazardous waste facilities accept them free of charge. Many LiftMaster dealers also offer recycling programs during service visits. Proper disposal prevents environmental contamination and supports sustainable manufacturing practices.
Conclusion
Learning how to change the battery on LiftMaster garage door opener systems empowers you to maintain home security and convenience independently. Whether swapping a simple coin cell or replacing a backup power unit, the key is patience, proper tools, and adherence to safety protocols. Regular maintenance prevents emergencies and extends your system’s life significantly.
Found this guide helpful? Share it with neighbors, friends, or family members who might be stranded outside their garage right now! Tag us on social media with your successful repair photos—we love celebrating DIY wins. Together, we keep communities moving safely and smoothly. 🏡🔧
Leave a Reply