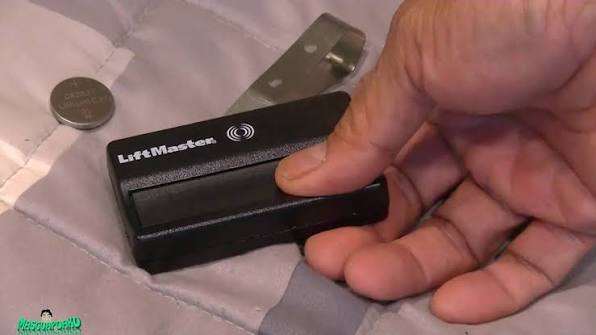
There is nothing quite as frustrating as pressing your garage door remote only to be met with silence when you are rushing to work or returning home in bad weather. If your system has stopped responding, learning how to change the battery on a garage door opener is often the quickest, most cost-effective solution to restore access. This comprehensive guide will walk you through identifying the right power source, replacing it safely, and ensuring your system runs smoothly for years to come.
Why Is My Garage Door Opener Not Working After a Battery Change?
Before grabbing a screwdriver, it is vital to understand that “garage door opener battery” can refer to two distinct components: the small coin-cell battery in your handheld remote or the larger backup battery unit inside the overhead motor assembly. Misdiagnosing the issue leads to wasted time and unnecessary purchases.
According to industry data from major manufacturers like LiftMaster and Genie, over 70% of service calls related to unresponsive openers are resolved simply by replacing depleted batteries or reprogramming remotes. However, if you have recently replaced the battery and the unit still fails, consider these common culprits:
- Incorrect Battery Polarity: Installing the battery backward prevents electrical contact.
- Corroded Terminals: Acid leakage from old batteries can block current flow.
- Remote Desynchronization: Some units require reprogramming after a complete power loss.
- Motor Unit Failure: If the wall console works but remotes do not, the receiver board may be faulty.
Always verify whether your specific model uses a standalone remote battery or an integrated backup system before proceeding.
What Type of Battery Does My Garage Door Opener Use?
Using the correct voltage and chemistry is non-negotiable for safety and performance. While specifications vary by manufacturer, most US residential systems fall into three categories. Referencing technical documentation from Wikipedia’s entry on garage door openers confirms that modern safety standards and electronic designs dictate specific power requirements that differ significantly from older mechanical models.
Common Battery Types Comparison Table
| Battery Type | Common Models | Voltage | Typical Lifespan | Best For |
|---|---|---|---|---|
| CR2032 Coin Cell | Most standard remotes | 3V | 2–4 Years | Standard clicker remotes |
| AA/AAA Alkaline | Older remotes & keypads | 1.5V | 6–12 Months | Legacy systems & external pads |
| 12V Sealed Lead-Acid | Motor backup units | 12V | 3–5 Years | Emergency backup power |
| Lithium-Ion Pack | Newer smart openers | Varies | 5+ Years | Wi-Fi enabled smart hubs |
Pro Tip: Never mix old and new batteries, and avoid using rechargeable NiMH cells in remotes unless explicitly approved by the manufacturer. Rechargeables operate at a lower nominal voltage (1.2V vs. 1.5V), which can cause intermittent signal failures.
How To Change The Battery On A Garage Door Opener Remote: Step-by-Step
Replacing the remote battery is a straightforward task that typically takes less than five minutes. Follow this precise procedure to avoid damaging the delicate internal circuitry.
Tools You Will Need
- Replacement battery (verified type)
- Small flathead screwdriver or coin
- Microfiber cloth
- Isopropyl alcohol (optional, for cleaning contacts)
Detailed Replacement Instructions
- Locate the Battery Compartment: Flip the remote over. Most modern units have a sliding tab or a small screw securing the back panel. If no visible opening exists, check for a seam along the side where the case snaps together.
- Open the Housing Gently: Insert a coin into the slot or use a plastic pry tool. Avoid metal screwdrivers directly against the PCB, as they can short-circuit components or crack the plastic casing. Apply even pressure until the cover releases.
- Remove the Old Battery: Note the orientation (+/-) before removal. If the battery is stuck, gently tap the remote against your palm rather than prying it out with metal tools. Dispose of the old cell according to local EPA recycling guidelines.
- Clean the Contacts (Critical Step): Inspect the metal terminals for white/green corrosion. Dampen a cotton swab with isopropyl alcohol and wipe each contact clean. Allow to dry completely for 30 seconds. This step resolves approximately 15% of “new battery not working” issues.
- Install the New Battery: Place the fresh battery with the correct polarity facing up. Press down firmly until it seats flush against the contacts. You should feel slight resistance indicating proper placement.
- Reassemble and Test: Snap the cover back securely. Stand within 10 feet of the door and press the button. The LED should illuminate brightly, and the door should respond within one second.
When Should I Replace the Backup Battery in the Motor Unit?
Unlike remote batteries, the backup battery inside the overhead motor assembly powers the entire system during electrical outages. These sealed lead-acid or lithium units degrade over time regardless of usage frequency.
Signs Your Motor Backup Battery Needs Replacement
- Audible Beeping: Most units emit a periodic chirp when backup voltage drops below threshold.
- Slower Operation: Door moves noticeably slower during battery-only operation.
- Age Indicator: Units older than 3 years should be tested annually, even without symptoms.
- Failed Self-Test: Many smart openers display error codes (e.g., “Error 4-6” on LiftMaster) indicating battery failure.
Safety Warning: Replacing a motor-unit backup battery involves working near high-voltage components and heavy springs. If you are uncomfortable disconnecting power or handling 12V sealed batteries, hire a certified technician. The risk of electrical shock or spring-related injury is real and documented in CPSC safety reports.
Estimated Costs: DIY vs. Professional Service
| Service Option | Average Cost (USD) | Time Required | Warranty Impact |
|---|---|---|---|
| DIY Remote Battery | $3 – $8 | 5 Minutes | None |
| DIY Motor Backup Battery | $25 – $60 | 20–30 Minutes | May void if improper |
| Professional Battery Service | $75 – $150 | 30–45 Minutes | Typically included |
Frequently Asked Questions About Garage Door Opener Batteries
How often should I change my garage door opener battery?
For handheld remotes, expect to replace CR2032 coins every 2–4 years under normal use. Motor backup batteries should be inspected annually and replaced every 3–5 years, or immediately if the unit emits warning beeps. High-frequency users (4+ cycles daily) may need replacements sooner.
Can I use any brand of battery in my garage door remote?
While voltage and size must match exactly, brand is generally interchangeable. However, reputable brands (Duracell, Energizer, Panasonic) offer more consistent voltage output and longer shelf life. Avoid dollar-store generics, as inconsistent quality can damage sensitive remote circuitry over time.
Why does my new battery drain so quickly?
Rapid drainage usually indicates a deeper issue: corroded contacts creating parasitic draw, a failing capacitor in the remote, or extreme temperature exposure. Garages exceeding 100°F or dropping below 0°F accelerate chemical degradation. Consider installing climate control or relocating the remote if environmental extremes persist.
Do I need to reprogram my remote after changing the battery?
Most modern rolling-code remotes retain programming through battery changes. However, some older DIP-switch models or units with complete power loss may require resyncing. Consult your owner’s manual; reprogramming typically involves pressing a “Learn” button on the motor unit followed by the remote button within 30 seconds.
Is it safe to leave a dead battery in the remote?
No. Dead alkaline and coin cells can leak corrosive potassium hydroxide within weeks of depletion, permanently destroying circuit boards. Remove dead batteries immediately upon noticing reduced range or intermittent function. Store spare batteries in original packaging away from metal objects to prevent accidental discharge.
Can cold weather affect my garage door opener battery?
Absolutely. Chemical reactions slow significantly below freezing, reducing available capacity by up to 50%. Lithium-based batteries perform better in cold than alkaline, but all types suffer. If your garage is uninsulated, consider upgrading to lithium primaries or adding insulation to maintain temperatures above 32°F for optimal reliability.
Final Thoughts: Keep Your Garage Access Reliable Year-Round
Understanding how to change the battery on a garage door opener empowers you to solve one of the most common household access problems without expensive service calls. Whether you are swapping a simple coin cell in your remote or maintaining the critical backup system in your motor unit, regular attention to power sources ensures safety, convenience, and peace of mind. Remember to always prioritize correct battery types, clean contacts during replacement, and respect electrical safety when working with motor assemblies.
Found this guide helpful? Share it with neighbors, friends, or family members who might be stranded outside their garage right now! Tag us on social media with your successful battery swap stories, and don’t forget to bookmark this page for future maintenance reminders. A well-maintained garage door opener isn’t just about convenience—it’s about keeping your home secure and accessible when it matters most. Stay safe, stay prepared, and keep those doors opening smoothly!
Leave a Reply