Introduction
There are few things more frustrating than pressing your garage door remote and hearing nothing but silence, especially when you are rushing to work or returning home late at night. If your opener is unresponsive, learning how to change the battery in the garage door opener is often the quickest fix to restore convenience and security. This guide provides a safe, step-by-step walkthrough designed specifically for US homeowners, ensuring you get back on track without needing an expensive service call.
Why Is My Garage Door Opener Not Working? Identifying Battery Issues
Before grabbing a screwdriver, it is vital to confirm that the battery is actually the culprit. According to industry data from major manufacturers like LiftMaster and Chamberlain, approximately 70% of “dead” garage door opener complaints are resolved simply by replacing batteries in the remote or backup system. However, misdiagnosis can lead to wasted time.
Signs Your Battery Needs Replacement
- Inconsistent Range: You have to stand directly next to the door for it to activate.
- LED Indicator Changes: The light on the remote flickers, dims, or turns red instead of green.
- Delayed Response: There is a noticeable lag between pressing the button and the motor engaging.
- Complete Failure: No lights or sounds occur when the button is pressed.
- Backup System Alert: The main unit beeps intermittently, indicating the internal backup battery is low.
Expert Insight: “Most standard garage door remotes use coin-cell batteries that last 2–3 years under normal usage. If you are replacing them annually, check for stuck buttons or signal interference rather than assuming battery failure.” — Certified Garage Door Technician Association Guidelines
What Type of Battery Does My Garage Door Opener Use?
Garage door systems utilize different power sources depending on the component. Using the wrong voltage can damage the circuit board permanently. Always verify against your owner’s manual or the label inside the battery compartment.
| Component | Common Battery Type | Voltage | Typical Lifespan |
|---|---|---|---|
| Standard Remote | CR2032 Coin Cell | 3V | 2–3 Years |
| Visor Remote | A23 / 12V Alkaline | 12V | 1–2 Years |
| Keypad | 9V Alkaline | 9V | 1 Year |
| Backup System | Sealed Lead-Acid | 12V | 3–5 Years |
| Smart Hub | Lithium-Ion Pack | Proprietary | 5+ Years |
For comprehensive technical specifications regarding electrochemical cells used in these devices, refer to the Wikipedia entry on Electric Batteries, which details the chemistry differences between lithium coin cells and alkaline variants commonly found in US residential hardware.
Safety First: Precautions Before Starting
Working with electrical components requires basic safety protocols. Even low-voltage batteries can cause issues if mishandled.
- Disconnect Power (For Backup Batteries Only): If replacing the main unit’s backup battery, unplug the opener from the ceiling outlet first. Remote replacements do not require this.
- Use Proper Tools: Avoid metal prying tools that can short-circuit terminals. Use plastic spudgers or fingernails.
- Check for Corrosion: White or green powder indicates leakage. Wear gloves and clean contacts with white vinegar before installing new cells.
- Dispose Responsibly: Never throw lithium or lead-acid batteries in household trash. Utilize local recycling drop-offs at stores like Home Depot or Best Buy.
- Avoid Mixing Brands: Different chemistries discharge at varying rates, potentially damaging the device.
Step-by-Step: How To Change The Battery In The Garage Door Opener Remote
This is the most common maintenance task. Follow these precise steps for a standard visor or handheld remote.
Step 1: Locate the Battery Compartment
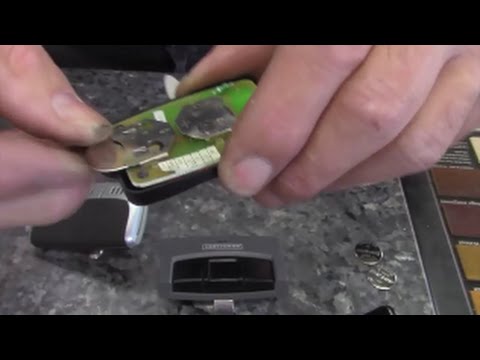
Flip the remote over. Look for a small sliding panel, a screw-secured cover, or a notch designed for prying. Some modern slim remotes require separating the two halves using a flathead screwdriver inserted into the side seam.
Step 2: Remove the Old Battery
Gently slide or pry out the existing cell. Note the orientation (+ facing up or down). Take a photo with your phone if you are unsure; this prevents installation errors later.
Step 3: Clean the Contacts
Inspect the metal terminals. If they appear dull or dirty, wipe them with a dry microfiber cloth. For minor corrosion, dip a cotton swab in rubbing alcohol and scrub gently. Allow to dry completely for 60 seconds.
Step 4: Insert the New Battery
Place the fresh battery matching the original polarity. Press down firmly until it seats flush. You should feel slight resistance; never force a battery that does not fit easily.
Step 5: Reassemble and Test
Snap the cover back or replace the screw. Stand within 10 feet of the door and press the button. The LED should illuminate brightly, and the door should respond instantly. If not, re-open and verify polarity.
Replacing the Main Unit Backup Battery
Modern openers with battery backup systems ensure operation during power outages. These units typically house a 12V sealed lead-acid battery behind the motor head cover.
- Unplug the Opener: Disconnect the power cord from the ceiling outlet.
- Remove the Lens Cover: Squeeze the tabs or unscrew the plastic lens to access the interior.
- Locate the Battery Harness: Find the black rectangular battery connected via a two-wire plug.
- Disconnect Wires: Pull the connector straight off. Do not yank individual wires.
- Swap Units: Slide out the old battery and insert the exact replacement model. Reconnect the harness securely.
- Restore Power: Plug the unit back in. Most systems require a 24-hour charging cycle before full backup capacity is achieved. Listen for a confirmation beep indicating successful recognition.
Troubleshooting: Still Not Working After Replacement?
If you have successfully learned how to change the battery in the garage door opener but the issue persists, consider these secondary causes:
- Reprogramming Required: Some remotes lose synchronization after battery removal. Hold the “Learn” button on the motor unit until the indicator blinks, then press your remote button twice.
- Signal Interference: LED bulbs in nearby fixtures can block RF signals. Swap to garage-door-specific LEDs rated for openers.
- Damaged Circuit Board: Visible burn marks or swollen capacitors indicate professional repair is needed.
- Antenna Issues: Ensure the hanging wire antenna is fully extended and not touching metal surfaces.
- Lock Mode Activated: Check the wall console for a blinking lock icon; hold the lock button for 3 seconds to disable.
Frequently Asked Questions (FAQ)
How often should I replace my garage door opener battery?
Standard remote batteries typically last 2–3 years with daily use. Backup system batteries should be tested annually and replaced every 3–5 years regardless of performance, as capacity degrades over time even without heavy cycling.
Can I use rechargeable batteries in my garage remote?
Generally, no. Most remotes are calibrated for the specific voltage curve of disposable lithium or alkaline cells. Rechargeables often operate at 1.2V instead of 1.5V/3V, causing premature “low battery” warnings or inconsistent range unless explicitly approved by the manufacturer.
Why did my remote stop working immediately after changing the battery?
This usually indicates incorrect polarity installation or a protective film left on the new cell. Double-check the +/- orientation and ensure no debris is blocking contact points. If correct, the remote itself may have failed coincidentally.
Does changing the battery reset my programmed codes?
For most modern rolling-code remotes, no. Memory is stored in non-volatile chips independent of battery power. However, older DIP-switch models or certain smart hubs may require re-syncing. Consult your manual if functionality doesn’t return immediately.
Where can I recycle old garage door batteries safely?
Major retailers including Lowe’s, Home Depot, and AutoZone offer free battery recycling kiosks. Municipal hazardous waste facilities also accept lead-acid backup batteries. Never dispose of them in regular curbside bins due to fire and environmental risks.
Can extreme cold affect my garage door battery performance?
Yes. Temperatures below 20°F (-6°C) can reduce lithium coin cell output by up to 40%. If your garage is uninsulated in northern US climates, consider installing a small heater near the opener or switching to cold-rated industrial batteries specified in your manual.
Conclusion
Mastering how to change the battery in the garage door opener empowers you to maintain one of your home’s most-used entry points independently, saving both time and service fees. Whether swapping a simple remote cell or servicing a backup system, following these structured steps ensures reliable operation and extends your equipment’s lifespan. Remember to always prioritize safety, use correct battery types, and test thoroughly after replacement.
Found this guide helpful? Share it with friends and neighbors on Facebook, Nextdoor, or X so they never get locked out again! Tag us with your success stories or lingering questions—we love hearing from fellow DIY homeowners keeping their garages running smoothly. Safe lifting! 🏠🔧
Leave a Reply