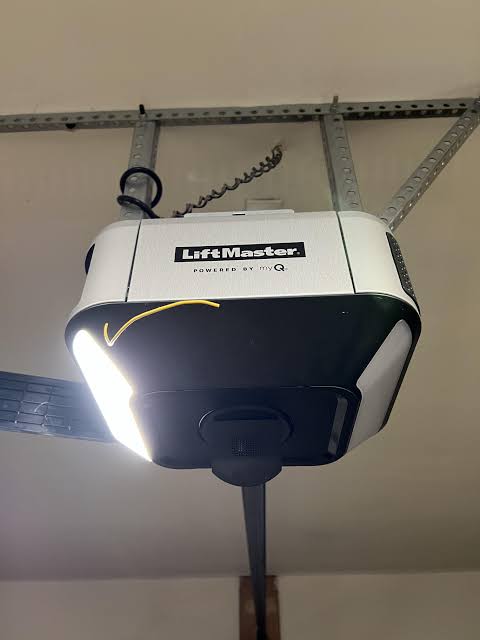
Introduction
There are few things more frustrating than pulling into your driveway at night only to realize your garage is pitch black because the opener’s light has failed. If you are searching for how to change light bulb on LiftMaster garage door opener, you are not alone; this is one of the most common maintenance tasks homeowners face. The good news is that replacing this bulb is a simple, safe DIY job that typically takes less than ten minutes and requires no specialized electrical knowledge. In this comprehensive guide, we will walk you through the exact steps, safety precautions, and bulb specifications needed to get your garage illuminated again.
Why Is My LiftMaster Garage Door Opener Light Not Working?
Before grabbing a ladder, it is essential to understand why the light failed. Diagnosing the root cause ensures you do not waste time replacing a perfectly good bulb if the issue lies elsewhere. According to industry service data, approximately 70% of lighting failures are simply burnt-out bulbs, while the remaining 30% involve socket corrosion, loose connections, or logic board issues.
Here are the most common culprits:
- Bulb Burnout: Standard incandescent bulbs have a finite lifespan and often fail due to the vibration of the garage door motor.
- Vibration Damage: Garage door openers generate significant movement. If a non-rough-service bulb was previously installed, the filament may have shattered.
- Socket Corrosion: Humidity in garages can cause oxidation on the metal contacts inside the socket, preventing electrical flow.
- Logic Board Failure: In rare cases, the relay on the opener’s motherboard that controls the light may have failed.
- LED Interference: Older LiftMaster models sometimes struggle with modern LED bulbs, causing flickering or premature failure.
Expert Insight: “Always test the old bulb in a known-working lamp before discarding it. This single step confirms whether the problem is the bulb or the opener itself,” advises certified garage door technicians.
What Type of Bulb Does a LiftMaster Garage Door Opener Use?
Using the correct bulb specification is critical for both safety and functionality. Installing a bulb with excessive wattage can melt the lens cover or damage the internal wiring, while using an incompatible LED can interfere with the remote control signal frequency.
Recommended Bulb Specifications
| Feature | Specification | Notes |
|---|---|---|
| Max Wattage | 60W (Incandescent) / 9W (LED) | Never exceed manufacturer limits |
| Base Type | E26 Medium Base | Standard US household screw base |
| Bulb Shape | A19 or G25 | Compact shapes prevent lens contact |
| Type | Rough Service / Vibration Resistant | Essential for opener longevity |
| Voltage | 120V AC | Standard residential voltage |
| LED Compatible | Check Manual | Some older units require specific LEDs |
For detailed technical standards regarding light bulb bases and classifications, you can refer to the Wikipedia entry on Edison screw, which provides authoritative background on the E26 standard used in virtually all LiftMaster residential openers.
Pro Tip: Upgrade to a vibration-resistant LED bulb specifically rated for garage door openers. These consume 85% less energy, produce less heat, and are engineered to withstand the constant shaking of the motor unit.
Step-by-Step: How To Change Light Bulb On LiftMaster Garage Door Opener
Now that you have the correct replacement bulb, follow this detailed tutorial to complete the swap safely. Always prioritize safety when working with electrical fixtures mounted overhead.
Tools You Will Need
- Replacement bulb (correct spec)
- Stepladder or sturdy platform
- Microfiber cloth or glove (to handle new bulb)
- Non-contact voltage tester (optional but recommended)
- Compressed air canister (for cleaning socket)
The Replacement Process
- Disconnect Power Source Locate the power cord of your LiftMaster opener and unplug it from the ceiling outlet. If your unit is hardwired, turn off the corresponding circuit breaker in your electrical panel. Never rely solely on the wall switch or remote to cut power. Wait at least 60 seconds to allow any residual capacitor charge to dissipate.
- Access the Light Lens Position your stepladder securely beneath the opener. Most LiftMaster models feature a translucent plastic lens cover that snaps off or pivots. Look for the release tab or hinge mechanism on the side of the housing. Gently press the tab and swing the lens open or remove it entirely. Set it aside on a soft surface to prevent scratching.
- Remove the Old Bulb Allow the old bulb to cool completely if it was recently lit. Grip the bulb firmly but gently near its base—not by the glass neck—and rotate counterclockwise. If the bulb feels stuck, use a rubber jar gripper or wrap a thick cloth around it for traction. Do not force it, as breaking the glass inside the socket creates a serious hazard.
- Inspect and Clean the Socket Before installing the new bulb, shine a flashlight into the empty socket. Look for dark burn marks, green corrosion, or bent brass tabs. Use compressed air to blow out dust and debris. If you see minor corrosion, carefully clean the contacts with electrical contact spray and a cotton swab. Ensure the center brass tab is slightly raised; if it appears flattened, gently pry it up with a wooden toothpick (power must remain disconnected).
- Install the New Bulb Handle the new bulb with a microfiber cloth or clean glove. Skin oils can create hot spots on halogen and some LED bulbs, reducing their lifespan. Align the bulb with the socket threads and rotate clockwise until snug. Do not overtighten. Hand-tight plus a quarter-turn is sufficient.
- Reassemble and Test Replace the lens cover, ensuring all tabs click securely into place. Restore power by plugging the unit back in or flipping the circuit breaker. Activate the light using your wall console or remote. The new bulb should illuminate instantly without flickering. If it does not work, re-verify power and socket integrity before assuming a defective new bulb.
Troubleshooting: Light Still Not Working After Replacement?
If you have followed the steps above and the light remains dark, the issue likely extends beyond the bulb itself. Consider these diagnostic checkpoints:
- Test the Socket Voltage: Use a multimeter set to AC voltage. With power restored, carefully probe the socket contacts. You should read approximately 120V. Zero reading indicates a wiring or board failure.
- Check the Wall Console: Some LiftMaster systems have a dedicated light button on the wall panel. If this button is stuck or malfunctioning, it may override automatic lighting.
- Reset the Opener: Unplug the unit for five minutes, then reconnect. This soft reset can clear logic board glitches affecting the light relay.
- Verify Bulb Compatibility: Double-check that your LED bulb is explicitly labeled “garage door opener compatible.” Generic LEDs often lack the necessary shielding to prevent RF interference with the opener’s receiver.
- Inspect Wiring Harness: Trace the wire from the socket back to the main board. Look for pinched wires, rodent damage, or loose connector plugs.
Frequently Asked Questions (FAQ)
Can I use any LED bulb in my LiftMaster garage door opener?
No, not all LED bulbs are suitable. Many standard LEDs emit electromagnetic interference that disrupts the radio frequency signals used by your remote controls and keypads. Always choose LEDs specifically marketed as “garage door opener compatible” or “RF shielded.” LiftMaster also manufactures proprietary LED bulbs guaranteed to work without interference.
How often should I replace the garage door opener light bulb?
With a quality vibration-resistant LED, you should expect 3–5 years of service. Traditional incandescent rough-service bulbs typically last 6–12 months under normal use. If you find yourself replacing bulbs frequently, investigate excessive vibration from worn rollers or tracks, as this mechanical issue accelerates bulb failure.
Is it safe to change the bulb myself, or should I hire a professional?
Changing the bulb is considered basic homeowner maintenance and is safe if you disconnect power first. However, if you discover damaged wiring, burnt sockets, or suspect a logic board failure, hire a licensed garage door technician. Electrical repairs beyond simple bulb replacement carry shock and fire risks best handled by professionals.
Why does my new LED bulb flicker when the garage door moves?
Flickering during operation usually indicates either an incompatible LED bulb or failing capacitors on the opener’s circuit board. First, swap in a known-compatible bulb. If flickering persists, the opener’s internal power regulation components may be degrading—a sign the unit may need servicing or replacement, especially if it is over 15 years old.
Does changing the light bulb affect my garage door opener warranty?
No. Replacing the light bulb is explicitly considered routine user maintenance and does not void your LiftMaster warranty. However, damage caused by using incorrect wattage bulbs, modifying wiring, or improper installation can void coverage. Always follow manufacturer specifications and keep records of compatible parts used.
Conclusion
Learning how to change light bulb on LiftMaster garage door opener empowers you to maintain a safe, well-lit garage without costly service calls. By selecting the correct vibration-resistant bulb, following proper safety protocols, and understanding basic troubleshooting, you can resolve most lighting issues in under fifteen minutes. Remember: the right bulb matters as much as the installation technique. A quality LED upgrade not only restores illumination but also reduces energy consumption and future maintenance headaches.
Found this guide helpful? Share it with friends, family, or neighbors who might be fumbling in the dark tonight! Tag us on social media with your successful bulb swap—we love seeing fellow DIYers conquer garage door maintenance with confidence. 💡🔧
Leave a Reply