Introduction
A dark garage isn’t just an inconvenience; it’s a genuine safety hazard when you’re trying to navigate around tools, vehicles, or pets at night. If your overhead light has burned out, knowing how to change light bulb in LiftMaster garage door opener is a simple DIY task that restores visibility and security in minutes. This guide walks you through the exact process, compatible bulb specifications, and expert tips to ensure your opener functions perfectly without voiding your warranty.
Understanding Your LiftMaster Lighting System
Before grabbing a ladder, it is crucial to understand that not all garage door openers are created equal. LiftMaster has evolved its lighting technology significantly over the last decade. Older models typically use standard incandescent sockets, while newer units often feature integrated LED panels or specialized vibration-resistant sockets.
According to industry standards documented on Wikipedia, modern garage door openers integrate lighting as a primary safety feature, but the electrical load and heat dissipation requirements vary drastically between chain-drive, belt-drive, and wall-mount models. Using the wrong bulb type is the number one reason for premature failure or logic board damage.
Identifying Your Model Type
- Chain/Belt Drive (Standard): Usually features a removable plastic lens cover and a standard A19 socket.
- Wall Mount (Jackshaft): Often uses integrated LED strips or specialized candelabra bases.
- Smart Openers (MyQ Enabled): May have non-replaceable LED panels requiring professional service if they fail.
What Type of Bulb Do I Need for My LiftMaster?
This is the most critical step. Using a standard household bulb can cause interference with your remote controls or burn out due to vibration.
| Bulb Type | Best For | Pros | Cons |
|---|---|---|---|
| Rough Service Incandescent | Older Models | Cheap, no RF interference | Short lifespan, high heat |
| Garage Door LED (Vibration Rated) | All Models | Long life, cool running, energy efficient | Slightly higher upfront cost |
| Smart LED (MyQ Compatible) | Smart Openers | App control, adjustable brightness | Expensive, model-specific |
| Standard Household LED | Not Recommended | N/A | Can cause signal interference |
Expert Tip: Always check the sticker inside the light lens or your owner’s manual for the maximum wattage rating. Exceeding this limit (e.g., putting a 100W equivalent in a 60W max socket) can melt the housing and create a fire risk.
Safety First: Essential Precautions
Never skip safety protocols when working with electricity and elevated surfaces.
- Disconnect Power: Unplug the opener from the ceiling outlet or turn off the dedicated circuit breaker. The light socket remains live even when the unit is “off” via the wall button.
- Secure Ladder Placement: Ensure your stepladder is on flat, dry concrete. Never stand on the top rung.
- Cool Down Period: If the light was recently on, wait at least 5 minutes. Incandescent bulbs can exceed 200°F (93°C).
- Eye Protection: Wear safety glasses to prevent glass shards or dust from falling into your eyes during removal.
Step-by-Step: How To Change Light Bulb In LiftMaster Garage Door Opener
Follow these precise steps for a safe and successful replacement. This tutorial applies to most standard chain and belt-drive LiftMaster models manufactured after 2000.
Step 1: Access the Light Lens
Locate the light lens cover on the motor head. Most LiftMaster lenses are secured by two screws on the sides or a single tab at the bottom.
- For Screw-On Lenses: Use a Phillips-head screwdriver to loosen (do not fully remove) the side screws. Swing the lens down.
- For Tab-Secured Lenses: Press the textured release tab inward and gently pull the lens downward until it hinges open.
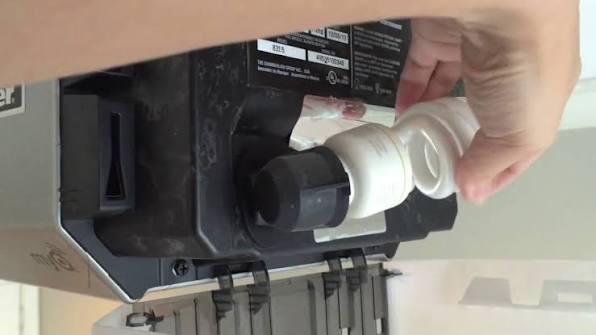
Step 2: Remove the Old Bulb
With the power disconnected, grasp the old bulb firmly but gently.
- Twist Counter-Clockwise: Rotate left until the bulb releases from the socket.
- Stuck Bulb? If corrosion has seized the base, use a strip of rubber jar gripper or duct tape (sticky side out) wrapped around the bulb for extra traction. Never use pliers directly on glass.
- Dispose Properly: Place the old bulb in its original packaging or a paper bag before disposal to prevent breakage.
Step 3: Inspect the Socket
Before installing the new bulb, shine a flashlight into the socket. Look for:
- Black scorch marks (indicates arcing/overheating)
- Corrosion or green patina on brass contacts
- Bent center tab
If you see damage, stop. The socket assembly may need replacement by a certified technician.
Step 4: Install the New Bulb
Insert the new vibration-rated garage door bulb into the socket.
- Align Carefully: Match the threads and turn clockwise.
- Hand-Tighten Only: Tighten until snug. Over-torquing can crack the bulb base or strip the socket threads.
- Wattage Check: Verify the new bulb does not exceed the printed max wattage on the housing.
Step 5: Reassemble and Test
- Swing the lens cover back into position.
- Secure the screws or snap the tab back into place. Ensure no wires are pinched.
- Restore power at the breaker or plug.
- Test using the wall console, remote, and MyQ app (if applicable) to confirm full functionality.
Why Does My LiftMaster Light Keep Burning Out?
If you’ve mastered how to change light bulb in LiftMaster garage door opener but find yourself doing it monthly, you likely have an underlying issue.
- Excessive Vibration: Standard LEDs lack reinforced filaments/bases. Upgrade to “Garage Door Specific” LEDs with silicone dampening.
- Voltage Spikes: Garage circuits shared with freezers or power tools can experience surges. Install a surge protector on the opener’s outlet.
- Loose Socket Contacts: Over time, the center brass tab flattens. With power OFF, gently pry it upward 2mm with needle-nose pliers to restore tension.
- Logic Board Failure: If bulbs blow instantly upon installation, the internal relay or capacitor may be faulty. This requires professional diagnosis.
Frequently Asked Questions (FAQ)
Q1: Can I use any LED bulb in my LiftMaster opener?
No. Standard LEDs can emit radio frequency interference that blocks your remote’s signal. Always use LEDs specifically labeled “Garage Door Opener Compatible” or those listed in your LiftMaster manual. These are shielded to prevent RF noise and built to withstand vibration.
Q2: How often should I replace my garage door opener light bulb?
Vibration-rated LEDs typically last 15,000–25,000 hours (roughly 5–10 years with normal use). Incandescent rough-service bulbs last 1,000–2,000 hours. If replacing more than once yearly, investigate vibration or electrical issues rather than continuing to swap bulbs.
Q3: Is it safe to change the bulb without unplugging the opener?
Technically possible, but strongly discouraged. The socket carries live voltage whenever the unit is plugged in, regardless of whether the light is switched on. A slip could result in severe shock. Always disconnect power—it takes less than 30 seconds and eliminates risk entirely.
Q4: My new LED flickers or doesn’t turn on. What’s wrong?
First, verify the bulb is garage-door compatible. Second, check that the socket’s center tab makes firm contact. Third, some older LiftMaster models require a minimum wattage draw to activate the relay; ultra-low-watt LEDs may not meet this threshold. Try a slightly higher wattage (within max limits) or add a dummy load resistor.
Q5: Can I upgrade from incandescent to LED myself?
Absolutely. LED upgrades are user-safe and recommended. They reduce heat buildup (protecting the logic board), cut energy use by 80%, and eliminate vibration-related failures. Just ensure you select a vibration-rated, RF-shielded model designed for garage door openers.
Q6: Does changing the bulb void my LiftMaster warranty?
No. Bulb replacement is considered routine homeowner maintenance under all LiftMaster warranties. However, damage caused by using incorrect wattage, non-compatible bulbs, or improper reassembly is not covered. Keep your receipt for the correct bulb type as proof of proper maintenance.
Conclusion
Mastering how to change light bulb in LiftMaster garage door opener empowers you to maintain a safer, brighter garage without costly service calls. By selecting the correct vibration-rated bulb, following safety protocols, and understanding your specific model’s requirements, you’ll enjoy reliable illumination for years. Remember: the right bulb isn’t just about light—it’s about protecting your investment and your family’s safety.
Found this guide helpful? Share it on Facebook, Pinterest, or your neighborhood Nextdoor group to help fellow homeowners avoid dark garages and burnt-out bulbs! Tag a friend who’s been squinting in their garage lately—they’ll thank you. 💡🔧
Leave a Reply