Introduction
Is your garage door remote suddenly unresponsive, leaving you stranded outside or forcing you to manually lift that heavy door? You are not alone; a depleted battery is the most common culprit behind this frustrating everyday problem. Knowing how to change battery in overhead garage door opener remote can save you time, money, and unnecessary stress, getting your daily routine back on track in just a few minutes.
How To Change Battery In Overhead Garage Door Opener Remote: Step-by-Step Guide
Replacing the battery in your garage door remote is a straightforward DIY task. Most remotes use either a coin-cell battery (like a CR2032) or a small cylindrical battery (like a 12V A23 or 23A). Follow these precise steps to ensure a safe and successful replacement.
Step 1: Identify Your Remote Model and Battery Type
Before purchasing a replacement, check the back of your remote or open the battery compartment to read the existing battery’s label. Common brands like Chamberlain, LiftMaster, and Genie typically use a CR2032 3V lithium coin battery or a 23A 12V alkaline battery. Pro Tip: Take a clear photo of the old battery with your smartphone before removing it to avoid buying the wrong type.
Step 2: Gather the Necessary Tools
You do not need an extensive toolkit for this job. Ensure you have the following ready:
- A replacement battery (verify the exact model number).
- A small flathead screwdriver or a plastic pry tool (to avoid scratching the casing).
- A clean, dry microfiber cloth (for wiping away any dust or corrosion).
Step 3: Open the Remote Casing
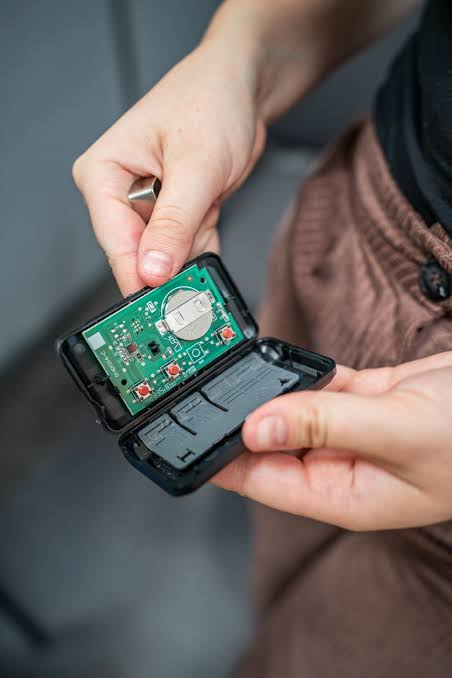
Locate the seam or the small notch on the side of your remote. Gently insert the flathead screwdriver into the notch and twist slightly to pop the casing open. If your remote has a visible screw, use a precision Phillips-head screwdriver to remove it first. Apply minimal force to prevent breaking the plastic clips holding the two halves together.
Step 4: Remove the Old Battery and Clean the Compartment
Carefully note the orientation of the old battery (look for the + and – signs). Use the screwdriver or your fingernail to gently lift the battery out. Inspect the metal contacts inside the compartment. If you notice any white, powdery residue (corrosion), gently wipe it away with the microfiber cloth. For stubborn corrosion, a cotton swab lightly dampened with rubbing alcohol works perfectly. Let it dry completely before proceeding.
Step 5: Insert the New Battery
Place the new battery into the compartment, ensuring the positive (+) side faces up, matching the orientation of the old battery. Press down firmly until you hear or feel a slight click, confirming it is securely seated.
Step 6: Reassemble and Test
Snap the two halves of the remote casing back together. If there was a screw, tighten it securely but do not overtighten. Stand within 10–15 feet of your garage door and press the button. The LED indicator on the remote should light up brightly, and the door should respond immediately.
Common Battery Types for Garage Door Remotes
Understanding the power source of your device is crucial for long-term reliability. Below is a quick comparison of the most prevalent battery types used in modern overhead garage door systems.
| Battery Type | Voltage | Common Remote Brands | Average Lifespan | Best Use Case |
|---|---|---|---|---|
| CR2032 | 3V (Lithium) | LiftMaster, Chamberlain, Genie | 2–3 years | Slim, modern keychain remotes |
| 23A (A23) | 12V (Alkaline) | Older Genie, Craftsman, Universal | 1–2 years | Bulkier, traditional clicker remotes |
| CR2016 | 3V (Lithium) | Some compact universal remotes | 1–2 years | Space-constrained, mini remotes |
Note: Always opt for name-brand batteries (e.g., Energizer, Duracell, Panasonic) over generic alternatives. According to industry data, premium lithium batteries maintain a stable voltage output longer, reducing the risk of sudden remote failure.
DIY Replacement vs. Professional Help: Pros and Cons
While calling a technician might seem like the easiest route, handling this task yourself is highly recommended. Here is a quick breakdown to help you decide:
DIY Battery Replacement
- Pros: Costs under $5, takes less than 5 minutes, builds self-reliance, no scheduling required.
- Cons: Requires buying the correct battery type, minor risk of breaking plastic clips if forced.
Professional Service
- Pros: Guaranteed correct installation, technician can inspect the remote for other faults.
- Cons: Service call fees ($50–$150), scheduling delays, overkill for a simple battery swap.
Verdict: For 99% of homeowners, DIY is the clear winner. Save your money for a coffee and tackle this simple fix yourself.
Troubleshooting: What If the Remote Still Doesn’t Work?
If you have successfully learned how to change battery in overhead garage door opener remote but the device remains unresponsive, do not panic. Consider these expert-backed troubleshooting steps:
- Check the Battery Orientation: It is surprisingly common to insert the new battery upside down. Double-check the + and – alignment.
- Inspect the LED Light: Press the button. If the LED does not light up at all, the battery may be dead on arrival (DOA), or the internal contacts are dirty. Try a second new battery.
- Reprogram the Remote: Sometimes, a complete power loss can reset the remote’s memory. You may need to sync it again with the main opener unit. Refer to your manufacturer’s manual for the specific “Learn” button sequence.
- Examine the Garage Door Opener Unit: Ensure the main overhead unit is plugged in and that the circuit breaker has not tripped. For a deeper understanding of how these systems operate, you can review the general mechanics of a garage door opener on Wikipedia.
- Look for Physical Damage: Drop damage can dislodge internal wiring or crack the circuit board. If the remote was recently dropped, it may need replacement rather than just a battery swap.
Frequently Asked Questions (FAQ)
1. How often should I change the battery in my garage door remote?
On average, you should replace the battery every 1 to 2 years. However, if you notice the remote’s LED light dimming, or if you have to stand closer to the garage door for it to respond, it is time for a replacement.
2. Can I use a rechargeable battery in my garage door remote?
It is generally not recommended. Most garage door remotes are designed for the specific voltage of disposable alkaline or lithium batteries (e.g., 3V or 12V). Rechargeable equivalents often have a slightly lower nominal voltage (e.g., 1.2V per cell instead of 1.5V), which can lead to inconsistent performance or failure to trigger the opener.
3. Will changing the battery erase my remote’s programming?
No. Replacing the battery typically takes only a few seconds, which is not long enough to drain the residual power from the remote’s internal capacitor. Your programming should remain intact. If it does reset, reprogramming is a quick process using the “Learn” button on the main motor unit.
4. What is the difference between a 23A and a 27A battery?
While both are 12V batteries and look similar, a 23A battery is slightly smaller in diameter and length than a 27A battery. They are not always interchangeable. Always check the exact alphanumeric code printed on your old battery before purchasing a replacement.
5. Why does my new battery drain so quickly?
Rapid battery drain can indicate a stuck button inside the remote casing, causing it to continuously transmit a signal. It could also point to a short circuit on the remote’s internal board. If this happens, inspect the buttons for debris or consider replacing the entire remote.
Conclusion
Mastering how to change battery in overhead garage door opener remote is a simple yet invaluable skill for every homeowner. By following this step-by-step guide, you can avoid the frustration of a malfunctioning garage door, save on unnecessary service fees, and ensure your home’s accessibility remains seamless. Remember to use high-quality batteries, handle the casing with care, and keep your remote clean.
Did you find this guide helpful? Share this article with your friends, family, or neighbors on Facebook, Twitter, or WhatsApp to help them conquer their garage door woes too! If you have any questions or additional tips, leave a comment below—we love hearing from our community.
Leave a Reply