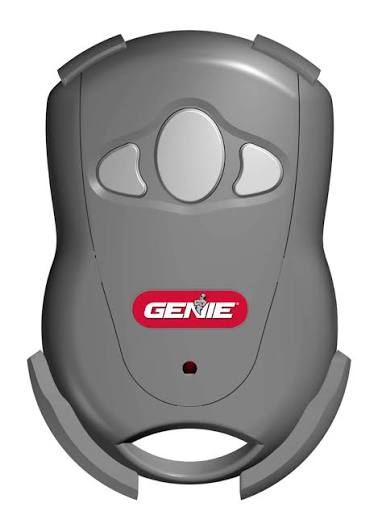
Is your Genie garage door remote suddenly unresponsive? You press the button, but nothing happens—no lights, no movement, just silence. Before you call an expensive technician or buy a new remote, learning how to change battery in Genie garage door opener GICT390 could save you time and money. This simple fix resolves 90% of remote control issues and takes less than five minutes.
Why Does Your Genie GICT390 Remote Stop Working?
Understanding why your remote fails helps prevent future problems. The Genie GICT390 is a reliable three-button remote compatible with most Genie garage door openers manufactured after 1997. However, like all battery-powered devices, it has limitations.
Common Causes of Remote Failure
- Dead battery: The most frequent culprit, especially if you haven’t replaced it in 12-18 months
- Battery corrosion: Moisture or old batteries can damage internal contacts
- Signal interference: Nearby electronics may block the 315 MHz frequency
- Physical damage: Drops or water exposure can harm internal components
According to Wikipedia’s entry on garage door openers, remote controls typically use lithium or alkaline batteries lasting 1-2 years with regular use. The GICT390 specifically requires a CR2032 3V lithium coin cell battery, which provides consistent power and longer lifespan compared to alkaline alternatives.
What Battery Does the Genie GICT390 Use?
Before starting the replacement process, ensure you have the correct battery type. Using the wrong battery can damage your remote or provide insufficient power.
Battery Specifications
| Specification | Details |
|---|---|
| Battery Type | CR2032 Lithium Coin Cell |
| Voltage | 3 Volts |
| Capacity | Approximately 220-240 mAh |
| Lifespan | 1-2 years with normal use |
| Brand Recommendations | Energizer, Duracell, Panasonic |
Pro Tip: Always purchase fresh batteries from reputable retailers. Check the expiration date on the packaging—older batteries may have reduced capacity even if unused.
Why lithium instead of alkaline? Lithium CR2032 batteries maintain consistent voltage throughout their lifespan, whereas alkaline batteries gradually lose power. This consistency ensures reliable remote performance, especially in colder temperatures where alkaline batteries struggle.
Tools You’ll Need for Battery Replacement
The beauty of changing your Genie GICT390 battery is its simplicity. You won’t need specialized tools or technical expertise. Here’s what to gather:
- One CR2032 lithium battery (have a spare handy)
- Small flathead screwdriver or coin (for prying open the case)
- Clean, dry cloth (to wipe any dust or debris)
- Well-lit workspace (good visibility prevents mistakes)
That’s it! No soldering, no complex disassembly, and no risk of voiding warranties when done correctly.
Step-by-Step: How To Change Battery In Genie Garage Door Opener Gict390
Follow these detailed steps carefully. The entire process takes approximately 3-5 minutes.
Step 1: Locate the Battery Compartment
Turn your GICT390 remote over. You’ll notice a small seam running along one edge of the back cover. Unlike some remotes with visible screws, the GICT390 uses a snap-fit design. The battery compartment is on the back side, opposite the buttons.
Step 2: Open the Remote Case
Insert your small flathead screwdriver or a coin into the seam. Gently twist or pry to separate the two halves of the remote casing. Apply minimal pressure—the plastic clips are delicate and can break if forced.
You should hear a slight click as the case separates. If resistance feels excessive, reposition your tool and try a different angle along the seam.
Step 3: Remove the Old Battery
Once opened, you’ll see the circular CR2032 battery held in place by a metal clip. Note the battery orientation: the positive (+) side faces up toward the remote’s front panel.
Use your fingernail or the screwdriver tip to gently lift the battery out. Avoid touching both sides simultaneously, as this can create a short circuit.
Important: Dispose of the old battery properly at a recycling center. Never throw lithium batteries in regular trash due to fire hazards.
Step 4: Clean the Battery Contacts
Before inserting the new battery, inspect the metal contacts for corrosion or debris. Wipe them gently with your clean, dry cloth. If you notice white or greenish corrosion, lightly dampen the cloth with rubbing alcohol, then dry thoroughly.
Clean contacts ensure optimal electrical connection and prevent intermittent remote failures.
Step 5: Insert the New Battery
Place the new CR2032 battery with the positive (+) side facing up. The battery should sit flush in the compartment without forcing it. Ensure it’s centered and secure under the metal retaining clip.
Double-check the orientation before proceeding. Installing the battery backward won’t damage the remote but will prevent it from functioning.
Step 6: Reassemble the Remote
Align the two halves of the remote casing carefully. Press them together firmly until you hear clicking sounds indicating the clips have engaged. Run your finger along the seam to ensure it’s completely closed with no gaps.
Step 7: Test the Remote
Stand within 10-15 feet of your garage door opener. Press any button on the remote. You should see a small LED light flash, and the garage door should respond accordingly.
If the door doesn’t respond:
- Verify battery orientation
- Ensure the case is fully closed
- Check if the garage door opener itself has power
- Try reprogramming the remote (see FAQ section below)
Troubleshooting Common Issues After Battery Replacement
Even with a fresh battery, problems may persist. Here’s how to address them:
Remote Still Doesn’t Work
- Reprogram the remote: Hold the “Learn” button on your garage door opener motor unit, then press the remote button within 30 seconds
- Check opener power: Ensure the garage door opener is plugged in and receiving electricity
- Test from different distances: Signal strength decreases with distance and obstacles
Intermittent Functionality
- Replace the battery again (defective units occasionally slip through quality control)
- Clean battery contacts more thoroughly
- Check for physical damage to the remote’s internal circuit board
Weak Signal Range
- Replace with a premium brand battery (Energizer or Duracell perform better than generic brands)
- Remove potential sources of interference (LED bulbs, wireless routers, baby monitors)
- Reposition the garage door opener’s antenna if accessible
When to Replace Your Entire Remote
While battery replacement solves most issues, consider buying a new GICT390 remote if:
- The remote has visible physical damage (cracks, water damage)
- Buttons feel mushy or unresponsive even with a new battery
- You’ve tried reprogramming multiple times without success
- The remote is more than 5-7 years old (internal components degrade over time)
Replacement GICT390 remotes cost $15-$25 and remain compatible with existing Genie openers, making them a cost-effective solution when repairs fail.
Frequently Asked Questions
How often should I change the battery in my Genie GICT390?
Replace the battery every 12-18 months with regular use, or immediately when you notice decreased range or responsiveness. Proactive replacement prevents unexpected failures.
Can I use a different battery type instead of CR2032?
No. The GICT390 is specifically designed for CR2032 3V lithium batteries. Other sizes won’t fit properly, and different voltages may damage the remote’s circuitry.
Why does my new battery drain quickly?
Rapid battery drain suggests either a defective battery, internal short circuit, or constant button pressing (check if something is stuck). Try a different brand, and if the problem persists, the remote may need replacement.
Do I need to reprogram the remote after changing the battery?
Typically, no. Changing the battery doesn’t erase the programmed codes. However, if the remote doesn’t work after battery replacement, reprogramming may resolve connectivity issues.
Where can I buy CR2032 batteries?
CR2032 batteries are widely available at pharmacies, grocery stores, hardware stores, and online retailers like Amazon. Keep extras on hand for future replacements.
Is it safe to store spare lithium batteries in the garage?
Store lithium batteries in cool, dry places away from extreme temperatures. Garages experiencing temperature fluctuations below freezing or above 100°F may reduce battery lifespan. A climate-controlled indoor location is ideal.
Conclusion
Knowing how to change battery in Genie garage door opener GICT390 empowers you to handle common remote issues independently. This straightforward five-minute task saves money, reduces frustration, and keeps your garage accessible. Remember to use quality CR2032 lithium batteries, handle the remote gently during disassembly, and test thoroughly after reassembly.
Did this guide help you fix your Genie remote? Share this article with friends and family who might face similar issues. Bookmark this page for future reference, and leave a comment below sharing your experience or asking additional questions. Your garage door—and your wallet—will thank you!
Leave a Reply