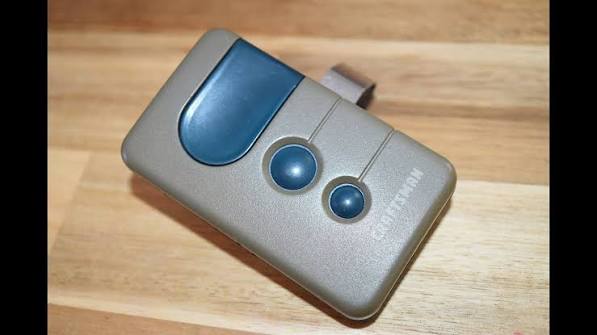
Is your Craftsman garage door remote suddenly unresponsive? You’re not alone—thousands of homeowners face this frustrating issue every year. Learning how to change battery in Craftsman garage door opener remote is a quick fix that can save you time and money, restoring convenience to your daily routine.
Why Your Craftsman Remote Stops Working
Before diving into the battery replacement process, it’s important to understand why your remote might fail. According to industry data from the International Door Association, battery-related issues account for approximately 65% of garage door remote malfunctions. Other common causes include signal interference, damaged circuit boards, or worn-out buttons.
However, in most cases, a simple battery replacement resolves the problem entirely. The good news? This is one of the easiest DIY repairs you can tackle at home without any special tools or technical expertise.
What Type of Battery Does My Craftsman Remote Use?
Different Craftsman remote models use different battery types. Identifying the correct battery is crucial before starting the replacement process. Here’s a quick reference guide:
| Remote Model | Battery Type | Typical Lifespan |
|---|---|---|
| Older Models (Pre-2010) | CR2032 | 1-2 years |
| Standard Models (2010-2018) | CR2032 or 3V Lithium | 1-2 years |
| Newer Models (2019+) | CR2032 or A23 | 2-3 years |
| Keychain Remotes | CR2016 | 6-12 months |
Pro Tip: Always check the existing battery compartment or your owner’s manual to confirm the exact battery type. Using the wrong battery can damage your remote or cause poor performance.
Most Craftsman remotes use a CR2032 3-volt lithium coin cell battery, which is widely available at hardware stores, pharmacies, and online retailers for under $5. These batteries are known for their long lifespan and reliable performance in low-drain devices like garage door remotes.
Step-by-Step Guide: How to Change Battery in Craftsman Garage Door Opener Remote
Follow these detailed instructions to replace your remote’s battery safely and efficiently:
Step 1: Gather Your Supplies
Before beginning, ensure you have:
- The correct replacement battery (typically CR2032)
- A small flathead screwdriver or coin (for prying open the case)
- A clean, well-lit workspace
Step 2: Locate the Battery Compartment
Most Craftsman remotes have one of two designs:
Design A – Slide-Open Back:
- Look for a small seam or groove on the back of the remote
- Some models have a small arrow indicating the direction to slide
Design B – Screw-Sealed Case:
- Check for tiny screws on the back panel
- These require a precision screwdriver to remove
Step 3: Open the Remote Carefully
For slide-open models:
- Hold the remote firmly in one hand
- Use your thumb or a coin to gently slide the back cover in the indicated direction
- Apply even pressure—don’t force it
For screw-sealed models:
- Use a small Phillips or flathead screwdriver
- Remove all screws carefully, placing them in a safe location
- Gently pry open the case using a plastic tool or your fingernail
Warning: Never use excessive force, as this can crack the plastic housing or damage internal components.
Step 4: Remove the Old Battery
Once the case is open:
- Locate the circular battery holder
- Note the battery orientation (positive side usually faces up)
- Gently push or lift the old battery out
- Dispose of the old battery properly at a recycling center
Step 5: Insert the New Battery
- Take your new CR2032 battery
- Ensure the positive (+) side faces upward (matching the previous orientation)
- Press the battery firmly into place until it sits flush
- Double-check that it’s secure and properly aligned
Step 6: Reassemble the Remote
For slide-open models:
- Align the back cover and slide it back into place until it clicks
For screw-sealed models:
- Close the case carefully
- Replace and tighten all screws (but don’t overtighten)
Step 7: Test Your Remote
- Stand within 10-15 feet of your garage door opener
- Press the button firmly
- The garage door should respond immediately
If it doesn’t work, try these troubleshooting steps:
- Recheck battery orientation
- Ensure the battery is making proper contact
- Try reprogramming the remote to your opener
Common Problems After Battery Replacement
Even after successfully replacing the battery, you might encounter issues. Here’s what to do:
Remote Still Doesn’t Work:
- The battery might be defective—try another new one
- The remote may need reprogramming
- Internal contacts could be corroded—clean with a cotton swab and rubbing alcohol
Intermittent Response:
- Check for signal interference from LED bulbs or other electronics
- Ensure you’re within range (typically 50-100 feet)
- Replace the battery again if it’s been sitting unused for months
Weak Signal Range:
- Verify you’re using the correct battery type
- Clean the remote’s exterior and button contacts
- Consider replacing the remote if it’s over 10 years old
For more information on garage door opener technology and safety standards, visit Wikipedia’s page on garage door openers.
When to Replace vs. Repair Your Craftsman Remote
Not every remote issue requires a full replacement. Use this decision guide:
Replace the Battery If:
- The remote worked fine until recently
- Buttons still click normally
- No visible physical damage exists
- The remote is less than 10 years old
Consider a New Remote If:
- Battery replacement doesn’t solve the problem
- The case is cracked or broken
- Buttons are worn out or unresponsive
- The remote is over 10 years old
- You’ve lost the remote entirely
New Craftsman-compatible remotes typically cost between $20-$40, while professional programming services range from $50-$100. However, many newer models feature self-programming capabilities, saving you additional costs.
Tips to Extend Your Remote Battery Life
Maximize your battery’s lifespan with these expert recommendations:
- Store properly: Keep spare remotes in a cool, dry place away from direct sunlight
- Avoid extreme temperatures: Don’t leave remotes in hot cars during summer
- Limit unnecessary presses: Only press the button when needed
- Check annually: Even if working, test your remote every few months
- Buy quality batteries: Stick with reputable brands like Energizer, Duracell, or Panasonic
According to battery manufacturers, proper storage and usage can extend battery life by up to 30%, potentially saving you money in the long run.
Frequently Asked Questions
How often should I change the battery in my Craftsman garage door remote?
Typically, you should replace the battery every 1-2 years, depending on usage frequency. If you notice decreased range or intermittent response, it’s time for a new battery regardless of when you last changed it.
Can I use a rechargeable battery in my Craftsman remote?
While technically possible, rechargeable batteries aren’t recommended. They typically provide lower voltage (1.2V vs. 3V for lithium) and may not power the remote effectively. Stick with standard 3V lithium coin cells for optimal performance.
What do I do if my remote still doesn’t work after changing the battery?
First, double-check the battery orientation and ensure it’s seated properly. If problems persist, try reprogramming the remote to your opener. Consult your owner’s manual for specific programming instructions, or contact Craftsman customer support for assistance.
Is it safe to dispose of old remote batteries in regular trash?
No. Lithium batteries should be recycled properly to prevent environmental contamination. Many hardware stores, pharmacies, and recycling centers offer free battery disposal programs. Check with your local waste management facility for specific guidelines.
Can water damage affect my Craftsman remote even after battery replacement?
Yes. If your remote has been exposed to moisture, internal corrosion may prevent proper function even with a new battery. In such cases, cleaning the circuit board with isopropyl alcohol or replacing the remote entirely may be necessary.
How do I know if my Craftsman remote needs reprogramming after battery change?
Most remotes retain their programming after battery replacement. However, if the remote doesn’t respond, try reprogramming it. Signs that reprogramming is needed include: no response at all, inconsistent operation, or the remote working only at very close range.
Conclusion
Learning how to change battery in Craftsman garage door opener remote is a simple yet essential skill for every homeowner. With just a few minutes and a inexpensive CR2032 battery, you can restore full functionality to your garage door system and avoid unnecessary service calls.
Remember to always use the correct battery type, handle the remote carefully during disassembly, and test thoroughly after reassembly. By following this guide, you’ll save time, money, and frustration while keeping your home secure and convenient.
Did this guide help you fix your Craftsman remote? Share this article with friends and family on social media who might be struggling with the same issue. Your share could save someone else from an expensive service call!
Leave a Reply