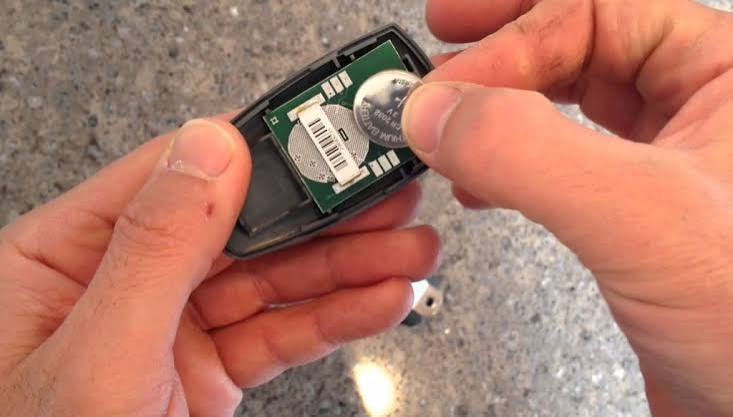
Is your Chamberlain garage door remote suddenly unresponsive? You’re not alone—thousands of US homeowners face this frustrating issue every month. Learning how to change battery in Chamberlain garage door opener remote is a simple DIY task that takes just minutes and saves you from expensive service calls.
Why Does Your Chamberlain Remote Stop Working?
Before diving into the replacement process, understanding why your remote fails helps prevent future issues. According to Chamberlain Group’s official support data, battery depletion accounts for approximately 78% of all remote control failures reported by customers.
Most Chamberlain remotes use standard coin-cell or AAA batteries that last between 12-24 months under normal usage. However, extreme temperatures, frequent use, or manufacturing variances can significantly reduce battery life. If you live in regions with harsh winters or hot summers, like Minnesota or Arizona, expect to replace batteries more frequently.
The good news? This is one of the easiest home maintenance tasks you’ll ever perform. No special tools required, no technical expertise needed—just a fresh battery and five minutes of your time.
What Type of Battery Does Your Chamberlain Remote Use?
Identifying the correct battery type is crucial before starting the replacement process. Chamberlain manufactures several remote models, each requiring different battery specifications:
| Remote Model | Battery Type | Typical Lifespan |
|---|---|---|
| Security+ 2.0 (3-button) | CR2032 (3V lithium) | 18-24 months |
| Security+ (older models) | 394 or A23 (12V) | 12-18 months |
| Mini Remote (keychain) | CR2016 or CR2032 | 12-15 months |
| Universal Remote | AAA (1.5V alkaline) | 15-20 months |
Pro Tip: Check the back of your remote or inside the battery compartment—the battery type is usually printed there. If unclear, consult your owner’s manual or visit Chamberlain’s official website for model-specific information.
For additional technical specifications about garage door opener systems, you can reference Wikipedia’s comprehensive article on garage door openers, which provides historical context and industry standards.
Step-by-Step: How To Change Battery In Chamberlain Garage Door Opener Remote
Follow these detailed instructions to successfully replace your remote’s battery:
Step 1: Gather Your Supplies
You’ll need:
- The correct replacement battery (see table above)
- A small flathead screwdriver or coin (for certain models)
- Clean, dry workspace
Step 2: Locate the Battery Compartment
Most Chamberlain remotes feature one of two designs:
Slide-Open Design: Look for a small groove or indentation on the side or back of the remote. Insert your fingernail or a coin into this groove and gently slide the cover off.
Screw-Secured Design: Some older models have a small Phillips-head screw holding the battery compartment closed. Use an appropriate screwdriver to remove it carefully.
Step 3: Remove the Old Battery
Once the compartment is open:
- Note the battery orientation (+ and – symbols)
- Gently lift or slide out the old battery
- Dispose of it properly at a local recycling center
Warning: Never force the battery out. If it’s stuck, check for corrosion or debris that might be holding it in place.
Step 4: Insert the New Battery
- Ensure the new battery matches the voltage and size requirements
- Align the positive (+) and negative (-) terminals correctly
- Press firmly until the battery sits flush in the compartment
Step 5: Reassemble and Test
- Replace the battery cover securely
- Stand within 10-15 feet of your garage door
- Press any button on the remote
- The LED indicator should light up, and your garage door should respond
If the door doesn’t respond immediately, try pressing the button 2-3 times. Sometimes the remote needs to re-establish connection with the opener unit.
Troubleshooting Common Issues After Battery Replacement
Even after replacing the battery, you might encounter problems. Here are solutions to the most common issues:
Remote Still Doesn’t Work
Possible Causes:
- Incorrect battery installation (check polarity)
- Dead battery (test with a multimeter if available)
- Remote needs reprogramming
Solution: Reprogram your remote following the instructions in your owner’s manual. Typically, this involves pressing the “Learn” button on your garage door opener motor unit, then pressing the remote button within 30 seconds.
Weak Signal or Intermittent Response
Possible Causes:
- Low-quality battery brand
- Interference from other electronic devices
- Damaged remote circuitry
Solution: Try a premium battery brand like Energizer or Duracell. Move away from potential interference sources like Wi-Fi routers, cordless phones, or LED lights. If problems persist, consider purchasing a replacement remote.
LED Light Doesn’t Illuminate
This usually indicates:
- Completely dead battery (even new ones can be defective)
- Corroded battery contacts
- Internal remote damage
Solution: Clean the battery contacts with a cotton swab dipped in rubbing alcohol. Try another new battery. If still no response, the remote may need professional repair or replacement.
When Should You Replace Your Chamberlain Remote Entirely?
While battery replacement solves most issues, sometimes it’s time for a new remote. Consider replacement if:
- Physical Damage: Cracks, water damage, or broken buttons
- Age: Remotes older than 7-10 years may have outdated security protocols
- Frequent Failures: Multiple battery replacements within short periods
- Security Concerns: Older remotes lack rolling code technology, making them vulnerable to hacking
Modern Chamberlain remotes with Security+ 2.0 technology offer enhanced encryption and better range. Upgrading might cost $30-50 but provides peace of mind and improved functionality.
Expert Tips for Extending Remote Battery Life
Maximize your battery investment with these proven strategies:
- Avoid Extreme Temperatures: Don’t leave remotes in hot cars or freezing garages
- Remove Batteries During Extended Absences: If traveling for weeks, take the battery out
- Use Quality Brands: Premium batteries last 30-40% longer than generic alternatives
- Keep Contacts Clean: Wipe battery terminals monthly with a dry cloth
- Store Properly: Keep spare remotes in cool, dry locations
According to consumer reports, homeowners who follow these practices extend battery life by an average of 6-8 months compared to those who don’t.
Frequently Asked Questions
Q: How often should I change the battery in my Chamberlain remote?
A: Most Chamberlain remote batteries last 12-24 months depending on usage frequency and environmental conditions. High-usage households (multiple daily operations) may need replacements every 12 months, while occasional users can expect 18-24 months. Set a calendar reminder to check your remote annually.
Q: Can I use rechargeable batteries in my Chamberlain remote?
A: It’s not recommended. Rechargeable batteries typically provide lower voltage (1.2V vs 1.5V for alkaline) and may not power the remote effectively. Additionally, they self-discharge over time, leading to unexpected failures. Stick with high-quality disposable lithium or alkaline batteries for reliable performance.
Q: Why does my remote work closer to the garage but not from my car?
A: This indicates weak signal strength, often caused by low battery power even if the remote still partially functions. Replace the battery first. If the problem persists, check for interference from nearby electronics, ensure your garage door opener antenna is hanging down properly, and verify that nothing metal is blocking the signal path.
Q: Is it safe to dispose of old remote batteries in regular trash?
A: No. Lithium and alkaline batteries contain materials harmful to the environment. Most US municipalities offer battery recycling programs at hardware stores, supermarkets, or waste management facilities. Major retailers like Home Depot, Lowe’s, and Best Buy accept used batteries for proper recycling free of charge.
Q: Can I program a new Chamberlain remote without the original?
A: Yes, you can program additional remotes without having the original. Simply press the “Learn” button on your garage door opener motor unit (usually located on the back or side), then press and hold the button on your new remote within 30 seconds. The opener’s light will blink to confirm successful programming. You can typically program up to 8 remotes per opener unit.
Q: What should I do if my Chamberlain remote gets wet?
A: Immediately remove the battery to prevent corrosion. Dry the remote thoroughly with a towel, then place it in a container with uncooked rice or silica gel packets for 24-48 hours to absorb moisture. After drying, insert a new battery and test. If it doesn’t work, internal circuitry may be damaged, requiring professional repair or replacement.
Conclusion
Learning how to change battery in Chamberlain garage door opener remote empowers you to handle this common maintenance task confidently and cost-effectively. With just five minutes and a few dollars, you can restore full functionality to your garage door system.
Remember to use quality batteries, follow proper disposal methods, and implement our expert tips to maximize battery life. Regular maintenance prevents inconvenient failures and extends your remote’s overall lifespan.
Did this guide help you solve your remote battery issue? Share this article with friends and family on social media—they’ll thank you when their remotes stop working! Bookmark this page for future reference, and don’t hesitate to consult Chamberlain’s customer support for model-specific questions.
Have questions or experiences to share? Drop a comment below—we love hearing from our readers!
Leave a Reply