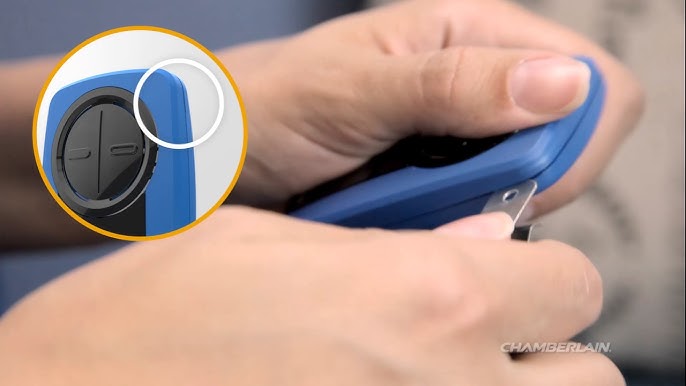
Is your Chamberlain garage door remote suddenly unresponsive? You’re not alone—thousands of homeowners face this frustrating issue every month. Learning how to change battery in Chamberlain Clicker garage door opener is a simple fix that takes less than five minutes and can save you from costly service calls or being locked out of your garage.
Why Does Your Chamberlain Remote Stop Working?
Before diving into the battery replacement process, it’s important to understand why your remote might fail. According to Chamberlain Group, the manufacturer behind LiftMaster and Chamberlain brands, battery depletion accounts for approximately 78% of remote control issues. Other factors include:
- Signal interference from nearby electronics
- Physical damage to the remote
- Programming errors after power outages
- Worn-out internal components
Understanding these common causes helps you determine whether a battery change will solve your problem or if further troubleshooting is needed.
What Type of Battery Does a Chamberlain Clicker Use?
Most Chamberlain garage door remotes use standard 3-volt lithium coin cell batteries, specifically the CR2032 model. However, some older models may require different battery types:
| Remote Model | Battery Type | Approximate Lifespan |
|---|---|---|
| KLIK1U/KLIK2U | CR2032 | 2-3 years |
| Security+ Models | CR2032 | 2-3 years |
| Older Universal Remotes | CR2016 or CR2025 | 1-2 years |
| Mini Remotes | CR2032 | 1-2 years |
Pro Tip: Always check your specific remote model number (usually found inside the battery compartment) before purchasing replacement batteries. Using the wrong battery type can damage your remote or cause inconsistent performance.
You can find detailed specifications for your particular model on Chamberlain’s official support page, which provides comprehensive documentation for all their products.
Step-by-Step Guide: How to Change Battery in Chamberlain Clicker Garage Door Opener
Step 1: Gather Your Supplies
Before starting, ensure you have:
- New CR2032 battery (or appropriate type for your model)
- Small flathead screwdriver or coin (for prying open the case)
- Clean, dry workspace
- Optional: Soft cloth for cleaning contacts
Step 2: Locate the Battery Compartment
Turn your remote over and look for a small seam or indentation along the edge. Most Chamberlain remotes feature one of two designs:
Slide-Open Design: Look for arrows indicating the direction to slide the cover.
Snap-Open Design: Find the small notch or groove where you’ll insert your tool to pry open the case.
Step 3: Open the Remote Carefully
For slide-open models:
- Hold the remote firmly in one hand
- Use your thumb to slide the cover in the indicated direction
- The cover should come off easily without excessive force
For snap-open models:
- Insert a small flathead screwdriver or coin into the notch
- Gently twist or pry to release the clips
- Work your way around the edges if necessary
- Warning: Apply minimal pressure to avoid breaking plastic clips
Step 4: Remove the Old Battery
Once opened, you’ll see the circular battery held in place by a metal clip or plastic holder:
- Note the battery orientation (positive side up in most cases)
- Gently lift the battery out using your fingernail or a non-conductive tool
- Dispose of the old battery properly at a recycling center
Step 5: Clean the Battery Contacts
This often-overlooked step can significantly improve performance:
- Inspect the metal contacts for corrosion or debris
- Use a soft, dry cloth to gently wipe the contacts
- For stubborn corrosion, lightly dampen the cloth with rubbing alcohol
- Allow contacts to dry completely before proceeding
Step 6: Insert the New Battery
- Place the new CR2032 battery with the positive (+) side facing up
- Ensure it sits flush in the compartment
- Verify the battery is secure but not forced
Step 7: Close the Remote
- Align the cover properly with the base
- Press firmly until you hear a click (for snap-open models)
- Slide the cover back into place (for slide-open models)
- Ensure no gaps remain around the edges
Step 8: Test Your Remote
Stand within 10-15 feet of your garage door and press the button:
- Success: The door responds immediately
- No response: Try reprogramming the remote (see FAQ section)
- Intermittent response: Check battery orientation and contacts again
Common Mistakes When Changing Chamberlain Remote Batteries
Even this simple task can go wrong if you’re not careful. Here are the most frequent errors:
Installing the Battery Backwards The positive side must face up. Reversing it won’t damage the remote but will prevent it from working.
Using Low-Quality Batteries Cheap, no-name batteries may have inconsistent voltage output. Stick with reputable brands like Energizer, Duracell, or Panasonic.
Forcing the Case Open Excessive pressure can break plastic clips permanently. If it doesn’t open easily, reassess your approach.
Ignoring Contact Corrosion Dirty contacts create resistance, reducing battery efficiency even with fresh batteries.
Not Testing Immediately Always test your remote right after battery replacement to confirm success before closing everything up.
How Often Should You Replace Chamberlain Remote Batteries?
While manufacturers claim 2-3 year battery life, real-world usage varies significantly:
- Heavy use (multiple times daily): 12-18 months
- Moderate use (2-3 times daily): 18-24 months
- Light use (occasional): 24-36 months
Signs it’s time to replace your battery:
- Decreased operating range
- Need to press buttons multiple times
- Intermittent response
- Complete failure to operate
Consider keeping spare batteries on hand to avoid being stranded when your remote dies unexpectedly.
Troubleshooting: Remote Still Doesn’t Work After Battery Change
If your Chamberlain remote remains unresponsive after installing a new battery, try these solutions:
- Verify battery orientation – Double-check the positive side is up
- Test with another battery – Rule out defective new batteries
- Reprogram the remote – Follow your opener’s manual for reset instructions
- Check the garage door opener – Ensure it has power and isn’t malfunctioning
- Look for interference – LED bulbs and wireless devices can disrupt signals
For more information about radio frequency interference affecting garage door openers, visit Wikipedia’s article on electromagnetic interference.
Frequently Asked Questions
Q: Can I use a rechargeable battery in my Chamberlain remote?
A: While technically possible, rechargeable coin cells typically provide only 2.8-3.0 volts compared to 3.0-3.3 volts for standard lithium batteries. This lower voltage may cause reduced range or unreliable operation. Standard disposable CR2032 batteries are recommended for optimal performance.
Q: How do I know if my Chamberlain remote needs reprogramming after battery change?
A: Most Chamberlain remotes retain their programming when you change batteries. However, if the remote doesn’t work after installing a new battery (and you’ve verified correct installation), reprogramming may be necessary. Consult your opener’s manual for specific reprogramming instructions, which typically involve pressing a “learn” button on the motor unit.
Q: Where can I buy replacement batteries for Chamberlain remotes?
A: CR2032 batteries are widely available at:
- Major retailers (Walmart, Target, Costco)
- Hardware stores (Home Depot, Lowe’s)
- Online (Amazon, eBay)
- Pharmacies and convenience stores
Expect to pay $2-5 for a single battery or $8-15 for multi-packs.
Q: Is it normal for my Chamberlain remote to have reduced range over time?
A: Yes, gradual range reduction is normal as batteries weaken. However, sudden range loss typically indicates other issues like interference, damaged antennas, or failing components in either the remote or opener unit.
Q: Can extreme temperatures affect Chamberlain remote battery life?
A: Absolutely. Lithium batteries perform poorly in extreme cold (below 0°F/-18°C) and degrade faster in extreme heat (above 120°F/49°C). If you live in areas with temperature extremes, consider keeping a spare remote indoors and replacing batteries more frequently.
Q: What should I do if my Chamberlain remote battery compartment is damaged?
A: Minor cracks can sometimes be repaired with strong adhesive. However, if clips are broken or the compartment won’t close securely, replacement is the safest option. Chamberlain offers replacement remotes, or you can purchase universal compatible models from various manufacturers.
Conclusion
Learning how to change battery in Chamberlain Clicker garage door opener is an essential skill that saves time, money, and frustration. With just a few minutes and a $3 battery, you can restore your remote to full functionality and maintain convenient access to your garage.
Remember to use quality CR2032 batteries, handle your remote carefully during the process, and test immediately after replacement. Keep spare batteries on hand, and don’t hesitate to reprogram your remote if necessary.
Found this guide helpful? Share it with friends and family who might struggle with their garage door remotes. Bookmark this page for future reference, and leave a comment below if you have additional tips or questions about Chamberlain garage door openers!
Leave a Reply