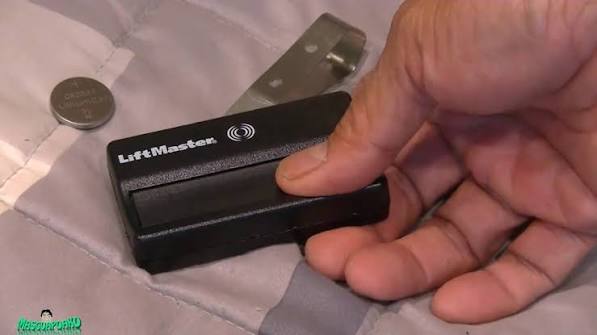
Is your Access Master garage door remote suddenly unresponsive? You’re not alone—thousands of homeowners face this frustrating issue every month. Learning how to change battery in Access Master garage door opener is a simple 5-minute task that can save you from calling a technician or buying a new remote. This comprehensive guide will walk you through everything you need to know.
Why Does Your Access Master Remote Need a New Battery?
Before diving into the replacement process, it’s helpful to understand why batteries die and when to replace them. Most Access Master garage door openers use standard coin-cell or AA batteries, depending on the model year. According to industry data, the average lifespan of a garage door remote battery ranges from 6 to 12 months with regular daily use.
Several factors affect battery life:
- Frequency of use: Multiple daily operations drain power faster
- Temperature extremes: Cold winters and hot summers reduce battery efficiency
- Battery quality: Premium brands last longer than generic alternatives
- Remote age: Older remotes may have worn contacts that increase power consumption
If you notice any of these warning signs, it’s time for a battery change:
- Weak or inconsistent signal range
- Delayed response when pressing buttons
- Complete failure to operate the door
- Dim or flickering LED indicator light
Tools and Materials You’ll Need
Gathering the right supplies before starting makes the process smoother and faster. Here’s what you’ll need:
| Item | Specification | Notes |
|---|---|---|
| Replacement Battery | CR2032 or AA (check your model) | Lithium batteries last longer |
| Small Phillips Screwdriver | #0 or #1 size | For models with screw compartments |
| Clean Cloth | Microfiber preferred | To clean battery contacts |
| Flashlight | LED recommended | For better visibility |
Pro Tip: Always check your remote’s battery compartment or user manual to confirm the exact battery type before purchasing. Using the wrong battery can damage your remote.
Step-by-Step: How to Change Battery in Access Master Garage Door Opener
Follow these detailed instructions to safely replace your remote’s battery. The entire process takes approximately 3-5 minutes.
Step 1: Locate the Battery Compartment
Most Access Master remotes have one of two battery compartment designs:
Slide-Open Design:
- Look for a small notch or groove on the back or side of the remote
- Use your thumbnail or a flat object to gently slide the cover off
- Apply even pressure to avoid cracking the plastic
Screw-Open Design:
- Identify one or two small screws on the back panel
- Use a Phillips screwdriver to carefully remove them
- Keep screws in a safe place—they’re easy to lose
Step 2: Remove the Old Battery
Once the compartment is open:
- Note the battery orientation (positive/negative sides)
- Gently lift or slide out the old battery
- Inspect the compartment for corrosion or debris
- If you see white or green residue, clean it with a dry cloth
Warning: Never use water or cleaning solutions inside the battery compartment, as moisture can damage electronic components.
Step 3: Insert the New Battery
Proper installation is crucial for optimal performance:
- Check the + and – markings inside the compartment
- Align the new battery according to these markings
- Press firmly until the battery sits flush
- Double-check orientation before closing
For CR2032 batteries, ensure the positive side (+) faces up. For AA batteries, follow the diagram printed inside the compartment.
Step 4: Close the Battery Compartment
- Slide-Open: Align the cover and slide it back until it clicks
- Screw-Open: Replace screws and tighten gently—don’t overtighten
Step 5: Test Your Remote
Stand within 10-15 feet of your garage door and press the button. The door should respond immediately. If it doesn’t:
- Recheck battery orientation
- Ensure the compartment is fully closed
- Try reprogramming the remote (see troubleshooting section below)
Common Mistakes to Avoid
Even experienced homeowners make errors when changing remote batteries. Here are the most frequent pitfalls:
Using the Wrong Battery Type Installing an incorrect voltage or size can permanently damage your remote. Always verify the required battery type in your owner’s manual or on the existing battery.
Incorrect Battery Orientation Reversing the positive and negative terminals prevents the remote from working. Take a photo of the old battery before removing it as a reference.
Overtightening Screws This can crack the plastic housing or strip the screw threads. Tighten just enough to secure the cover snugly.
Ignoring Corrosion Leaving corroded contacts reduces conductivity and shortens battery life. Always clean contacts with a dry cloth before installing a new battery.
Troubleshooting: What If It Still Doesn’t Work?
If your remote remains unresponsive after changing the battery, try these solutions:
Reprogram the Remote
Sometimes the remote loses its connection to the opener unit. To reprogram:
- Locate the “Learn” button on your garage door opener motor (usually on the back or side)
- Press and release the Learn button—the indicator light will blink
- Within 30 seconds, press and hold the button on your remote
- Release when the opener light blinks or you hear a click
- Test the remote again
For detailed programming instructions specific to your model, consult the Access Master official documentation.
Check the Garage Door Opener Unit
The problem might not be your remote:
- Verify the opener has power (check the outlet and circuit breaker)
- Look for error codes or blinking lights on the motor unit
- Ensure safety sensors are aligned and unobstructed
Try a Different Battery
Occasionally, new batteries are defective. Test with another fresh battery from a different package to rule out this possibility.
When to Replace vs. Repair Your Remote
Not every issue requires a new battery. Consider these factors:
| Situation | Recommended Action | Estimated Cost |
|---|---|---|
| Dead battery only | Replace battery | $2-$5 |
| Physical damage (cracks, broken buttons) | Replace remote | $20-$40 |
| Intermittent signal after battery change | Reprogram or replace | $0-$40 |
| Water damage | Replace remote | $20-$40 |
| Remote over 10 years old | Consider upgrade | $25-$50 |
According to home maintenance experts, if your remote is more than 8-10 years old, investing in a newer model with improved range and security features might be worthwhile. Modern remotes often include rolling code technology that provides better protection against unauthorized access.
Preventive Maintenance Tips
Extend your remote’s lifespan with these best practices:
- Store properly: Keep remotes away from extreme temperatures and moisture
- Use quality batteries: Brand-name lithium batteries last 30-50% longer
- Clean regularly: Wipe the exterior monthly with a dry cloth
- Avoid drops: Use a keychain clip to prevent falls
- Check annually: Inspect battery contacts every 6-12 months
Frequently Asked Questions
Q: What type of battery does an Access Master garage door opener use?
A: Most Access Master remotes use either a CR2032 coin-cell battery (for newer slim models) or two AA batteries (for older or larger remotes). Check your specific model’s manual or look at the existing battery to confirm. CR2032 batteries are 3-volt lithium cells widely available at hardware stores, pharmacies, and online retailers.
Q: How often should I change the battery in my garage door remote?
A: Under normal usage conditions, replace the battery every 6-12 months. If you use your garage door multiple times daily, consider checking the battery every 6 months. Signs that indicate immediate replacement include reduced range, delayed response, or complete failure to operate.
Q: Can I use a rechargeable battery in my Access Master remote?
A: While technically possible, rechargeable batteries are not recommended for garage door remotes. They typically provide lower voltage (1.2V vs. 1.5V for alkaline) and may not deliver consistent power. Additionally, rechargeable batteries self-discharge over time, which could leave you stranded if you haven’t used the remote recently. Stick with high-quality lithium or alkaline batteries for reliable performance.
Q: My remote works intermittently after changing the battery. What should I do?
A: Intermittent operation usually indicates one of three issues: incorrect battery orientation, dirty battery contacts, or the need for reprogramming. First, remove and reinstall the battery, ensuring proper orientation. Clean the contacts with a dry cloth. If problems persist, reprogram the remote following the steps outlined earlier. If none of these solutions work, the remote itself may be failing and require replacement.
Q: Is it safe to change the battery myself, or should I call a professional?
A: Changing a garage door remote battery is completely safe and requires no technical expertise. It’s one of the easiest DIY home maintenance tasks. However, if you’re uncomfortable working with small components or if your remote has a complex design, a professional handyman can complete the task in minutes for a minimal fee. That said, most homeowners find it straightforward and cost-effective to do it themselves.
Q: Will changing the battery erase my remote’s programming?
A: No, replacing the battery does not erase the remote’s programming. The memory chip that stores the access code is separate from the power source. However, if the battery was completely dead for an extended period, some older models might require reprogramming. Keep your opener’s programming instructions handy just in case.
Conclusion
Learning how to change battery in Access Master garage door opener empowers you to handle a common household issue quickly and affordably. With just a few minutes and a $3 battery, you can restore your remote’s functionality and avoid unnecessary service calls. Remember to use the correct battery type, install it with proper orientation, and test thoroughly before considering other solutions.
Regular maintenance and quality batteries will keep your Access Master remote performing reliably for years. Don’t wait until you’re locked out—check your remote’s battery every six months as part of your home maintenance routine.
Found this guide helpful? Share it with friends and family on social media! Bookmark this page for future reference, and leave a comment below if you have questions or additional tips to share with the community.
Leave a Reply