
Is your car packed with groceries, but the garage door refuses to open? It is incredibly frustrating when a simple dead battery ruins your day. Fortunately, learning how to change battery in remote garage door opener is a quick, five-minute fix that will get you back inside without calling an expensive technician.
How To Change Battery In Remote Garage Door Opener: What You Need
Before we dive into the actual replacement, you need to gather a few simple tools. Having everything ready ensures the process is smooth and stress-free.
Most garage door remotes do not require heavy machinery. You likely already have these items sitting in your kitchen junk drawer or toolbox.
Here is your quick checklist:
- A replacement battery: Check your current remote to confirm the exact size (more on this below).
- A small flathead screwdriver: Or a butter knife if you are in a pinch.
- A Phillips-head screwdriver: Specifically a #1 or #2 size, depending on your remote.
- A cotton swab and rubbing alcohol: For cleaning the battery contacts.
- A soft cloth: To wipe down the remote casing.
Pro tip: Take a quick photo of the inside of your remote with your smartphone before removing the old battery. This gives you a perfect visual reference for the battery orientation!
What Type of Battery Does a Garage Door Remote Use?
Using the wrong battery can damage your remote or simply fail to work. Most modern remotes use one of three common battery types.
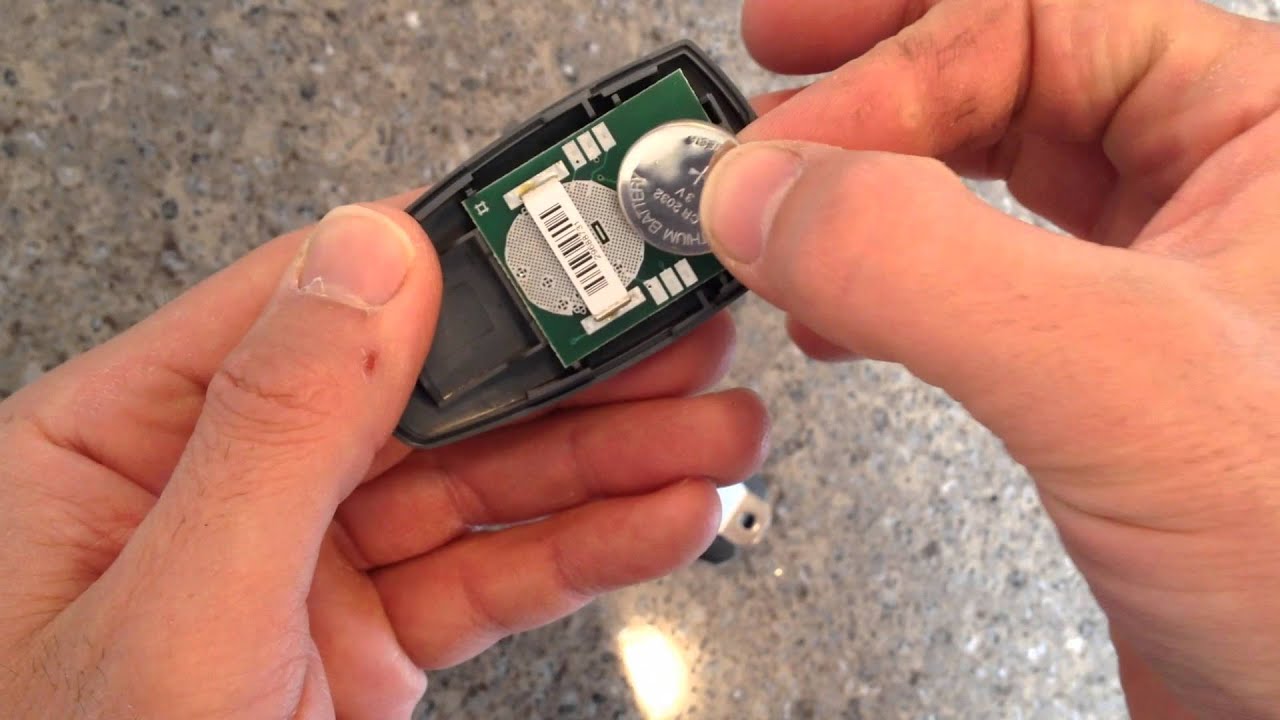
1. Lithium Coin Cell Batteries (CR2032 or CR2016) These are flat, round, 3-volt batteries. They are incredibly common in sleek, modern remotes from brands like Chamberlain and LiftMaster. They typically last 1 to 2 years.
2. Alkaline Cylindrical Batteries (12V 23AE or 27A) These look like tiny, skinny versions of standard AAA batteries. They are often found in older or universal remotes. They usually provide about 1 to 3 years of life.
3. Standard AAA Batteries Some newer keypad systems and specific remote models use standard 1.5-volt AAA batteries. These are the easiest to find at any local grocery store.
According to home improvement experts at the International Door Association (IDA), nearly 60% of perceived garage door failures stem from simple battery depletion. Keeping a spare pack of the correct battery in your kitchen drawer can save you from being locked out in the rain.
Step-by-Step: How To Change Battery In Remote Garage Door Opener
Now that you have your tools and the correct battery, let us get to work. Follow these concrete steps to replace the battery safely and effectively.
Step 1: Open the Remote Casing
Look closely at the seams of your remote. If you see a small slot, insert your flathead screwdriver and gently twist to pop the cover open. If there is no slot, look for a tiny screw on the back or under the battery cover. Use your Phillips-head screwdriver to remove it. Apply gentle pressure to avoid cracking the plastic.
Step 2: Remove the Old Battery
Once the casing is open, carefully lift the dead battery out. If it is a coin cell, it might be sitting in a small metal tray. Use a plastic spudger or your fingernail to pop it out. Avoid using metal tools to pry a coin cell, as this can cause a short circuit.
Step 3: Clean the Battery Contacts
This is a step most people skip, but it is crucial for a long-lasting connection. Dip a cotton swab in a small amount of rubbing alcohol. Gently rub the metal contacts inside the battery compartment. This removes any microscopic corrosion or dirt that might block the electrical flow. Let it dry for exactly 30 seconds.
Step 4: Insert the New Battery
Refer to the photo you took earlier! Place the new battery into the compartment. For coin cells, ensure the positive (+) side is facing up. For cylindrical batteries, match the positive end with the + symbol inside the plastic housing. Press it down firmly until it clicks into place.
Step 5: Reassemble and Test
Snap the plastic cover back together until you hear a secure click. If your remote has a screw, tighten it just enough to hold the case closed—do not over-tighten. Walk over to your garage door and press the button. The door should respond immediately.
Brand-Specific Tips for Opening Your Remote
Different manufacturers design their remotes differently. Here is how to open the most popular brands without breaking them.
- Chamberlain and LiftMaster: These usually have a visor clip on the back. Pop the clip off first. Underneath, you will often find a small screw. Remove it, then slide the front cover down to open it.
- Genie Intellicode: Many Genie remotes have a small notch at the bottom. Insert a flathead screwdriver into the notch and twist gently. The case will split right down the middle.
- Universal Remotes: These often feature a sliding battery door on the back, exactly like a TV remote. Simply slide it down to reveal the battery compartment.
DIY Battery Replacement vs. Buying a New Remote
Sometimes, a remote is too far gone to be saved. Here is a quick comparison to help you decide whether to replace the battery or just buy a brand-new remote.
| Feature | DIY Battery Replacement | Buying a New Remote |
|---|---|---|
| Cost | Extremely Low ($3 – $8) | Moderate ($25 – $50) |
| Time Required | 5 to 10 Minutes | 15 to 30 Minutes (includes programming) |
| Eco-Friendly | High (reduces plastic waste) | Low (adds to electronic waste) |
| Difficulty Level | Beginner | Intermediate (requires reprogramming) |
| Best For | Remotes in good physical condition | Remotes with broken buttons or casing |
Troubleshooting: What If the Remote Still Doesn’t Work?
You changed the battery, but the garage door still will not open. Do not panic! This is a common hurdle with a few simple solutions.
First, check the battery orientation one more time. It is incredibly easy to accidentally put a coin cell battery in upside down.
Next, check the garage door opener motor itself. Look at the wall button inside your garage. If the light on the motor is blinking, the system might be in “lock mode.” Simply press and hold the lock button for 3 seconds to deactivate it.
Finally, consider the technology. Modern garage door openers use rolling code technology for security. Sometimes, a complete power loss can desync the remote. If all else fails, you may need to press the “Learn” button on the motor unit and reprogram the remote from scratch.
Frequently Asked Questions (FAQ)
1. How often should I change the battery in my garage door remote?
You should proactively change the battery every 1 to 2 years. However, if you notice the remote only works when you are extremely close to the door, or if the LED light on the remote is dim, it is time for a replacement.
2. Can I use a different battery size if I cannot find the exact match?
No, you should never force a different battery size. Using a battery with the wrong voltage can leak acid and permanently destroy the remote’s internal circuit board. Always match the exact model number printed on the old battery.
3. Why is the little light on my garage door remote blinking?
A blinking light usually indicates one of two things. First, it could mean the battery is critically low and needs immediate replacement. Second, it could mean the remote is transmitting a signal but the motor unit is not receiving it, indicating a sync issue or a blocked sensor.
4. Do I need to reprogram the remote after changing the battery?
In 95% of cases, no. Changing the battery does not erase the remote’s memory. The remote should work instantly once the new battery is installed. You only need to reprogram it if you replaced the entire remote or reset the main motor unit.
5. What should I do if the battery terminals inside the remote are corroded?
If you see a white, crusty substance on the metal contacts, the old battery leaked. Dip a cotton swab in white vinegar or rubbing alcohol and scrub the contacts gently. Once clean and completely dry, insert the new battery. If the metal contacts are completely eaten away, you will need to buy a new remote.
Conclusion
Learning how to change battery in remote garage door opener is one of the easiest and most rewarding home maintenance tasks you can master. By spending just five minutes and a few dollars, you restore convenience to your daily routine and avoid unnecessary service calls.
Remember to keep a spare battery in your house, check for corrosion, and always match the correct voltage. Your garage door will thank you!
Did this guide save your day? Please share this article on your Facebook, Twitter, or Pinterest to help your friends and family fix their garage remotes just as easily!
Leave a Reply