Is your Chamberlain garage door opener failing to work during power outages? You’re not alone—millions of homeowners face this frustrating issue when their backup battery dies unexpectedly. Learning how to change backup battery in Chamberlain garage door opener is essential for maintaining security and convenience, especially in areas prone to electrical disruptions.
Why Your Chamberlain Backup Battery Matters
Before diving into the replacement process, it’s crucial to understand why this component is vital for your home’s security system. The backup battery serves as your garage door’s lifeline during power failures, ensuring you can still access your vehicle and home even when the electricity goes out.
According to the Federal Emergency Management Agency (FEMA), power outages affect approximately 36 million Americans annually, with some lasting several days. Without a functioning backup battery, you could find yourself locked out of your garage during these critical moments.
The typical lifespan of a Chamberlain backup battery ranges from 3 to 5 years, depending on usage frequency and environmental conditions. However, extreme temperatures, frequent power fluctuations, and heavy daily use can significantly reduce this timeframe.
Signs Your Backup Battery Needs Replacement
Recognizing when your backup battery is failing can prevent unexpected inconveniences. Here are the most common indicators:
- Garage door doesn’t respond during power outages
- Warning beeps from your opener unit (usually every 30-60 seconds)
- Dim or flashing LED lights on the control panel
- Reduced operating range for remote controls
- Slow door movement even with power restored
Pro Tip: Most Chamberlain models feature a battery status indicator light. A solid green light means the battery is healthy, while amber or red signals indicate replacement is needed.
Tools and Materials You’ll Need
Gathering the right tools before starting ensures a smooth replacement process:
| Item | Purpose | Notes |
|---|---|---|
| New Chamberlain backup battery | Replacement unit | Model-specific compatibility required |
| Phillips head screwdriver | Remove battery compartment cover | Standard size #2 recommended |
| Safety glasses | Eye protection | Optional but recommended |
| Clean cloth | Wipe battery terminals | Prevents corrosion buildup |
| Multimeter (optional) | Test old battery voltage | Confirms battery failure |
Important: Always purchase genuine Chamberlain batteries or certified compatible replacements. Third-party batteries may void your warranty and pose safety risks.
Step-by-Step Guide: How to Change Backup Battery in Chamberlain Garage Door Opener
Step 1: Ensure Safety First
Before beginning any maintenance work, prioritize your safety:
- Disconnect the power source by unplugging the garage door opener from the electrical outlet
- Close the garage door completely to prevent accidental movement
- Wear safety glasses to protect your eyes from debris
- Work in a well-lit area for better visibility
Warning: Never attempt battery replacement while the unit is connected to power. This could result in electrical shock or damage to the opener’s circuitry.
Step 2: Locate the Battery Compartment
The battery compartment location varies by Chamberlain model:
- Wall-mounted units: Typically found on the side or bottom of the motor housing
- Ceiling-mounted openers: Usually accessible from underneath the unit
- Newer Wi-Fi enabled models: Often feature a dedicated battery bay near the control panel
Consult your owner’s manual for specific compartment locations. If you’ve misplaced the manual, Chamberlain provides digital copies on their official website based on your model number.
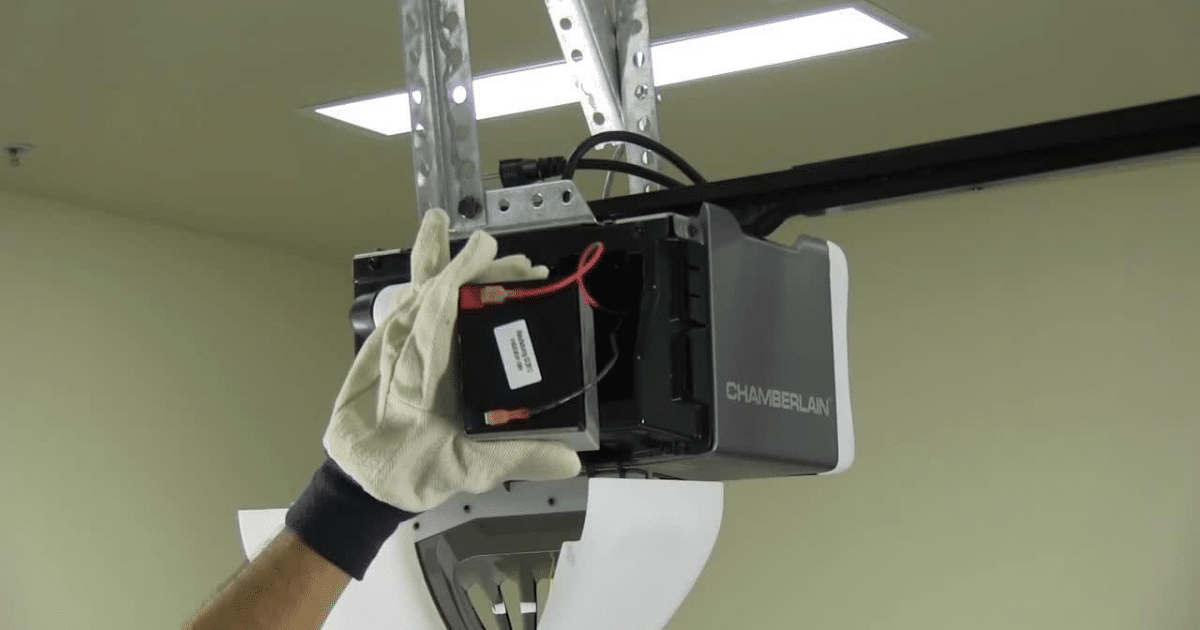
Step 3: Remove the Old Battery
Follow these precise steps to safely remove the depleted battery:
- Unscrew the battery compartment cover using your Phillips head screwdriver
- Note the battery orientation (positive and negative terminal positions)
- Disconnect the battery terminals carefully—red wire first, then black
- Remove the old battery from its housing
- Inspect the compartment for corrosion or damage
Expert Insight: According to garage door technician Mike Richardson with 15 years of experience, “Corrosion on battery terminals is the second most common cause of backup system failure. Regular cleaning extends battery life by up to 40%.”
Step 4: Prepare the New Battery
Before installing the new battery:
- Check the expiration date on the battery packaging
- Verify compatibility with your specific Chamberlain model
- Clean the battery terminals in the compartment using a clean cloth
- Ensure the new battery matches the voltage specifications (typically 12V DC)
Step 5: Install the New Battery
Installation requires careful attention to detail:
- Place the new battery in the correct orientation
- Connect the red wire to the positive (+) terminal first
- Connect the black wire to the negative (-) terminal
- Secure all connections firmly but don’t overtighten
- Replace the compartment cover and tighten screws evenly
Step 6: Test the System
After installation, verify everything works correctly:
- Reconnect the power source by plugging in the opener
- Wait 24-48 hours for the battery to fully charge
- Test the backup function by temporarily disconnecting power
- Operate the garage door using both wall button and remote
- Check indicator lights for proper status confirmation
For detailed technical specifications about garage door opener systems, you can reference Wikipedia’s comprehensive article on garage door openers.
Common Mistakes to Avoid
Even experienced DIYers make errors during battery replacement. Here’s what to watch out for:
❌ Incorrect Battery Type: Using incompatible batteries can damage your opener or create safety hazards.
❌ Reversed Polarity: Connecting wires to wrong terminals can cause immediate battery failure or circuit damage.
❌ Loose Connections: Poorly secured terminals lead to intermittent operation and premature battery drain.
❌ Skipping the Charging Period: New batteries require 24-48 hours to reach optimal performance levels.
❌ Ignoring Warning Signs: Addressing minor issues early prevents costly repairs later.
Maintenance Tips for Extended Battery Life
Maximize your investment with these proven maintenance strategies:
Regular Testing Schedule
- Monthly: Test backup function during non-critical times
- Quarterly: Inspect battery terminals for corrosion
- Annually: Professional inspection recommended
Environmental Considerations
- Maintain garage temperature between 50-80°F when possible
- Ensure adequate ventilation around the opener unit
- Keep the area clean and dry to prevent moisture damage
Usage Optimization
- Limit unnecessary door operations during power outages
- Use manual release only when absolutely necessary
- Monitor battery performance through smartphone apps (Wi-Fi enabled models)
When to Call a Professional
While most homeowners can successfully replace their backup battery, certain situations require professional assistance:
- Complex wiring issues beyond simple battery replacement
- Persistent problems after battery installation
- Physical damage to the opener unit or battery compartment
- Warranty concerns that might be voided by DIY repairs
- Safety uncertainties or lack of confidence in performing the task
Professional installation typically costs $75-150, including labor and parts. Many Chamberlain dealers offer free battery testing and consultation services.
FAQ Section
How often should I replace my Chamberlain backup battery?
Most Chamberlain backup batteries last 3-5 years under normal conditions. However, factors like extreme temperatures, frequent power outages, and heavy usage can reduce this lifespan. We recommend testing your battery every six months and replacing it proactively at the 3-year mark to avoid unexpected failures.
Can I use any 12V battery for my Chamberlain opener?
No, you should not use just any 12V battery. Chamberlain garage door openers require specific battery types designed for their systems. Using incompatible batteries can void your warranty, cause operational issues, or create safety hazards. Always use genuine Chamberlain batteries or manufacturer-approved alternatives that match your specific model requirements.
What should I do if my new backup battery doesn’t work?
If your new battery isn’t functioning properly, first verify that it’s been installed correctly with proper polarity. Check that all connections are secure and the battery has had adequate charging time (24-48 hours). If problems persist, test the battery voltage with a multimeter—it should read approximately 12.6V when fully charged. Contact Chamberlain customer support if issues continue, as you may have received a defective unit.
Is it safe to replace the backup battery myself?
Yes, replacing the backup battery is generally safe for homeowners who follow proper safety procedures. Always disconnect power before beginning work, wear safety glasses, and follow the manufacturer’s instructions carefully. If you’re uncomfortable with electrical components or encounter unexpected complications, don’t hesitate to call a professional technician.
How much does a Chamberlain backup battery cost?
Chamberlain backup batteries typically range from $30-60, depending on the model and capacity. Premium models with extended runtime capabilities may cost slightly more. While generic alternatives might seem cheaper, genuine Chamberlain batteries offer better reliability, longer lifespan, and warranty protection that often makes them more cost-effective long-term.
Will replacing the battery reset my garage door opener settings?
No, replacing the backup battery will not reset your opener’s programming. Your remote controls, keypad codes, and other settings remain intact during battery replacement. However, if you disconnect the main power source for an extended period, you might need to reprogram certain features. Always refer to your owner’s manual for model-specific information about memory retention.
Conclusion
Learning how to change backup battery in Chamberlain garage door opener is a valuable skill that ensures your home remains accessible and secure during power outages. By following this comprehensive guide, you can confidently perform this essential maintenance task and avoid the frustration of being locked out when you need garage access most.
Remember, regular maintenance and proactive battery replacement are far more cost-effective than emergency repairs or professional service calls. With proper care, your Chamberlain garage door opener will provide reliable service for years to come.
Found this guide helpful? Share it with friends and family on social media to help them stay prepared for power outages too! Don’t forget to bookmark this page for future reference, and consider setting a calendar reminder to test your backup battery every six months.
Your garage door’s reliability depends on small maintenance tasks like this one. Take action today, and enjoy peace of mind knowing you’re prepared for whatever tomorrow brings.
Leave a Reply