Introduction
Is your garage door remote suddenly acting sluggish, or does it fail to open the door when you need it most? You are not alone, and learning how to change a battery on a garage door opener is a quick, five-minute fix that can save you from being locked out in the rain or cold. Let us walk through this simple, stress-free process together so you can get back to your daily routine without any hassle.
What Type of Battery Does a Garage Door Opener Remote Use?
Before you begin, it is crucial to identify the correct battery type. Most modern garage door remotes (from brands like LiftMaster, Chamberlain, and Genie) use 3-Volt Lithium Coin Cell batteries. The most common models are:
- CR2032 (Most popular, 3V, 20mm diameter)
- CR2025 (Slightly thinner, 3V)
- CR2016 (Even thinner, often used in older or slimmer remotes)
However, some older or heavy-duty remotes may require a 12V A23 alkaline battery. Always check the inside of the battery compartment or your owner’s manual before purchasing a replacement. Buying the wrong battery is the number one reason for DIY frustration, so a quick visual check saves time and money.
Tools You Will Need Before You Start
Gathering your tools beforehand ensures a smooth, uninterrupted process. You will only need a few basic household items:
- Replacement battery (CR2032, CR2025, or A23, as identified).
- Small flathead screwdriver or a standard coin (like a dime or quarter).
- Microfiber cloth (to clean any dust or corrosion from the battery contacts).
- Step ladder (only required if you are replacing the backup battery inside the main motor unit).
Pro Tip: Keep a spare battery in your kitchen drawer. According to the International Door Association (IDA), proactive maintenance, including having spare remote batteries on hand, prevents over 30% of minor, avoidable garage door service calls.
Step-by-Step: How To Change A Battery On A Garage Door Opener
Follow these precise, beginner-friendly steps to safely replace your remote’s battery.
Step 1: Locate the Battery Compartment
Turn your remote over. Most modern remotes have a sliding back cover or a small seam along the side. Look for a tiny indentation or a battery icon indicating where to apply pressure.
Step 2: Open the Compartment Safely
Insert your small flathead screwdriver or coin into the indentation. Apply gentle, steady pressure of about 1–2 pounds and slide the cover off at a 45-degree angle. Avoid using excessive force, as the plastic clips can snap if pried too aggressively.
Step 3: Remove the Old Battery
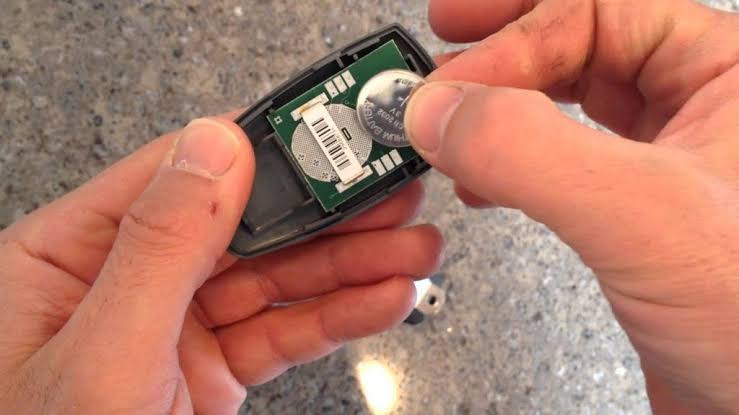
Carefully note the orientation of the old battery. The positive (+) side almost always faces upward. Gently push the battery from the side or use a non-metallic tool to pop it out.
Step 4: Clean the Contacts
Before inserting the new battery, wipe the metal contact points inside the compartment with your microfiber cloth. If you see any white, powdery corrosion, lightly dab it with a cotton swab dipped in a tiny amount of rubbing alcohol. Let it dry completely.
Step 5: Insert the New Battery
Place the new battery into the slot, ensuring the positive (+) side faces up, matching the diagram inside the compartment. Press down firmly until you hear a soft click, securing it in place.
Step 6: Test the Remote
Slide the cover back on until it snaps securely. Stand approximately 10–15 feet away from your garage door and press the button. The door should activate immediately. If it does not, double-check the battery orientation and ensure the battery tab (if present) was fully removed.
Note on Main Unit Backup Batteries:
If you have a modern smart opener (e.g., LiftMaster with Wi-Fi), it may have a 12V 4.5Ah or 7Ah Sealed Lead-Acid (SLA) backup battery inside the main motor housing. To change this:
- Unplug the main unit from the wall outlet.
- Remove the 2–4 screws holding the light cover.
- Disconnect the red (positive) wire first, then the black (negative) wire to prevent short circuits.
- Swap the battery, reconnect black first, then red, and replace the cover.
Battery Comparison: Lithium vs. Alkaline for Garage Remotes
Choosing the right chemistry matters for longevity and reliability. Here is a quick comparison to help you decide:
| Feature | Lithium Coin Cell (e.g., CR2032) | Alkaline (e.g., 12V A23) |
|---|---|---|
| Lifespan | 3–5 years under normal use | 1–2 years under normal use |
| Temperature Resistance | Excellent (performs well in -4°F to 140°F) | Poor (voltage drops in extreme cold) |
| Weight | Very lightweight (3 grams) | Heavier (10+ grams) |
| Best For | Modern, compact remotes | Older, larger “clicker” remotes |
| Verdict | Highly Recommended for reliability | Acceptable, but requires frequent checks |
Source Insight: Understanding the basic electromechanical design of a garage door opener highlights why consistent voltage delivery (like that from lithium batteries) is critical for maintaining a strong radio frequency (RF) signal to the motor unit.
Pro Tips to Extend Your Garage Door Remote Battery Life
Maximize the lifespan of your new battery with these simple, actionable habits:
- Avoid Extreme Heat: Do not leave your remote on the dashboard of your car. Temperatures exceeding 120°F (49°C) can degrade lithium battery chemistry rapidly.
- Stop “Mash-Clicking”: Press the button once firmly. Repeatedly pressing it when the door is already moving drains unnecessary power and wears out the internal microswitch.
- Annual Check-Up: Make it a habit to check your remote’s battery every time you change your smoke detector batteries (e.g., during Daylight Saving Time transitions).
- Use a Keychain Holder: If your remote lacks a sturdy clip, use a silicone keychain sleeve to prevent accidental button presses inside your pocket or bag.
Frequently Asked Questions (FAQ)
Q1: How do I know if my garage door opener battery is dead?
A: The most common signs include a significantly reduced operating range (you have to stand very close to the door), a dim or non-existent LED light on the remote when pressed, or the door only working intermittently.
Q2: Can I use a different battery brand for my garage remote?
A: Yes. Reputable third-party brands (like Energizer, Duracell, or Panasonic) are perfectly safe and often perform just as well as OEM (Original Equipment Manufacturer) batteries, provided the model number (e.g., CR2032) matches exactly.
Q3: How often should I change the battery in my garage door opener?
A: For standard 3V lithium coin cells, expect a lifespan of 3 to 5 years. For 12V A23 alkaline batteries, plan to replace them every 1 to 2 years, or sooner if you use the remote multiple times a day.
Q4: What do I do if the garage door still does not work after changing the battery?
A: First, verify the battery is inserted with the correct polarity (+ side up). Next, check if the remote needs to be reprogrammed to the motor unit. If that fails, the issue may be with the motor unit’s power supply, safety sensors, or a broken internal wire in the remote.
Q5: Is it safe to change the backup battery in the main garage door motor unit myself?
A: Yes, it is generally safe for a DIYer, provided you unplug the unit from the wall first to eliminate any risk of electric shock. Always disconnect the red (positive) wire first and reconnect it last to prevent accidental short circuits.
Conclusion
Knowing how to change a battery on a garage door opener is a simple, empowering skill that saves you time, money, and the frustration of unexpected lockouts. By using the right battery type, following a careful step-by-step process, and adopting a few proactive maintenance habits, you can ensure your garage door operates smoothly for years to come.
Did you find this guide helpful? Share this article on Facebook, X (Twitter), or Pinterest to help your friends and family avoid garage door emergencies! If you have any questions or specific remote models you need help with, leave a comment below—we are here to help.
Leave a Reply