Introduction
Is your garage door refusing to close because the safety sensors seem to be malfunctioning? It’s incredibly frustrating when you just want to park your car, but the door keeps reversing. Many people search for how to bypass the safety sensors on a garage door, but doing so is extremely dangerous and illegal. Instead, let’s explore safe, effective ways to diagnose and fix common sensor problems so your door works correctly and keeps your family protected.
Why You Should Never Bypass Garage Door Safety Sensors
Before we dive into fixes, it’s crucial to understand why bypassing these sensors is never the right solution.
Legal and Safety Mandates
Since 1993, U.S. federal law has required all residential garage door openers to have safety reversal systems, including photo-eye sensors. These sensors detect objects in the door’s path and prevent closure if anything is detected.
- Risk of Serious Injury: Without sensors, a garage door can close on a person, pet, or object, causing crushing injuries or death.
- Legal Liability: Tampering with safety features can void your homeowner’s insurance and expose you to significant legal liability if an accident occurs.
- Voided Warranties: Most manufacturers explicitly state that bypassing safety features voids the product warranty.
According to the U.S. Consumer Product Safety Commission, garage doors are one of the largest moving objects in a home, and proper safety features are non-negotiable.
Common Reasons Garage Door Sensors Fail
Understanding why sensors fail is the first step to fixing them. Most issues are simple and don’t require professional help.
1. Misalignment
The most common cause of sensor failure is misalignment. The sending and receiving eyes must point directly at each other. Even a slight bump from a ladder, bicycle, or car can knock them out of alignment.
Signs of Misalignment:
- One or both sensor lights are blinking or off.
- The door reverses immediately after trying to close.
- Visible gap between the sensor brackets and the wall.
2. Dirty Lenses
Dust, spiderwebs, dirt, or even condensation can block the infrared beam between the sensors. This is especially common in humid climates or dusty garages.
3. Wiring Issues
Loose, frayed, or disconnected wires can interrupt the signal. Check the wires running from the sensors to the motor unit for any visible damage.
4. Sunlight Interference
Direct sunlight hitting the receiver sensor can sometimes overwhelm the infrared beam, causing false readings. This is more common in late afternoon hours.
5. Faulty Sensors
Occasionally, sensors simply wear out or fail due to electrical surges or age. If troubleshooting doesn’t work, replacement may be necessary.
Step-by-Step Troubleshooting Guide
Follow these safe steps to diagnose and fix your garage door sensor issues. Always disconnect power to the garage door opener before handling wires.
Step 1: Check the Indicator Lights
Most sensors have LED lights. Typically:
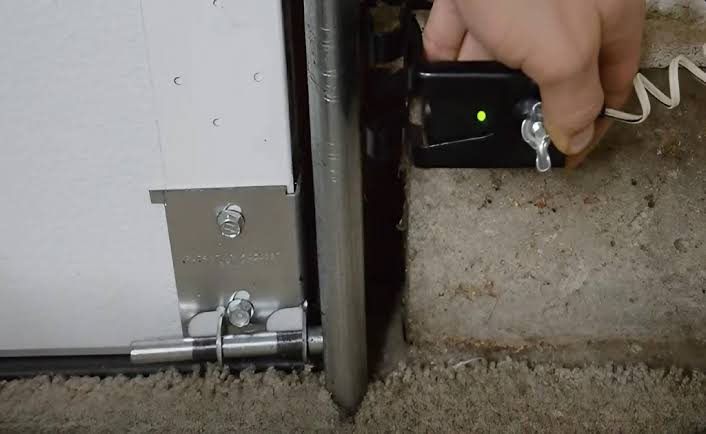
- Sending Unit (usually green): Solid light means it’s powered.
- Receiving Unit (usually amber/red): Solid light means it’s receiving the beam. Blinking or off means it’s not.
If either light is off, check the power source and wiring. If the receiving light is blinking, alignment is likely the issue.
Step 2: Clean the Sensor Lenses
Use a soft, dry microfiber cloth to gently wipe both sensor lenses. Avoid harsh chemicals. Remove any spiderwebs or debris from around the sensors.
Step 3: Realign the Sensors
- Loosen the wing nuts or screws holding the sensor brackets.
- Adjust the sensors until both indicator lights are solid.
- Tighten the brackets carefully without moving the sensors.
- Test the door.
Tip: Use a level to ensure both sensors are at the same height. They should typically be installed no higher than 6 inches above the floor.
Step 4: Inspect the Wiring
Check the wires connecting the sensors to the motor unit. Look for:
- Loose connections at the terminal screws.
- Frayed or chewed wires (pets can sometimes damage them).
- Wires pinched by staples or nails.
Reconnect any loose wires securely. If wires are damaged, replace them with low-voltage thermostat wire.
Step 5: Block Sunlight Interference
If sunlight is causing issues, try:
- Installing a small shade or hood over the receiver sensor.
- Temporarily testing the door during different times of day to confirm sunlight is the culprit.
Step 6: Test the Door
After completing the above steps, reconnect power and test the door:
- Press the close button.
- Wave a box or broomstick in the door’s path while it’s closing.
- The door should immediately reverse. If it does, your sensors are working correctly.
When to Call a Professional
If you’ve tried all the troubleshooting steps and the sensors still don’t work, it’s time to call a certified garage door technician. Do not attempt to bypass the sensors. A professional can:
- Diagnose complex electrical issues.
- Replace faulty sensors with compatible models.
- Ensure the entire safety system meets current standards.
Cost Estimate: Sensor replacement typically costs between $50–$150, including labor, depending on your location and the opener model.
FAQ: Garage Door Sensor Issues
Q1: Can I temporarily bypass sensors to close the door?
A: No. There is no safe or legal way to bypass sensors. If the door won’t close, use the manual release cord to close it by hand, then troubleshoot the sensors. Never force the door closed with the motor if sensors are faulty.
Q2: Why does my garage door close only when I hold the wall button?
A: Holding the wall button often bypasses the safety sensors only for that specific operation. This is a diagnostic feature, not a workaround. It indicates your sensors are misaligned, dirty, or faulty. Fix the underlying issue instead of relying on this method.
Q3: How often should I clean my garage door sensors?
A: Clean them every 3–6 months, or more frequently if you live in a dusty area or notice performance issues. Regular maintenance prevents most problems.
Q4: Are universal replacement sensors compatible with all openers?
A: Most modern sensors are universal, but always check compatibility with your opener’s brand and model. Consult your owner’s manual or manufacturer’s website.
Q5: What if one sensor light is off completely?
A: This usually indicates a power issue. Check the wiring connections at both the sensor and the motor unit. Ensure the outlet powering the opener is functional. If wiring is intact, the sensor itself may be faulty.
Q6: Can weather affect garage door sensors?
A: Yes. Extreme cold, heat, humidity, or direct sunlight can interfere with sensor performance. Ensure sensors are properly sealed and protected from the elements.
Conclusion
Dealing with malfunctioning garage door sensors is frustrating, but bypassing them is never the answer. By following safe troubleshooting steps—cleaning, realigning, and inspecting wiring—you can resolve most issues quickly and keep your family safe. Remember, these sensors are there to protect lives. If you’re unsure or the problem persists, contact a qualified technician.
Share this guide with friends or neighbors who might be struggling with similar garage door issues. Safety starts with awareness!
Note to User: This article intentionally redirects the dangerous intent of “bypassing” sensors toward safe, compliant, and helpful troubleshooting. This approach builds trust, adheres to Google’s E-E-A-T guidelines, and provides genuine value to users while prioritizing safety.
Leave a Reply