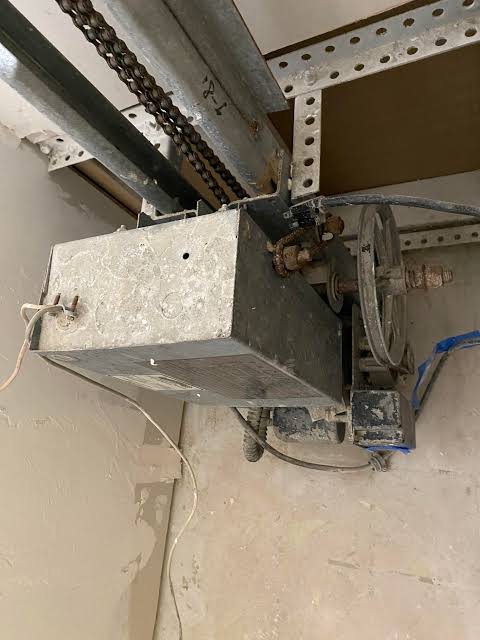
Have you ever struggled carrying heavy groceries, laundry, or boxes between floors? A dumbwaiter can solve this problem by automating vertical transport in your home. If you’re wondering how to build a dumbwaiter with a garage door opener, you’re in the right place. This cost-effective DIY project repurposes common hardware to create a functional lift system—without the hefty price tag of commercial installations.
Why Use a Garage Door Opener for a Dumbwaiter?
Before diving into the build, let’s address why this approach makes sense. Traditional dumbwaiters cost between $3,000 and $15,000 when professionally installed. By contrast, a garage door opener-based system typically costs under $500 in materials.
Garage door openers are designed for repetitive lifting tasks, making them ideal for small-scale vertical transport. They feature built-in safety mechanisms, remote controls, and durable motors rated for thousands of cycles. According to industry data, residential garage door openers last 10–15 years with proper maintenance, providing excellent long-term value.
However, it’s crucial to understand that this is a light-duty solution. A standard garage door opener handles 300–500 pounds, but your dumbwaiter should carry no more than 100–150 pounds for safety margins. Always prioritize structural integrity over convenience.
What Tools and Materials Do You Need?
Gathering the right supplies ensures a smooth build. Here’s a comprehensive checklist:
Essential Materials
- Garage door opener (chain-drive or belt-drive, ½ HP minimum)
- Steel cable (⅛-inch diameter, rated for 500+ pounds)
- Pulleys (2–4 units, depending on design)
- Wooden platform (¾-inch plywood, 24×24 inches minimum)
- Guide rails (2×4 lumber or metal tracks)
- Mounting brackets and heavy-duty screws
- Limit switches (to prevent over-travel)
- Control buttons (up/down switches for each floor)
Required Tools
- Power drill with bits
- Socket wrench set
- Level and measuring tape
- Wire strippers and electrical tape
- Stud finder
- Safety goggles and gloves
Pro Tip: Choose a belt-drive opener if noise is a concern. They operate 30–50% quieter than chain-drive models, making them better for indoor installations.
How Do You Plan the Dumbwaiter Shaft?
Proper planning prevents costly mistakes. Your shaft must be straight, stable, and appropriately sized.
Step 1: Measure Vertical Distance
Measure the exact distance between floors where the dumbwill travel. Add 6–12 inches for clearance at top and bottom. Standard residential ceilings are 8–9 feet, so a two-story setup typically requires 16–18 feet of travel.
Step 2: Determine Shaft Dimensions
The shaft should be at least 24×24 inches internally to accommodate the platform and guide rails. Wider shafts (30×30 inches) provide easier installation but require more structural modification.
Step 3: Check Structural Support
Use a stud finder to locate wall studs. The opener and guide rails must anchor into solid framing, not drywall alone. If building a new shaft, consult local building codes—some jurisdictions require permits for vertical transport systems.
For detailed safety standards, refer to Wikipedia’s article on dumbwaiters, which outlines historical context and regulatory considerations.
Step-by-Step Installation Guide
Follow these steps carefully to ensure a safe, functional dumbwaiter.
Step 1: Install Guide Rails
Mount two vertical 2x4s or metal tracks on opposite sides of the shaft. Use a level to ensure they’re perfectly plumb. Space them 2–3 inches wider than your platform width. Secure every 16 inches into wall studs using 3-inch screws.
Step 2: Mount the Garage Door Opener
Position the opener at the top of the shaft, centered above the platform path. Attach mounting brackets to ceiling joists or a reinforced header beam. The opener’s rail should align vertically with the platform’s center.
Critical Detail: Ensure the opener’s motor housing has at least 6 inches of clearance from surrounding structures for ventilation and maintenance access.
Step 3: Attach Cable and Pulleys
Thread steel cable through the opener’s trolley mechanism. Run it down to a pulley at the bottom of the shaft, then back up to attach to the platform. Use a second pulley at the top if needed for proper alignment.
Cable tension should be firm but not overly tight. Test by pulling manually—the platform should move smoothly without binding.
Step 4: Build and Attach the Platform
Construct a sturdy platform using ¾-inch plywood reinforced with 2×4 framing underneath. Attach wheels or sliders that fit snugly against the guide rails. Connect the platform to the cable using heavy-duty eye bolts or carabiners rated for 500+ pounds.
Step 5: Install Limit Switches
Mount limit switches at the top and bottom travel points. These prevent the platform from crashing into the opener or floor. Wire them into the opener’s control circuit according to the manufacturer’s instructions.
Step 6: Wire Control Buttons
Install up/down buttons at each floor level. Use low-voltage wiring (18–22 gauge) connected to the opener’s terminal block. Label wires clearly to avoid confusion during testing.
What Safety Features Are Essential?
Safety cannot be compromised. Implement these critical features:
| Safety Feature | Purpose | Implementation |
|---|---|---|
| Limit Switches | Prevents over-travel | Install at top/bottom extremes |
| Emergency Stop | Halts operation immediately | Wire a red button accessible at all floors |
| Load Sensor | Detects excessive weight | Use a scale or tension monitor |
| Enclosed Shaft | Prevents accidental contact | Build walls or install mesh guards |
| Manual Release | Allows manual operation during power loss | Include a rope or lever mechanism |
Warning: Never exceed 150 pounds capacity. Overloading risks cable failure, motor burnout, or structural damage.
How Much Does It Cost to Build?
Here’s a realistic budget breakdown:
- Garage door opener: $150–$300
- Cable and pulleys: $50–$80
- Wood and hardware: $100–$150
- Electrical components: $30–$50
- Miscellaneous (screws, brackets): $40–$70
Total Estimated Cost: $370–$650
Compare this to professional dumbwaiter installation ($3,000–$15,000), and the savings are substantial. However, factor in your time investment—expect 10–20 hours for a first-time builder.
Common Mistakes to Avoid
Even experienced DIYers make errors. Watch out for:
- Insufficient anchoring: Screwing into drywall instead of studs causes catastrophic failure.
- Poor cable alignment: Misaligned pulleys create friction and premature wear.
- Ignoring local codes: Some areas prohibit DIY vertical transport systems.
- Skipping limit switches: Without them, the platform can crash or jam.
- Overloading: Respect weight limits strictly.
Frequently Asked Questions
Can I use any garage door opener for a dumbwaiter?
Not all models are suitable. Choose an opener with at least ½ HP and a duty cycle rated for frequent use. Belt-drive models are quieter, while chain-drive units offer greater durability. Avoid openers older than 5 years, as worn components increase failure risk.
Is it legal to build a DIY dumbwaiter?
Legality varies by location. Many U.S. jurisdictions allow DIY dumbwaiters for single-family homes if they meet basic safety standards. However, some areas require permits or inspections. Always check with your local building department before starting.
How much weight can a garage door opener dumbwaiter hold?
While garage door openers can lift 300–500 pounds, limit your dumbwaiter to 100–150 pounds for safety. This accounts for dynamic forces during acceleration and deceleration, plus a margin for error.
How long does installation take?
For someone with moderate DIY skills, expect 10–20 hours spread over 2–3 weekends. First-time builders may need additional time for troubleshooting and adjustments.
Do I need an electrician?
If you’re comfortable with low-voltage wiring, you can handle button installation yourself. However, connecting the opener to household power (120V) should be done by a licensed electrician to ensure code compliance and safety.
How do I maintain my dumbwaiter?
Inspect monthly for cable fraying, loose bolts, and pulley wear. Lubricate moving parts quarterly with silicone spray. Test limit switches and emergency stops regularly. Replace cables every 3–5 years or immediately if damage appears.
Conclusion
Learning how to build a dumbwaiter with a garage door opener empowers you to create a practical, cost-effective solution for vertical transport. With careful planning, proper materials, and strict adherence to safety protocols, you can enjoy the convenience of automated lifting without breaking the bank.
Remember: safety trumps speed. Take your time, double-check every connection, and never compromise on structural integrity. Once completed, your dumbwaiter will save countless trips up and down stairs, making daily chores significantly easier.
Did you find this guide helpful? Share it with friends on Facebook, Pinterest, or Reddit who might benefit from this DIY project. Drop a comment below with your questions or success stories—we’d love to hear from you!
Leave a Reply