Introduction
Is your Chamberlain garage door stopping too soon or hitting the floor with a loud bang? You’re not alone—thousands of homeowners face this frustrating issue every year. Knowing how to adjust the travel on a Chamberlain garage door can save you time, money, and unnecessary stress. In this comprehensive guide, we’ll walk you through the exact steps to calibrate your door’s open and close limits, ensuring smooth and safe operation every time.
Why Adjusting Travel Limits Matters
Before diving into the “how,” let’s understand the “why.” Travel limits determine how far your garage door opens upward and closes downward. If these settings are off, you risk:
- Damage to the door or opener motor from over-traveling
- Safety hazards if the door doesn’t close fully
- Inconvenience when the door stops short of fully opening
According to the Consumer Product Safety Commission (CPSC), improperly adjusted garage doors contribute to thousands of household accidents annually. Proper calibration isn’t just about convenience—it’s about safety.
Tools You’ll Need
Gather these items before starting:
- A sturdy ladder
- A screwdriver (usually Phillips-head)
- Your Chamberlain owner’s manual (if available)
- A helper (optional but recommended for safety)
Step-by-Step: How to Adjust Travel on a Chamberlain Garage Door
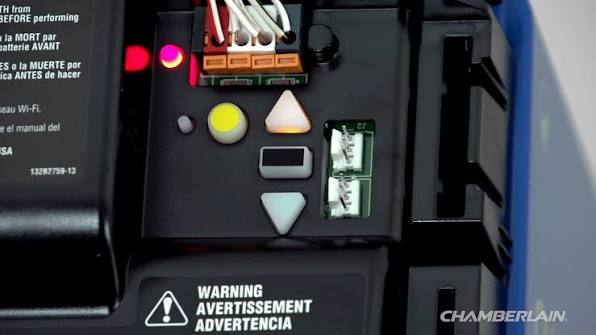
Step 1: Locate the Travel Limit Adjustment Screws
Most Chamberlain garage door openers have two adjustment screws located on the side or back of the motor unit. They are typically labeled:
- UP limit (or open limit)
- DOWN limit (or close limit)
These screws may be marked with arrows indicating which direction increases or decreases travel distance. Refer to your specific model’s manual, as locations can vary slightly between models like the B970, HD950, or LW series.
Pro Tip: If you’ve lost your manual, visit Chamberlain’s official support page and enter your model number to download a digital copy.
Step 2: Test the Current Door Position
Before making adjustments, operate the door using the wall button or remote. Observe:
- Does it stop before fully opening?
- Does it hit the ground hard or reverse unexpectedly?
Take note of these behaviors—they’ll guide your adjustments.
Step 3: Adjust the UP (Open) Limit
- Use your screwdriver to turn the UP limit screw.
- Turn clockwise to increase the open height.
- Turn counterclockwise to decrease it.
- Make small adjustments—quarter turns at a time.
- Test the door after each adjustment.
The goal is for the door to open fully without straining the motor or hitting any overhead obstacles.
Step 4: Adjust the DOWN (Close) Limit
- Locate the DOWN limit screw.
- Turn clockwise to allow the door to close further.
- Turn counterclockwise to reduce closing distance.
- Again, use quarter-turn increments.
- Test repeatedly until the door seals tightly against the floor without excessive force.
Warning: Never force the door to close beyond its natural stopping point. This can damage the springs, cables, or opener mechanism.
Step 5: Test the Safety Reverse Feature
After adjusting travel limits, test the auto-reverse function:
- Place a 2×4 piece of wood or a roll of paper towels on the floor where the door closes.
- Activate the door to close.
- The door should reverse immediately upon contact.
If it doesn’t reverse, your down limit may be set too aggressively, or the safety sensors need realignment. For more on garage door safety standards, see Wikipedia’s entry on garage door openers.
Step 6: Fine-Tune and Repeat
Adjustments often require iteration. If the door still doesn’t behave correctly:
- Recheck both limit screws
- Ensure the tracks are clean and aligned
- Verify that the safety sensors are unobstructed and properly aligned
Common Mistakes to Avoid
| Mistake | Consequence | Solution |
|---|---|---|
| Over-adjusting in one turn | Door slams or strains motor | Use quarter-turn increments |
| Ignoring safety sensors | Door won’t reverse on obstruction | Clean and align sensors |
| Skipping testing | Incorrect limits go unnoticed | Test after every adjustment |
| Forcing the door manually | Damages springs or cables | Let the opener do the work |
When to Call a Professional
While most travel limit adjustments are DIY-friendly, call a certified technician if:
- The door makes grinding or squeaking noises
- Cables appear frayed or loose
- Springs look damaged or broken
- Adjustments don’t resolve the issue after multiple attempts
Garage door springs are under extreme tension and can cause serious injury if handled incorrectly. Always prioritize safety.
FAQ Section
Q1: How often should I adjust my Chamberlain garage door travel limits?
A: You typically only need to adjust travel limits once during initial setup. However, seasonal temperature changes, wear and tear, or accidental impacts may require occasional recalibration. Check your door’s performance every 6–12 months.
Q2: Can I adjust travel limits without a ladder?
A: It depends on your opener’s mounting height. Most Chamberlain units are mounted high enough that a ladder is necessary for safe access. Never stretch or stand on unstable surfaces to reach the adjustment screws.
Q3: What if my door reverses before touching the floor?
A: This usually indicates the down limit is set too high, or the safety sensors are misaligned. First, check sensor alignment. If they’re fine, slightly increase the down limit by turning the screw clockwise in small increments.
Q4: Do all Chamberlain models have the same adjustment process?
A: The general process is similar across most models, but screw locations and labeling may vary. Always consult your specific model’s manual for precise instructions. Newer smart models may also allow adjustments via a mobile app.
Q5: Will adjusting travel limits void my warranty?
A: No, routine maintenance like adjusting travel limits does not void your warranty. However, damage caused by improper adjustments or neglect may not be covered. Keep records of any professional service if unsure.
Q6: My door opens fine but won’t close completely. What’s wrong?
A: This is a classic sign that the down limit needs adjustment. Follow Step 4 above to increase the closing distance. Also, ensure nothing is blocking the safety sensors, as this will prevent closing.
Conclusion
Learning how to adjust the travel on a Chamberlain garage door empowers you to maintain a safe, efficient, and quiet garage system. With just a few simple tools and careful adjustments, you can resolve common issues like incomplete opening or harsh closing. Remember to make small changes, test frequently, and prioritize safety at every step.
If this guide helped you, share it with friends or neighbors who might be struggling with their garage doors. A well-adjusted garage door isn’t just convenient—it’s a cornerstone of home safety. Don’t forget to bookmark this page for future reference!
Have questions or success stories? Drop them in the comments below—we’d love to hear from you!
Leave a Reply