Is your garage door slamming shut or feeling unusually heavy? It is completely normal to feel frustrated when your daily routine is interrupted by a stubborn, unbalanced door. In this comprehensive guide, we will show you exactly how to adjust the torsion spring on a garage door safely and effectively.
Why You Need to Know How To Adjust The Torsion Spring On A Garage Door
A properly balanced garage door is essential for the longevity of your entire system. When the springs are out of balance, your automatic opener has to work twice as hard, leading to premature motor failure.
Understanding the mechanics of a garage door reveals that the springs are responsible for counterbalancing the heavy weight of the door panels. According to the International Door Association (IDA), a standard torsion spring is rated for about 10,000 cycles (one cycle equals opening and closing the door once).
Over time, these springs stretch and lose their tension. Learning to adjust them yourself can save you hundreds of dollars in professional service calls and keep your home running smoothly.
Essential Tools and Safety Precautions
Before we dive into the steps, safety must be our top priority. Torsion springs store a massive amount of mechanical energy. If handled incorrectly, they can cause severe injury.
Always wear safety glasses and ensure you have the right tools before starting.
Required Tools
- Two steel winding bars: These must be 18 to 24 inches long. Never use screwdrivers, as they can slip and cause the spring to snap back violently.
- Socket wrench set: For loosening and tightening the set screws.
- Vise-grip locking pliers: To secure the door track.
- Stepladder: Sturdy enough to reach the spring shaft safely.
- Tape measure: To check the spring gap.
- Safety glasses: To protect your eyes from flying debris.
Step-by-Step Guide: Adjusting the Tension
Now that you are geared up, let’s walk through the process. Take your time and follow each step carefully.
Step 1: Disconnect the Power and Close the Door
Unplug your automatic garage door opener to prevent it from accidentally activating. Pull the emergency release cord to disconnect the door from the opener carriage. Ensure the door is completely closed to the floor.
Step 2: Secure the Door to the Track
This is a critical safety step. Use your vise-grip locking pliers to clamp onto the garage door track just above the bottom rollers on both sides. This prevents the door from shooting up while you are working on the springs.
Step 3: Measure the Current Gap
Look at the torsion spring coils above the closed door. There should be a small gap between each coil.
- Concrete Detail: The standard gap should be about 1/4 inch to 1/2 inch (0.6 to 1.2 cm) between the coils when the door is fully closed. If the coils are touching tightly, the spring needs more tension.
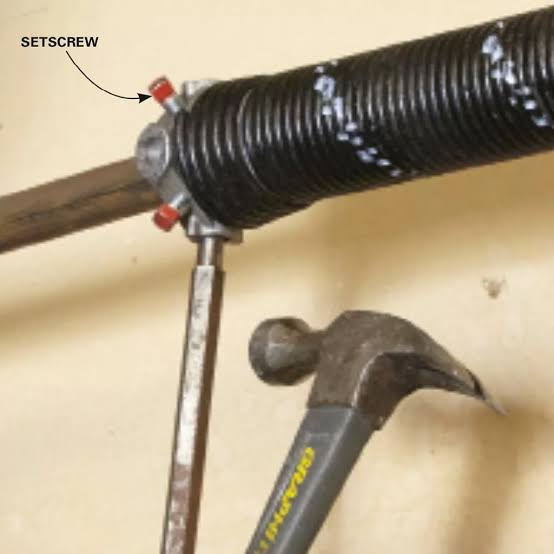
Step 4: Loosen the Set Screws
Locate the winding cone at the end of the torsion spring. You will see two set screws on the side of the cone. Use your socket wrench to loosen these screws slightly. Do not remove them completely; just loosen them enough to allow the cone to turn when you apply pressure with the winding bars.
Step 5: Insert the Winding Bars
Insert your first steel winding bar into the bottom hole of the winding cone. Keep a very firm grip on it with your dominant hand. This bar will act as your anchor.
Step 6: Adjust the Tension (Add 1/4 Turns)
To increase tension (which is necessary if the door is too heavy), you need to wind the spring tighter.
- Pull the first bar upward to the next hole, creating a 1/4 turn (90 degrees).
- Immediately insert your second winding bar into the bottom hole to hold this new tension.
- Remove the first bar, move it to the bottom hole, and repeat the process.
Rule of Thumb: For a standard 7-foot (2.1 meters) tall door, you typically need about 7.5 to 8 full turns (which equals 30 to 32 quarter-turns). For an 8-foot (2.4 meters) door, aim for 8 to 8.5 full turns. Always adjust in 1/4 turn increments to avoid over-tightening.
Step 7: Tighten the Set Screws
Once you have reached the desired number of turns and the coil gap looks even, use your socket wrench to tighten the set screws securely against the shaft. Ensure both screws are fully tightened so the cone does not slip.
Step 8: Remove the Vise-Grips and Test the Balance
Remove the vise-grip pliers from the tracks. Manually lift the door halfway up and let go.
- If the door stays in place: Your adjustment was perfect!
- If the door falls: The spring needs slightly more tension. Add another 1/4 turn.
- If the door rises: The spring is over-tightened. You will need to carefully release a 1/4 turn of tension.
Torsion Springs vs. Extension Springs: A Quick Comparison
Not all garage doors use torsion springs. Some older or lighter setups use extension springs. Here is a quick comparison to help you understand your system:
| Feature | Torsion Springs | Extension Springs |
|---|---|---|
| Location | Mounted horizontally above the closed door. | Mounted parallel to the horizontal tracks on both sides. |
| Lifespan | Longer lifespan (15,000 to 20,000 cycles for heavy-duty). | Shorter lifespan (typically 10,000 cycles). |
| Safety | Safer; if they break, they usually just unwind. | Less safe; if they break, they can snap violently. |
| Operation | Provides a smoother, more balanced lifting motion. | Can cause the door to jerk if one spring is weaker. |
Pros and Cons of DIY Garage Door Spring Adjustment
Before you grab your tools, it is important to weigh the benefits and risks of doing this yourself.
The Advantages
- Cost Savings: You avoid the $100+ labor fee charged by professional technicians.
- Immediate Fix: You do not have to wait days for a service appointment.
- Skill Building: You learn a valuable home maintenance skill.
The Disadvantages
- High Risk: The extreme tension in the springs can cause severe injury if a winding bar slips.
- Tool Requirement: You must purchase specific steel winding bars; improper tools are dangerous.
- Potential Damage: Over-tightening can bend the door struts or strip the opener gears.
Frequently Asked Questions (FAQ)
1. How do I know if my torsion spring needs adjustment?
If your garage door struggles to open, reverses before hitting the floor, or feels incredibly heavy when lifted manually, it likely needs adjustment. You can also check for a visible gap in the middle of the spring, which indicates it has broken and needs replacement, not just adjustment.
2. How many turns should a torsion spring have?
The industry standard is based on the height of your door. A general rule is that a 7-foot door requires roughly 30 quarter-turns (7.5 full turns), while an 8-foot door needs about 32 quarter-turns (8 full turns). Always refer to the manufacturer’s specifications if available.
3. Can I adjust a garage door torsion spring myself?
Yes, you can adjust it yourself if you have the proper steel winding bars and follow strict safety protocols. However, if you feel uncomfortable or lack the right tools, hiring a certified professional is always the safest choice.
4. How long do torsion springs last?
On average, standard torsion springs last between 7 to 10 years, or about 10,000 cycles. If you open and close your door multiple times a day, heavy-duty springs rated for 20,000 cycles are a worthwhile investment.
5. What is the cost to adjust a torsion spring professionally?
If you decide not to do it yourself, professional spring adjustment or replacement typically costs between $150 and $350. This price varies based on your geographic location, the type of spring, and the specific service provider.
Conclusion
Learning how to adjust the torsion spring on a garage door is an empowering skill that saves you money and keeps your home secure. By following these step-by-step instructions, prioritizing safety, and using the correct tools, you can restore your door’s balance in less than an hour. Remember to always test the door manually after making adjustments to ensure it is perfectly balanced.
Leave a Reply