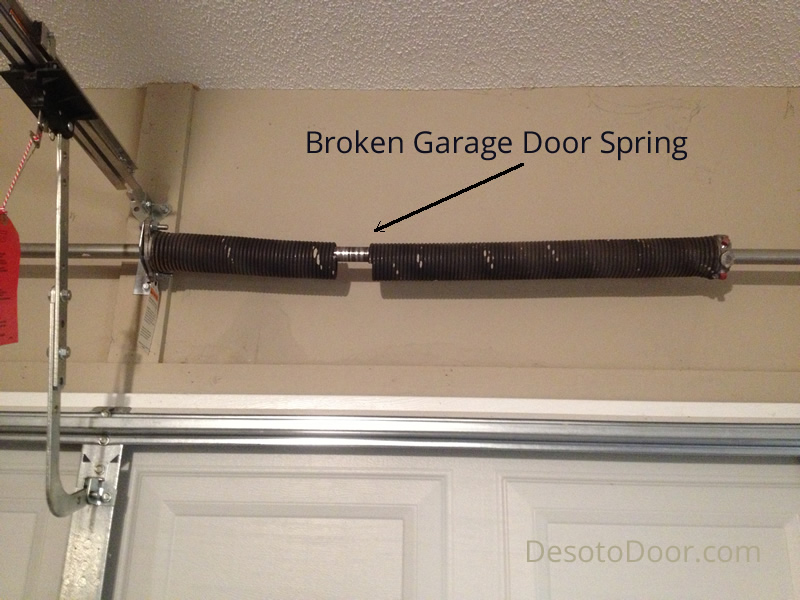
A snapped spring can leave your car trapped and your day ruined, but knowing how much to fix broken spring on garage door systems can save you from overpaying. We understand the frustration of a stuck garage, so let us break down the exact costs and help you get back on track safely.
How Much To Fix Broken Spring On Garage Door?
When your garage door refuses to open, the immediate question is about the financial damage. On average, homeowners in the US can expect to pay between $150 and $350 for a professional spring replacement.
However, this price is not set in stone. The final bill depends heavily on the type of spring your system uses, the size of your door, and your local labor rates. If you decide to tackle the project yourself, you will only pay for the parts, which typically range from $30 to $100.
Note: While DIY saves money upfront, the physical risks involved are exceptionally high.
What Factors Influence the Total Repair Cost?
To truly understand your expenses, we need to look at the variables that drive the price up or down. According to recent home repair statistics, labor accounts for nearly 60% of the total cost when hiring a professional.
Here are the primary factors that dictate your final bill:
- Spring Type: Torsion springs are mounted above the door and are more expensive to replace than extension springs, which run along the sides.
- Door Weight and Size: Heavier, custom wooden doors require heavy-duty springs, which cost more than standard springs for single-car aluminum doors.
- Material Quality: Standard steel springs are cheaper, but galvanized or coated springs resist rust longer and cost slightly more.
- Additional Repairs: If the broken spring damaged the lifting cables or roller brackets, those parts must be replaced simultaneously.
“Garage door springs are under extreme mechanical tension; a miscalculation during installation can cause severe injury or property damage,” warns Mark Davis, a certified garage door technician with 15 years of field experience.
Torsion vs. Extension Springs: Which Costs More?
Not all garage doors are built the same. The system you have directly impacts your wallet. Here is a quick comparison to help you identify your setup and its associated costs.
| Feature | Torsion Springs | Extension Springs |
|---|---|---|
| Location | Mounted horizontally above the door. | Mounted parallel to the ceiling tracks. |
| Average Part Cost | $50 – $150 per spring. | $20 – $60 per spring. |
| Average Labor Cost | $100 – $200. | $80 – $150. |
| Total Average Cost | $150 – $350 | $100 – $210 |
| Lifespan | 15,000 to 20,000 cycles. | 10,000 to 15,000 cycles. |
| Safety Profile | Safer (contained inside a steel tube). | Lower (requires safety containment cables). |
As shown in the table, torsion springs are generally more expensive to fix. However, they offer a smoother operation and a longer lifespan, making them a better long-term investment for most modern homes.
DIY vs. Professional Replacement: Pros and Cons
Should you grab your tools or pick up the phone? This is a highly debated topic in the home improvement community. Let us weigh the advantages and disadvantages of both approaches.
The DIY Route
- Pros: Significant cost savings (you only pay $30–$100 for parts). You gain a sense of accomplishment and learn a new mechanical skill.
- Cons: Extremely dangerous if you lack the proper tools. Incorrect tensioning will ruin the new spring or damage the door opener. It also voids most manufacturer warranties.
The Professional Route
- Pros: Guaranteed safety, correct tension calibration, and a warranty on both parts and labor. The job is usually completed in under an hour.
- Cons: Higher upfront cost. You have to schedule an appointment and wait for the technician to arrive.
Our Verdict: Unless you have prior mechanical experience and own specialized winding bars, hire a professional. The risk of severe injury from a snapping spring under high tension is simply not worth the $100 you might save.
Step-by-Step Guide to Replacing a Garage Door Spring
Disclaimer: This tutorial is for educational purposes. If you are replacing a torsion spring, extreme caution is required. The system relies on the counterbalance mechanics of a garage door to offset hundreds of pounds of weight.
If you are replacing an extension spring (the safer DIY option), follow these concrete steps:
- Disconnect the Power: Unplug the automatic garage door opener to prevent accidental activation.
- Secure the Door: Close the door completely. Place two C-clamps on the metal tracks just above the bottom rollers to lock the door in place.
- Release the Tension: For extension springs, carefully unhook the safety containment cable running through the center of the spring.
- Remove the Old Spring: Unhook the spring from the bottom bracket and the rear hanger pulley.
- Install the New Spring: Hook the new spring onto the rear hanger first, then stretch it carefully to attach it to the bottom bracket. Use a step ladder and ensure the pulley is aligned perfectly.
- Reattach Safety Cables: Thread the galvanized safety cable back through the center of the new spring to prevent whipping if it snaps.
- Test the Balance: Remove the C-clamps, plug the opener back in, and use the manual release handle to lift the door halfway. It should stay in place without drifting up or down.
For torsion springs, professionals use two 12-inch steel winding bars, inserting them into the winding cones at a precise 45-degree angle to tighten the spring. Never use screwdrivers, as they can slip and cause catastrophic injury.
Frequently Asked Questions
1. How long do garage door springs typically last?
The lifespan of a spring is measured in “cycles” (one cycle equals one full open and close). Standard springs are rated for 10,000 cycles, which translates to about 5 to 7 years for an average family. If you opt for heavy-duty springs rated for 20,000 cycles, they can last up to 14 years.
2. Can I replace just one broken spring if I have a dual system?
While it is technically possible, it is highly discouraged. If you have two torsion springs and only one breaks, the remaining spring has already endured the same amount of wear and tear. Replacing only one will force the new spring to do all the heavy lifting, causing it to burn out prematurely. Always replace both springs at the same time.
3. Is it dangerous to fix a garage door spring myself?
Yes, it is considered one of the most dangerous DIY home repairs. Torsion springs store massive amounts of kinetic energy. If a winding bar slips or an extension spring snaps without a safety cable, the released energy can cause severe lacerations, broken bones, or even fatal injuries.
4. What are the warning signs of a failing spring?
You will usually notice a few key symptoms before a complete break. The door may feel unusually heavy when lifted manually, the opener might struggle or make a loud straining noise, or you may notice a visible gap in the spring coil. If you see the spring stretching out or looking uneven, it is on its last legs.
5. Does homeowners insurance cover broken garage door springs?
In most cases, no. Homeowners insurance policies consider broken springs to be a result of normal wear and tear, which is excluded from standard coverage. However, if the spring broke due to a covered peril—like a lightning strike, a fallen tree, or vandalism—your insurance might cover the repair costs. Always check your specific policy details.
Conclusion
Understanding how much to fix broken spring on garage door systems empowers you to make smart, budget-friendly decisions. Whether you are paying a professional $250 for a safe, guaranteed repair or spending $50 on a DIY extension spring replacement, knowing the costs prevents you from getting ripped off.
By recognizing the signs of wear early and choosing the right type of spring for your door, you can ensure your garage operates smoothly for years to come.
Did you find this guide helpful? Please share this article on your favorite social media platforms to help your friends and neighbors avoid overpaying for their garage door repairs!
Leave a Reply