A broken garage door can completely disrupt your daily routine, leaving your car trapped and your home vulnerable. If you are currently stressing over the bills and wondering how much is it to replace garage door opener, you are not alone. Let us break down the exact costs so you can get your access back without breaking the bank.
How Much Is It To Replace Garage Door Opener?
When planning a replacement, understanding the national average is your best starting point. In the United States, homeowners typically spend between $350 and $650 to replace a standard garage door opener, including both parts and professional labor.
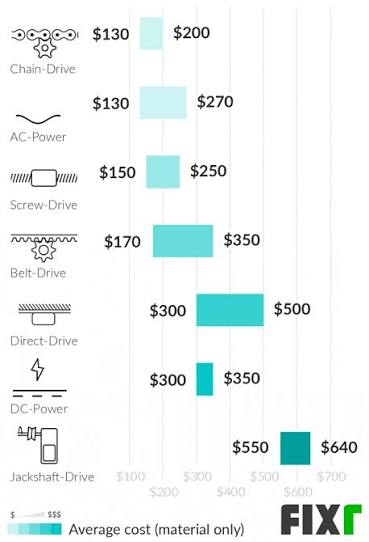
However, the final price tag depends heavily on the drive system you choose. Here is a quick comparison table to help you visualize the costs:
| Drive Type | Average Unit Cost | Total Cost (With Labor) | Noise Level | Best For |
|---|---|---|---|---|
| Chain-Drive | $150 – $250 | $350 – $550 | Loud | Detached garages |
| Belt-Drive | $200 – $300 | $400 – $650 | Very Quiet | Attached garages |
| Screw-Drive | $150 – $250 | $350 – $550 | Moderate | Extreme climates |
| Jackshaft | $300 – $500 | $550 – $850 | Quiet | High or custom doors |
Belt-drive systems are the most popular for modern homes because they operate quietly. This is especially important if your garage is located directly beneath a bedroom.
What Factors Influence the Total Replacement Cost?
Several variables will dictate your final bill. By understanding these factors, you can make smarter purchasing decisions.
1. Motor Horsepower (HP)
The size and weight of your door determine the horsepower you need.
- 1/2 HP: Perfect for standard, single-car steel doors. This is the most budget-friendly option.
- 3/4 HP: Ideal for double-wide doors or doors made of wood. It provides extra lifting power and reduces motor strain.
- 1 HP or higher: Required for custom, oversized, or heavily insulated doors. These units are significantly more expensive.
2. Smart Features and Battery Backup
Modern openers are essentially smart home devices. Adding Wi-Fi connectivity allows you to control and monitor your door via a smartphone app. Furthermore, a battery backup is a crucial add-on. It ensures you can still open your door during a power outage. These premium features usually add $50 to $150 to the unit cost.
3. Labor and Installation Fees
If you hire a professional, expect to pay between $150 and $300 for labor. Understanding the mechanics, as detailed in this Wikipedia overview of garage door openers, shows why precise alignment is critical for safety. Professionals charge for their expertise in handling high-tension springs and ensuring the safety sensors are perfectly calibrated.
Hidden Costs to Watch Out For
When budgeting, do not forget about the peripheral expenses. These small additions can quickly add up if you are not prepared.
- New Remotes and Keypads: If your new opener uses a different frequency, you will need to buy new remotes ($20–$40 each).
- Electrical Work: If your garage ceiling lacks a nearby power outlet, an electrician will charge $150 to $300 to install a dedicated outlet.
- Reinforcement Struts: If your old door is sagging, you may need to install a metal reinforcement strut ($30–$60) before hanging the new motor.
- Disposal Fees: Some municipalities or junk removal services charge a small fee ($25–$50) to haul away your old, heavy motor unit.
Step-by-Step Guide: How to Replace the Opener Yourself
If you are handy with tools, you can save hundreds of dollars by doing it yourself. Here is a concrete, step-by-step tutorial to guide you.
Step 1: Disconnect power and secure the door. Unplug the old opener from the ceiling outlet. Pull the manual release cord to disconnect the door from the motor. Close the door completely, then clamp a pair of locking C-clamps onto the metal tracks just below the bottom rollers to prevent the door from moving.
Step 2: Remove the old unit. Use a 7/16-inch wrench to disconnect the hanging brackets and the door arm. Have a helper support the motor unit while you unbolt it from the ceiling. Lower it carefully; these units weigh around 40 pounds.
Step 3: Mount the new rail and bracket. Assemble the new rail according to the manual. Attach the header bracket above the door. Ensure the rail is positioned exactly 2 inches above the highest point of the door’s travel path. Use a level to guarantee it is perfectly straight.
Step 4: Hang the motor and attach the arm. Lift the motor unit onto the mounting bracket. Secure it to the ceiling joist using heavy-duty lag screws—never anchor it only into drywall. Connect the curved door arm to the bracket on the top panel of the door.
Step 5: Program and test the safety sensors. Plug in the unit and program your remotes. The most critical step is testing the photo-eye sensors. Place a 2×4 piece of wood flat on the ground in the door’s path. Close the door; it must reverse immediately upon touching the wood. If it does not, adjust the sensor alignment until it passes this test.
DIY vs. Professional Installation: Which is Better?
Deciding between a DIY approach and hiring a pro is a common dilemma. Let us look at the advantages and disadvantages of each.
DIY Installation
Pros:
- Significant Savings: You eliminate $150–$300 in labor costs.
- Flexible Schedule: You can work on your own time, even on weekends.
- Skill Building: It is a highly rewarding home improvement project.
Cons:
- Time-Consuming: It takes the average homeowner 4 to 6 hours to complete.
- Safety Risks: Working on a ladder while holding a heavy motor can be dangerous.
- No Warranty on Labor: If you make a mistake, you pay for the fixes out of pocket.
Professional Installation
Pros:
- Speed and Efficiency: A trained technician can finish the job in 2 to 3 hours.
- Guaranteed Workmanship: Most companies offer a 1-year warranty on their labor.
- Safety Assurance: They know exactly how to handle high-tension components and heavy lifting.
Cons:
- Higher Upfront Cost: You must pay a premium for the convenience and expertise.
- Scheduling Required: You must take time off work to be home for the appointment.
Frequently Asked Questions
How long does a garage door opener typically last?
On average, a standard garage door opener lasts between 10 to 15 years. However, this lifespan depends heavily on usage frequency and regular maintenance. If your unit is over 12 years old and requires frequent repairs, it is usually more cost-effective to replace it entirely.
Can I replace a garage door opener myself?
Yes, you absolutely can, provided you have basic DIY skills and the right tools. The process involves mounting hardware, connecting low-voltage sensor wires, and programming the remote. However, if you are uncomfortable working on a ladder or dealing with electrical components, it is always safer to hire a professional.
Is it cheaper to repair or replace a garage door opener?
A good rule of thumb in the industry is the 50% rule. If the cost of the repair is more than 50% of the price of a brand-new unit, you should replace it. For example, if a new belt-drive opener costs $400 installed, and your motor gear needs a $250 repair, you are better off buying a new system with a fresh warranty.
What horsepower garage door opener do I need?
For a standard, single-car steel door, a 1/2 HP motor is perfectly sufficient. If you have a double-wide door, or a door made of heavy materials like solid wood, you should upgrade to a 3/4 HP motor. Using a motor that is too small will cause it to burn out prematurely.
Conclusion
Replacing a broken unit does not have to be a financial burden. By understanding how much is it to replace garage door opener, you can budget effectively and choose the right drive system for your home. Whether you decide to save money with a DIY installation or pay for the convenience of a professional, you now have the knowledge to make the best choice.
Did you find this guide helpful? Please share this article on your favorite social media platforms to help your friends and family save money on their next home repair project!
Leave a Reply