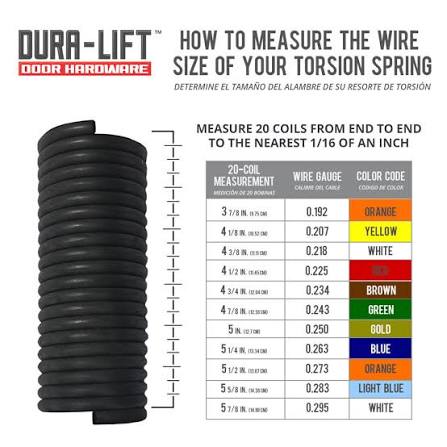
Have you ever stared at your garage door springs, wondering exactly how many turns on a garage door spring chart applies to your specific setup? You’re not alone. Thousands of homeowners face this confusing question every year, often risking injury or damaging their doors by guessing incorrectly. Getting the turn count wrong can lead to premature spring failure, uneven door movement, or even dangerous snap-backs. This comprehensive guide eliminates the guesswork with precise charts, professional insights, and step-by-step instructions to help you adjust your garage door springs safely and accurately.
Understanding Garage Door Spring Mechanics
Before diving into the chart, it’s essential to understand why turn count matters. Garage door torsion springs store mechanical energy when wound. Each quarter-turn adds tension that counterbalances the door’s weight. The standard rule is one full turn equals four quarter-turns, and most residential doors require between 7 to 12 full turns depending on height and weight.
According to the International Door Association (IDA), improper spring tension accounts for nearly 40% of premature garage door system failures. This statistic underscores why precision matters—not just convenience, but safety and longevity.
The number of turns depends on three critical factors:
- Door height (measured in feet)
- Spring wire size (thickness measured in inches)
- Drum diameter (typically 2 inches for residential doors)
For example, a standard 7-foot door with 0.250-inch wire usually requires 7.5 to 8 turns, while an 8-foot door may need 9 to 10 turns. These variations exist because taller doors weigh more and require greater counterbalance force.
The Essential Garage Door Spring Turn Chart
Here’s the reference chart most professional technicians use. Note that these are starting points—always verify with your specific spring manufacturer’s specifications, as wire composition and tempering can vary.
| Door Height | Wire Size (Inches) | Approximate Full Turns | Quarter-Turns Total |
|---|---|---|---|
| 6 feet | 0.207 | 6.5 – 7 | 26 – 28 |
| 7 feet | 0.225 | 7.5 – 8 | 30 – 32 |
| 7 feet | 0.250 | 7 – 7.5 | 28 – 30 |
| 8 feet | 0.250 | 9 – 9.5 | 36 – 38 |
| 8 feet | 0.262 | 8.5 – 9 | 34 – 36 |
| 9 feet | 0.262 | 10 – 10.5 | 40 – 42 |
| 10 feet | 0.283 | 11 – 11.5 | 44 – 46 |
Important: These values assume a standard 2-inch drum diameter. If your system uses a different drum size, consult your spring manufacturer’s technical bulletin. For additional technical specifications on torsion spring engineering, you can reference Wikipedia’s article on torsion springs, which provides foundational physics principles applicable to garage door systems.
Why Wire Size Matters
Thicker wire (larger gauge number actually means thinner wire, which is confusing) stores less energy per turn. A 0.250-inch wire spring needs more turns than a 0.283-inch wire spring for the same door height. This inverse relationship trips up many DIYers. Always measure your existing spring’s wire diameter with calipers before assuming the turn count.
Step-by-Step: How to Count and Adjust Spring Turns
Adjusting garage door springs is dangerous. Torsion springs store enough energy to cause severe injury or death if handled improperly. If you’re uncomfortable, hire a licensed technician. If you proceed, follow these steps meticulously:
Step 1: Gather Proper Tools
You’ll need:
- Two winding bars (solid steel, 18–24 inches long, never use screwdrivers)
- Safety glasses
- Heavy-duty gloves
- Ladder stable enough for overhead work
- Calipers or ruler to measure wire size
Step 2: Secure the Door
Close the garage door completely. Lock it in place using C-clamps on the tracks below the bottom rollers. This prevents accidental movement during adjustment.
Step 3: Locate the Winding Cone
Identify the stationary cone (fixed to the bracket) and the winding cone (with holes for winding bars). The winding cone rotates; the stationary cone does not.
Step 4: Insert Winding Bars
Insert one winding bar into a hole on the winding cone. Hold it firmly with both hands. Insert the second bar into the next available hole. Never remove the first bar until the second is securely in place.
Step 5: Count Existing Turns
Before adjusting, count how many turns are currently on the spring. Mark the starting position with chalk. Rotate the cone slowly, counting each quarter-turn. A full rotation equals four quarter-turns. Record this number.
Step 6: Adjust to Chart Specifications
Compare your current turn count to the chart above. If you need to add turns:
- Rotate the winding cone toward the door (tightening)
- Add quarter-turns incrementally
- Recheck after each full turn
If you need to reduce turns:
- Rotate the winding cone away from the door (loosening)
- Release tension gradually
- Never release all tension at once
Step 7: Test and Fine-Tune
Remove the C-clamps. Operate the door manually. It should lift smoothly with minimal effort and stay open at mid-height. If it slams shut, add half a turn. If it struggles to close, remove half a turn. Make adjustments in quarter-turn increments only.
Common Mistakes When Using Garage Door Spring Charts
Even with a chart, errors occur. Here are the most frequent pitfalls:
Mistake #1: Ignoring Door Weight Variations Not all 7-foot doors weigh the same. Insulated doors, wood doors, and doors with windows weigh significantly more than basic single-layer steel doors. Add 1–2 extra turns for heavy doors.
Mistake #2: Misidentifying Wire Size Wire size is often stamped on the spring, but wear can make it unreadable. Measure with calipers at multiple points. A difference of 0.010 inches changes the required turns by approximately 0.5 to 1 full turn.
Mistake #3: Assuming Both Springs Are Identical On two-spring systems, both springs must have equal tension. If one spring has 8 turns and the other has 7.5, the door will operate unevenly, causing premature wear on cables, drums, and opener gears.
Mistake #4: Forgetting Temperature Effects Steel expands and contracts with temperature. In cold climates (below 40°F), springs may feel tighter. In hot climates (above 90°F), they may feel looser. Adjust seasonally if you notice performance changes.
Extension Springs vs. Torsion Springs: Key Differences
While this guide focuses on torsion springs (mounted above the door), some older homes use extension springs (mounted on both sides along the horizontal tracks). These work differently:
| Feature | Torsion Springs | Extension Springs |
|---|---|---|
| Location | Above door on metal shaft | Alongside horizontal tracks |
| Adjustment Method | Winding turns on cone | Changing pulley/cable position |
| Safety Risk | Very high (stored energy) | Moderate (can snap violently) |
| Lifespan | 10,000–20,000 cycles | 5,000–10,000 cycles |
| Turn Chart Applicable? | Yes | No (uses different calculation) |
If you have extension springs, do not use this torsion spring chart. Extension springs rely on cable stretch and pulley ratios rather than wound turns. Consult a professional for extension spring adjustments.
When to Call a Professional
Despite having a chart, certain situations demand expert intervention:
- Springs are broken or visibly damaged
- Cables are frayed or detached
- You lack proper winding bars
- The door feels unbalanced after adjustment
- You hear grinding or popping noises
- The spring is rusted or corroded
Professional technicians carry liability insurance and specialized tools. The average service call costs $150–$300, far less than emergency room visits or door replacement due to DIY errors.
Frequently Asked Questions
Q1: How do I know if my garage door spring needs more or fewer turns?
A: Test the door’s balance. Disconnect the opener by pulling the release cord. Lift the door manually to halfway. If it stays in place, the tension is correct. If it rises, add turns. If it falls, remove turns. Adjust in quarter-turn increments and retest.
Q2: Can I use the same turn count for both springs on a two-spring system?
A: Yes, both springs should have identical turn counts. Uneven tension causes the door to twist, damaging tracks, rollers, and the opener. Count turns on both springs and match them precisely.
Q3: What happens if I put too many turns on my garage door spring?
A: Excessive tension overstresses the spring, leading to premature fatigue and sudden breakage. It also strains the opener motor, cables, and drums. Over-tensioned doors may slam shut dangerously or fail to close completely.
Q4: How often should I check my garage door spring turns?
A: Inspect spring tension every 6 months or after 5,000 cycles (approximately 2–3 years of normal use). Look for gaps between coils (indicating wear), rust, or difficulty operating the door. Annual professional maintenance is recommended.
Q5: Does the color of the garage door spring indicate the number of turns?
A: No. Spring color coding varies by manufacturer and typically indicates wire size or load capacity, not turn count. Always refer to the manufacturer’s specification sheet or measure wire diameter directly. Do not rely on color alone.
Q6: Can weather affect how many turns my garage door spring needs?
A: Yes, moderately. Cold temperatures make steel contract, increasing effective tension. Hot temperatures cause expansion, reducing tension. In extreme climates, you may need to adjust by 0.25 to 0.5 turns seasonally. However, major adjustments suggest underlying issues like worn springs or incorrect initial setup.
Conclusion
Knowing how many turns on a garage door spring chart applies to your specific door transforms a frustrating guessing game into a precise, safe adjustment process. By matching your door’s height and wire size to the chart, using proper tools, and testing balance carefully, you can extend your garage door system’s lifespan and ensure smooth, reliable operation.
Remember: safety always comes first. If anything feels uncertain, stop and call a licensed technician. Your health is worth far more than saving a service fee.
Did this guide help you confidently adjust your garage door springs? Share it with friends, family, or neighbors who might be struggling with the same issue. Bookmark this page for future reference, and leave a comment below with your experience or questions—we’re here to help!
Leave a Reply