Your garage door is stuck halfway, and you just realized the heavy lifting component is completely snapped. It is incredibly frustrating when your daily routine is halted by a massive mechanical failure. If you are currently asking yourself, “How hard is it to replace a garage door spring?“, you are not alone in facing this daunting DIY dilemma.
How Hard Is It To Replace A Garage Door Spring?
To give you a direct answer: the difficulty heavily depends on the type of spring your system uses. On a DIY difficulty scale of 1 to 10, replacing an extension spring (located on the sides) is about a 4 out of 10. However, replacing a torsion spring (mounted above the door) is a solid 8 or 9 out of 10.
According to the U.S. Consumer Product Safety Commission (CPSC), garage doors are responsible for thousands of emergency room visits annually, with the vast majority of severe injuries stemming from the sudden release of spring tension.
As an industry professional with over a decade of experience, I always tell homeowners to respect the hardware. The springs counterbalance the entire weight of your door, which can exceed 400 pounds. When dealing with high-tension torsion springs, the margin for error is practically zero.
Torsion vs. Extension Springs: Which One Do You Have?
Before you grab your toolbox, you need to identify your system.
- Extension Springs: These stretch and expand along the horizontal tracks on both sides of the door. They are generally safer to work on because they store less kinetic energy.
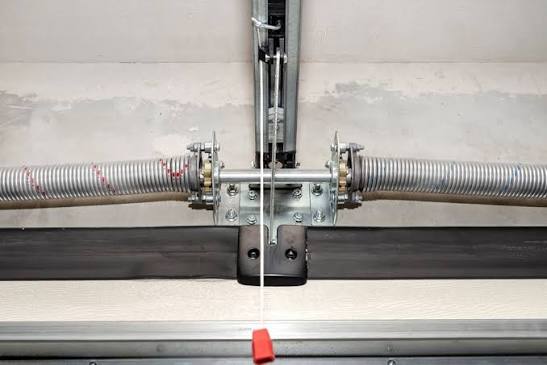
- Torsion Springs: These are tightly wound and mounted on a metal shaft above the closed door. They store a massive amount of torque. If a winding bar slips while you are working on a torsion spring, it can easily break your arm.
Is It Safe to Replace a Garage Door Spring Yourself?
Safety is the biggest factor when determining how hard this job truly is. For extension springs, a confident DIYer with basic mechanical skills can safely manage the replacement.
However, for torsion springs, the physical danger elevates the difficulty immensely. You are dealing with high-tension steel that wants to violently uncoil. For a deeper technical understanding of the mechanics and safety standards involved, you can review the engineering principles of a garage door and its lifting mechanisms.
Always wear safety glasses, heavy-duty leather gloves, and ensure no one else is in the garage while you work.
Step-by-Step Tutorial: Replacing a Torsion Spring
If you are determined to tackle a torsion spring replacement, precision is everything. Here is the exact process.
Step 1: Secure the Door Close the garage door completely. Place two heavy-duty C-clamps or locking pliers on the vertical tracks, resting directly just below the bottom roller brackets. This prevents the door from shooting up if the spring breaks.
Step 2: Release the Tension This is the most dangerous step. Insert two 18-inch solid steel winding bars into the holes of the winding cone. Never use screwdrivers or rebar; they can snap under the torque. Loosen the set screws on the cone. Keep one winding bar firmly planted at the 9 o’clock position while you slowly move the second bar to release the tension. Let the bars take the strain, not your hands.
Step 3: Remove the Old Spring Once the tension is at zero, remove the winding bars. Unbolt the center bearing plate and the spring anchors. Carefully slide the old, broken spring off the metal shaft.
Step 4: Install the New Spring Slide the new torsion spring onto the shaft. Ensure the left-wind spring goes on the left side, and the right-wind spring goes on the right. Reattach the center bearing plate and secure the anchors.
Step 5: Wind the New Spring Insert your first winding bar into the cone to lock it. Insert the second bar and begin winding. For a standard 7-foot tall door, you typically need exactly 30 quarter-turns (7.5 full turns). Alternate between the top and bottom holes on the cone to reach the correct tension. Once done, tighten the set screws securely with a 9/16-inch socket wrench.
DIY vs. Professional Replacement: Pros and Cons
Still wondering if you should call a pro? Here is a quick breakdown to help you decide.
| Feature | DIY Replacement | Professional Replacement |
|---|---|---|
| Cost | $50 – $120 (Parts only) | $200 – $350 (Parts + Labor) |
| Time Required | 2 to 5 hours (for beginners) | 45 to 60 minutes |
| Safety Level | High risk (especially for torsion) | Extremely safe (certified techs) |
| Warranty | Parts only (usually 1 year) | Parts and Labor (often 3+ years) |
| Tools Needed | Vise grips, winding bars, sockets | Tech brings all specialized tools |
Frequently Asked Questions
1. How long does it take to replace a garage door spring?
A professional technician can usually replace a broken spring in under an hour. If you are a beginner attempting a DIY torsion spring replacement, expect the job to take anywhere from 2 to 5 hours, factoring in time for safety precautions and troubleshooting.
2. How much does it cost to replace a garage door spring?
If you hire a professional, expect to pay between $200 and $350, which includes the price of the spring and the labor. If you choose the DIY route, a high-quality torsion spring kit will only cost you between $50 and $120 online.
3. How many cycles should a new garage door spring last?
Standard garage door springs are rated for about 10,000 cycles (one cycle equals opening and closing the door). This typically translates to 5 to 7 years of normal use. If you use your door frequently, you can upgrade to heavy-duty springs rated for 20,000 or even 30,000 cycles.
4. Can I replace just one garage door spring?
No, you should never replace just one spring. If you have a two-spring system and only one breaks, you must replace both. If you mix an old spring with a brand-new one, the door will become unbalanced. This uneven tension will cause the new spring to burn out prematurely and can severely damage your garage door opener.
Final Thoughts
So, how hard is it to replace a garage door spring? If you have extension springs and basic mechanical aptitude, it is a manageable weekend project. However, if your door utilizes high-tension torsion springs, the physical danger and required precision make it an incredibly difficult and hazardous task.
When in doubt, always prioritize your physical safety and hire a certified garage door technician. The peace of mind and warranty are well worth the extra cost.
Found this guide helpful and want to save a friend from a potential DIY disaster? Share this article on your social media or send it directly to your homeowner group chat!
Leave a Reply