Introduction
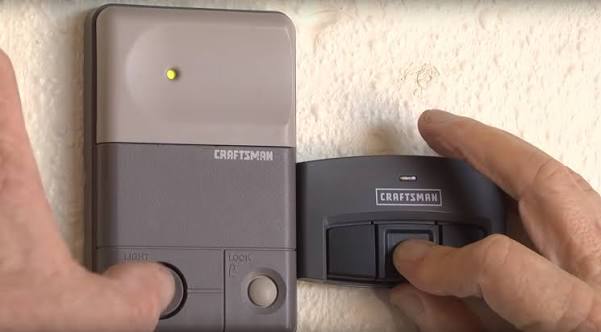
There are few things more frustrating than standing in your driveway, pressing your remote repeatedly, and watching your garage door remain stubbornly closed. Whether you have recently moved into a new home, replaced a battery, or experienced a power outage, understanding how do you reset a Craftsman garage door opener remote is an essential skill for any homeowner. This comprehensive guide will walk you through the exact steps to restore functionality safely and efficiently, ensuring you regain secure access to your home without needing an expensive service call.
Why Your Craftsman Remote Might Need Resetting
Before diving into the technical steps, it is helpful to understand why resets are necessary. Modern garage door openers utilize rolling code technology for security, which means the signal changes every time you use the remote. Occasionally, this synchronization can break due to:
- Power Surges: Lightning strikes or grid fluctuations can wipe the motor unit’s memory.
- Battery Replacement: Sometimes, changing batteries causes a temporary desync.
- Interference: New LED bulbs or nearby radio equipment can disrupt frequencies.
- New Ownership: Previous owners’ remotes must be cleared for security.
According to industry data from the International Door Association (IDA), over 70% of garage door opener service calls are related to simple programming or sensor issues that homeowners can resolve themselves. By mastering these steps, you save both time and money while maintaining your home’s security posture.
Safety First: Critical Precautions Before Resetting
Safety must always precede convenience. Garage doors are heavy mechanical systems under high tension.
- Clear the Area: Ensure no people, pets, or objects are in the door’s path.
- Check Sensors: Verify the photo-eye sensors near the floor are aligned and clean. If the safety beam is broken, the door will not operate regardless of remote programming.
- Disconnect Power (If Needed): Only disconnect power if you are working directly on the motor unit wiring. For standard remote resets, power should remain on.
- Use Proper Ladders: Never stand on chairs or unstable surfaces to reach the learn button. Use a fiberglass ladder to avoid electrical conductivity risks.
Expert Note: Always consult your specific model’s manual. While most Craftsman units share similar protocols, variations exist between older DIP-switch models and newer Security+ 2.0 systems. For foundational knowledge on how these mechanisms work, refer to the Garage Door Opener entry on Wikipedia to understand the evolution of rolling code technology.
Step-by-Step: How Do You Reset A Craftsman Garage Door Opener Remote
This section addresses the primary user intent with concrete, actionable instructions. Most Craftsman openers manufactured after 1993 use a “Learn Button” system.
Step 1: Locate the Learn Button
Find the motor unit mounted on your ceiling. The learn button is typically located on the back or side panel near the antenna wire. It is usually color-coded:
- Yellow: Security+ 2.0 (Post-2011)
- Purple: Security+ (2006–2011)
- Orange/Red: Older Rolling Code Models
- Green: Very Early Models (Pre-1993 may use DIP switches instead)
Step 2: Clear Old Codes (Optional but Recommended)
If you want a complete factory reset to remove all previously programmed remotes and keypads:
- Press and hold the learn button for approximately 6–10 seconds.
- Release when the indicator LED turns off or blinks.
- All memory is now erased. You must reprogram all devices.
Step 3: Program the Remote
- Press the learn button once briefly. The LED will illuminate or begin blinking steadily. You typically have 30 seconds to complete the next step.
- On your handheld remote, press and hold the desired button.
- Hold until the motor unit lights flash or you hear two distinct clicks. This confirms successful synchronization.
- Test the remote immediately by pressing the button once. The door should activate.
Step 4: Verify Operation
Test the remote from various distances (5 feet, 15 feet, and outside the garage). Consistent operation confirms the reset was successful.
Troubleshooting: When the Reset Doesn’t Work
Even when following the correct procedure for how do you reset a Craftsman garage door opener remote, issues can persist. Use this diagnostic table:
| Symptom | Probable Cause | Solution |
|---|---|---|
| Light flashes but door doesn’t move | Lock mode activated | Check wall console lock switch; disable vacation mode |
| No response at all | Dead battery or wrong frequency | Replace battery; verify remote compatibility with learn button color |
| Works only up close | Weak signal or interference | Replace LED bulbs with RF-shielded ones; check antenna extension |
| Door reverses immediately | Sensor obstruction or force limit | Clean sensor lenses; adjust travel limits per manual |
| Intermittent operation | Failing logic board or capacitor | Professional diagnosis recommended after basic troubleshooting |
Pro Tip: If you have recently installed bright LED shop lights in your garage, they may emit radio frequency interference. Try turning them off temporarily to test if range improves. Many manufacturers now offer specially shielded LED bulbs designed specifically for garage door opener environments.
Understanding Compatibility: Which Remote Works With Your Unit?
Not all Craftsman remotes are universal. Matching your remote to your opener’s frequency and security protocol prevents endless frustration.
- Security+ 2.0 (Yellow Button): Requires 893LM or compatible dual-frequency remotes. These offer superior range and encryption.
- Security+ (Purple/Orange): Uses 315 MHz frequency. Compatible with 971LM series.
- DIP Switch (Green/No Button): Requires matching physical switch positions inside both remote and motor unit. These are largely obsolete but still functional.
Always check the FCC ID on the back of your existing remote against replacement options. Cross-referencing ensures you purchase hardware that actually communicates with your specific receiver board.
FAQ Section
How often should I reset my Craftsman garage door remote?
You generally only need to reset your remote when experiencing malfunctions, after a power surge, or when moving into a new home. There is no scheduled maintenance interval for resetting. Regular battery replacement (every 1–2 years) is sufficient for normal operation. Frequent unexplained resets may indicate a failing logic board requiring professional inspection.
Can I reset my remote without accessing the motor unit?
No. The learn button on the motor unit is mandatory for syncing new codes. The remote alone cannot initiate a reset because it lacks the authority to modify the receiver’s memory. If your motor unit is inaccessible, consider installing an external wireless keypad as an alternative entry method while arranging safe access to the opener.
What does it mean if the learn button light stays solid?
A solid learn button light typically indicates the unit is in programming mode and awaiting a signal from a remote or keypad. If it remains solid indefinitely without accepting commands, try unplugging the unit for 30 seconds to reboot the logic board. Persistent solid lights may indicate a stuck button or internal circuit failure requiring technician service.
Will resetting my remote erase my keypad and car visor clips?
Yes, if you perform a full factory reset by holding the learn button for 6+ seconds. This clears all paired devices. However, simply pressing the learn button once to add a single remote will not affect other programmed devices. Plan accordingly and have all remotes and keypads available before performing a complete memory wipe.
My remote works but the wall button doesn’t. Is this a remote issue?
This is likely unrelated to your remote reset. Wall buttons can fail independently due to wiring shorts, worn contacts, or lock-mode activation. Check if the wall console has a blinking lock indicator. If unlocked and still non-functional, inspect the low-voltage wires connecting the button to the motor unit for damage or disconnection.
Are aftermarket remotes safe to use with Craftsman openers?
Reputable aftermarket brands like Chamberlain, Genie, and LiftMaster produce universally compatible remotes that meet federal safety standards. Avoid unbranded clones from unauthorized sellers, as they may lack proper rolling code encryption, creating security vulnerabilities. Always verify FCC certification and read reviews confirming compatibility with your specific learn button color before purchasing third-party alternatives.
Conclusion
Understanding how do you reset a Craftsman garage door opener remote empowers you to maintain one of your home’s most frequently used entry points confidently. From locating the correct learn button to troubleshooting interference issues, these skills save money and prevent unnecessary service calls. Remember that safety always comes first, and when in doubt, consulting a certified technician is the wisest choice.
Your garage door is more than convenience—it is security, protection, and peace of mind. By keeping your system properly maintained and synchronized, you ensure reliable daily operation for years to come.
Found this guide helpful? Share it on Facebook, X (Twitter), or Pinterest to help fellow homeowners solve their garage door dilemmas! Tag us with your success stories or lingering questions—we love hearing from our community of DIY enthusiasts. Together, we keep homes safe, secure, and smoothly operating. 💪🏠
Leave a Reply