Introduction
Is your garage door remote suddenly refusing to open the door, or did you just move into a new home and need to secure your space? You are not alone; thousands of homeowners face this frustration every year, often worrying about costly repairs or security breaches. If you are wondering how do you reprogram a Liftmaster garage door opener, the good news is that you likely don’t need a professional technician. With a few simple steps and this guide, you can regain control of your garage door quickly and safely.
Why Do You Need to Reprogram Your Liftmaster Opener?
Before diving into the technical steps, it helps to understand why reprogramming is necessary. Liftmaster openers use rolling code technology, which changes the access code every time you use the remote. This is a critical security feature, but it can sometimes cause synchronization issues.
Common reasons for reprogramming include:
- Battery Replacement: Changing batteries in the remote can sometimes break the sync.
- New Homeowners: Ensuring previous owners or neighbors cannot access your garage.
- Interference: Nearby electronic devices or Wi-Fi routers may disrupt the signal.
- Lost Remotes: Removing old codes from the system to prevent unauthorized access.
According to industry standards, maintaining an updated list of programmed remotes is essential for home security. By reprogramming, you ensure that only authorized devices can trigger your garage door mechanism.
Step-by-Step Guide: How Do You Reprogram a Liftmaster Garage Door Opener?
The process varies slightly depending on whether you have a newer model with a “Learn” button or an older model with DIP switches. Most modern Liftmaster units (manufactured after 1993) use the Learn button method.
Method 1: Using the “Learn” Button (Most Common)
This method applies to most Liftmaster Security+ and Security+ 2.0 models.
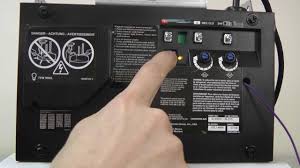
Step 1: Locate the Learn Button Climb a sturdy ladder to access your motor unit mounted on the ceiling. Look for a colored button on the back or side of the unit. The color is typically Yellow, Purple, Orange, or Red.
- Note: Do not press the large red emergency release cord handle by mistake.
Step 2: Clear Old Codes (Optional but Recommended) If you want to erase all previously programmed remotes and keypads for security purposes:
- Press and hold the Learn button for approximately 6–10 seconds.
- Release the button when the indicator light next to it turns off.
- All previous codes are now deleted. You will need to reprogram all your devices.
Step 3: Program the Remote Control
- Press and release the Learn button once. The indicator light will turn on or blink, indicating it is in programming mode. You have 30 seconds to complete the next step.
- Within those 30 seconds, press and hold the button on your handheld remote that you wish to use.
- Keep holding until the motor unit’s lights blink or you hear two clicks. This confirms the code has been accepted.
- Test the remote by pressing the button again. The door should operate.
Step 4: Program Additional Devices Repeat Step 3 for any additional remotes, wireless keypads, or vehicle homelink systems. Remember, you must press the Learn button on the motor unit each time you add a new device.
Method 2: Older Models with DIP Switches
If your Liftmaster opener was manufactured before 1993, it likely uses DIP switches instead of a Learn button.
- Open the battery compartment of your remote control.
- You will see a row of small switches (usually 8–12).
- Match the switch positions in the remote to the exact same pattern on the motor unit inside the garage.
- Close the remote and test it. No button pressing is required; the physical alignment of switches creates the code.
Safety Tip: Always ensure the garage door area is clear of people and pets before testing the opener. Never stand under a moving garage door.
Troubleshooting Common Programming Issues
Even with careful following of instructions, things can go wrong. Here are solutions to frequent problems.
| Issue | Possible Cause | Solution |
|---|---|---|
| Remote won’t program | Weak batteries | Replace remote batteries with fresh alkaline ones. |
| Light blinks but doesn’t save | Interference | Unplug nearby LED bulbs or Wi-Fi extenders temporarily. |
| Door moves but reverses | Safety sensor misalignment | Check the eyes at the bottom of the door tracks; ensure they are aligned and clean. |
| Learn button unresponsive | Logic board freeze | Unplug the opener for 60 seconds, then plug it back in to reset the system. |
If you continue to experience issues, consult the Liftmaster official support page or refer to general garage door mechanics principles documented on Wikipedia for broader technical context.
Understanding Liftmaster Frequency and Compatibility
Not all remotes work with all openers. Knowing your frequency is crucial when buying replacements.
- 315 MHz: Common in older models and some current basic units.
- 390 MHz: Used in many Security+ models.
- Security+ 2.0: Uses encrypted signals and is backward compatible with many older remotes, but requires specific programming steps.
To find your frequency, check the label on the back of your existing remote or the motor unit. Buying a universal remote without checking compatibility can lead to frustration and wasted money.
Advanced Tips for Smart Liftmaster Openers
If you have a Wi-Fi enabled Liftmaster (such as the 8500W or models with MyQ technology), reprogramming involves digital steps as well.
- Download the MyQ App: Available on iOS and Android.
- Connect to Wi-Fi: Ensure your opener is connected to your home network.
- Digital Key Management: You can add or remove users digitally through the app interface. This does not replace the physical remote programming but adds a layer of convenience.
- Firmware Updates: Occasionally, Liftmaster releases firmware updates to fix bugs. Check the app settings to ensure your opener is up to date.
FAQ Section
1. How do I know if my Liftmaster opener needs reprogramming?
If your remote fails to open the door despite having fresh batteries, and the wall console works fine, the remote has likely lost its synchronization with the motor unit. This is a clear sign that reprogramming is needed.
2. Can I reprogram a Liftmaster opener without the original remote?
Yes. You can program a new universal remote or a replacement Liftmaster remote directly using the Learn button on the motor unit. You do not need the old remote to add a new one, unless you are trying to clone a specific signal, which is not standard for Liftmaster rolling codes.
3. What does it mean if the Learn button light is blinking?
A blinking light usually indicates that the opener is in “Lock Mode” or has detected an obstruction. If it blinks rapidly during programming, it may indicate that the memory is full or there is a signal interference. Try unplugging the unit for a minute to reset it.
4. Is it safe to reprogram the garage door opener myself?
Absolutely. Reprogramming is a low-risk task that involves pressing buttons and does not require handling high-voltage wires or mechanical springs. However, always use caution when climbing ladders to reach the motor unit.
5. Why does my car’s Homelink system not work after reprogramming the remote?
Homelink systems often need to be retrained after the garage opener codes are changed. You will need to go into your car’s settings menu and repeat the Homelink pairing process, treating it like a new remote device.
6. How many remotes can I program to one Liftmaster opener?
Most modern Liftmaster openers can store up to 8–10 unique remote codes and several keypad codes. If you exceed this limit, you may need to clear old codes before adding new ones.
Conclusion
Learning how do you reprogram a Liftmaster garage door opener is a valuable skill that saves you time and money. Whether you are dealing with a simple sync issue or securing your home after a move, the process is straightforward when you follow the correct steps for your specific model.
By keeping your remotes synchronized and your security codes updated, you ensure smooth operation and peace of mind. Don’t let a malfunctioning remote disrupt your day. Try these steps today, and if you found this guide helpful, consider sharing it with friends or family who might be struggling with their own garage door issues.
Stay secure, stay connected, and keep your garage running smoothly!
Leave a Reply