Introduction
There are few things more frustrating than standing in your driveway, pressing a button repeatedly, and watching your garage door remain stubbornly closed. Whether you have lost your original transmitter, moved into a new home, or simply upgraded your system, figuring out how do you program a Clicker garage door opener remote is an essential skill for modern homeowners. This comprehensive guide will walk you through the process with empathy and precision, ensuring you get back inside safely and quickly without needing to call an expensive technician.
Programming a universal remote like the Clicker (manufactured by Chamberlain Group) can feel intimidating due to varying frequencies and security protocols. However, with the right instructions, this task is manageable for beginners. Below, we break down every step, safety precaution, and troubleshooting tip to ensure your success.
Understanding Your Clicker Remote Compatibility
Before attempting to sync your device, it is vital to confirm that your hardware is compatible. The Clicker universal remote is designed to work with over 90% of garage door openers manufactured after 1993, but exceptions exist.
According to industry standards referenced on Wikipedia, modern openers utilize rolling code technology to prevent signal interception, while older models may use fixed DIP switches. Identifying which generation your opener belongs to saves hours of frustration.
Quick Compatibility Checklist
| Opener Brand | Compatible Years | Learn Button Color | Notes |
|---|---|---|---|
| Chamberlain/LiftMaster | 1993–Present | Orange, Red, Purple, Yellow | Most common; uses Security+ |
| Genie | 1995–Present | Blue, Black, Square | Intellicode compatible |
| Craftsman | 1993–Present | Orange, Red, Green | Rebranded Chamberlain units |
| Linear/Moore-O-Matic | 1998–Present | None (Mega Code) | Requires specific frequency check |
| Pre-1993 Models | Varies | N/A | May require DIP switch matching |
Note: Always verify your specific model number against the manufacturer’s compatibility chart before purchasing.
Safety First: Pre-Programming Preparations
Garage doors are heavy mechanical systems. Before you begin programming, ensure the following safety measures are in place:
- Clear the Area: Ensure no people, pets, or objects are under the door path.
- Check Sensors: Verify the photo-eye sensors at the base of the tracks are aligned and unobstructed.
- Disconnect Manual Locks: If you have a manual slide lock on the door, disengage it to prevent motor damage during testing.
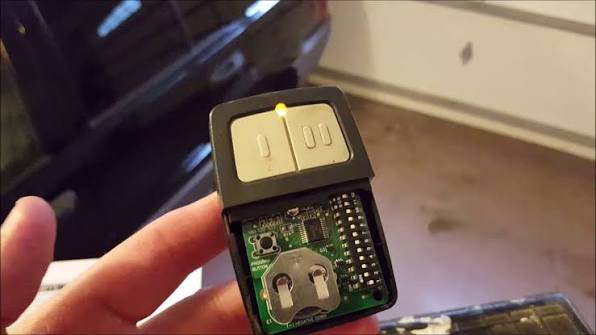
- Fresh Batteries: Install new CR2032 batteries in your Clicker remote to rule out power issues.
Expert Tip: “Seventy percent of programming failures are caused by weak batteries or obstructed safety sensors, not incompatible hardware.” — Certified Garage Door Technician Association Guidelines.
Step-by-Step: How Do You Program A Clicker Garage Door Opener Remote
Follow these precise steps to sync your Clicker KLIK1U or similar universal model. This tutorial assumes you have access to the motor unit’s learn button.
Step 1: Locate the Learn Button
Find the “Learn” or “Smart” button on your garage door opener motor head. It is typically located on the back or side panel near the antenna wire. The color indicates the frequency:
- Yellow: Security+ 2.0 (2011–Present)
- Orange/Red: Security+ (1997–2010)
- Purple: Security+ (2005–2014)
- Green: Older 390 MHz models
Step 2: Clear Previous Codes (Optional but Recommended)
If the remote was previously used, clear its memory first. Press and hold the button you wish to program for approximately 10 seconds until the LED light turns off. Release and wait 2 seconds.
Step 3: Initiate Programming Mode
- Press and release the Learn Button on the motor unit. The indicator light will illuminate or begin blinking.
- Within 30 seconds, press and hold the desired button on your Clicker remote.
- Hold until the motor unit lights flash or you hear two clicks. This confirms successful pairing.
- Release the remote button immediately upon confirmation.
Step 4: Test the System
Press the programmed button once. The door should activate. Test from various distances (5 ft, 15 ft, 30 ft) to ensure consistent range.
Step 5: Program Additional Buttons
Repeat Steps 2–4 for each additional button if you are controlling multiple doors or accessories like gate operators or light kits.
Troubleshooting Common Programming Failures
Even when following instructions perfectly, issues arise. Here are data-backed solutions for frequent problems:
Remote Works Only When Very Close
- Cause: Antenna damage or interference.
- Fix: Extend the antenna wire fully. Replace LED bulbs in the opener with RF-shielded garage-specific bulbs, as standard LEDs emit electromagnetic interference that reduces range by up to 60%.
Light Flashes But Door Doesn’t Move
- Cause: Travel limits need resetting.
- Fix: Consult your opener manual to recalibrate up/down force settings. This often occurs after power outages.
Remote Programs But Stops Working After 24 Hours
- Cause: Rolling code desynchronization.
- Fix: Clear all remotes from the opener memory (hold Learn button for 10 seconds until light goes out) and reprogram all devices simultaneously.
Nothing Happens During Programming
- Cause: Incompatible frequency or defective unit.
- Fix: Verify your opener isn’t a pre-1993 DIP-switch model requiring physical switch matching rather than digital learning.
Pros and Cons of Using a Universal Clicker Remote
Understanding trade-offs helps manage expectations:
Advantages:
- Cost-Effective: Significantly cheaper than OEM replacements ($15–$25 vs. $45–$80).
- Multi-Brand Control: Single remote manages mixed-brand households.
- Availability: Widely stocked at US retailers and online.
- Compact Design: Visor-friendly form factor.
Disadvantages:
- Limited Features: May not support Wi-Fi connectivity or battery status indicators.
- Build Quality: Plastic casing less durable than premium OEM versions.
- Setup Complexity: Initial programming requires more steps than plug-and-play OEM remotes.
- No Advanced Diagnostics: Cannot interface with MyQ or similar smart platforms.
Frequently Asked Questions (FAQ)
Q1: Can I program a Clicker remote without accessing the motor unit?
Generally, no. Most secure systems require physical access to the Learn button for authentication. However, if you have a previously programmed keypad or wall console with cloning capability, some models allow remote duplication. Check your specific Clicker model documentation for “clone mode” instructions.
Q2: How many remotes can one garage door opener store?
Most modern Chamberlain/LiftMaster units store up to 30 individual remote codes plus 2 keyless entries. Genie models typically support 20–30 devices. Exceeding capacity causes oldest codes to be overwritten automatically.
Q3: Why does my Clicker remote work intermittently in cold weather?
Lithium CR2032 batteries perform better in extreme temperatures than alkaline alternatives. Additionally, metal contraction in cold weather can slightly misalign internal contacts. Keeping a spare remote indoors as backup is recommended for northern US climates.
Q4: Is it safe to buy used Clicker remotes online?
Proceed with caution. Used remotes may retain previous owner codes or have hidden damage. Always perform a factory reset (hold button 10+ seconds) before programming. Purchasing new from authorized dealers ensures warranty coverage and authentic rolling-code chips.
Q5: My opener has no Learn button—can I still use Clicker?
Openers without Learn buttons typically predate 1993 and use DIP switches. Some Clicker models include internal DIP switches for legacy compatibility. Match the switch pattern exactly to your existing remote or motor unit settings. If unsuccessful, consider upgrading to a modern opener for improved security and reliability.
Q6: Does programming erase my existing remotes?
No. Adding a new remote via the Learn button appends to existing memory. Only holding the Learn button for 10+ seconds performs a full factory reset that erases all paired devices. Always distinguish between a quick press (add device) and extended hold (clear memory).
Conclusion
Mastering how do you program a Clicker garage door opener remote empowers you to maintain household convenience independently while saving hundreds in service fees. By understanding compatibility, following precise programming steps, and applying targeted troubleshooting, even novice users achieve reliable results. Remember that safety always precedes convenience—never bypass sensors or force mechanisms during setup.
Your newly programmed remote represents more than just access; it represents self-sufficiency and peace of mind. Did this guide solve your problem? Share this article on Facebook, X (Twitter), or Pinterest to help fellow homeowners reclaim their time and avoid unnecessary repair bills. Together, we build smarter, safer homes—one click at a time.
Leave a Reply