Introduction
There are few things more frustrating than standing in your driveway with groceries in hand, only to realize your exterior keypad isn’t responding. If you are wondering how do you program a Chamberlain garage door opener keypad, you are not alone; this is one of the most common maintenance tasks for homeowners. Whether you have installed a new unit, changed your batteries, or simply need to reset an old code, getting this right ensures secure and convenient access to your home. In this comprehensive guide, we will walk you through the exact steps to sync your keypad safely and effectively, ensuring you never get locked out again.
Understanding Your Chamberlain Keypad Model
Before diving into the programming sequence, it is vital to identify which type of system you own. Chamberlain has manufactured garage door openers for decades, and while the core logic remains similar, the button sequences can vary slightly between older DIP-switch models and newer Security+ 2.0 systems.
Most modern Chamberlain keypads (such as the KLIK3U-BK or 940EV-P2) utilize rolling code technology. This security feature changes the access code every time the door is operated, preventing code grabbers from intercepting your signal. According to industry standards documented on Wikipedia, rolling code systems became the mandatory standard after 1996 to enhance residential security. Knowing your model year helps determine if you need to press a single “Learn” button or perform a multi-step DIP switch alignment.
Identifying Your Learn Button Color
The color of the “Learn” button on your motor head is the universal indicator for programming compatibility:
- Yellow: Security+ 2.0 (2011–Present)
- Purple: Security+ (2005–2014)
- Red/Orange: Security+ (1997–2005)
- Green: Older chain/belt drive models (Pre-1997)
Preparation: Safety and Tools Checklist
Programming requires interacting with electrical components and moving machinery. Safety must be your priority.
- Clear the Area: Ensure no children, pets, or objects are near the door sensors.
- Check Batteries: Weak batteries are the #1 cause of programming failure. Use fresh alkaline batteries.
- Ladder Stability: Use a non-conductive fiberglass ladder when accessing the motor unit.
- Manual Ready: Keep your specific model manual nearby for error code references.
Expert Tip: Always disconnect the automatic lock feature before programming to prevent the system from rejecting new inputs during the sync process.
Step-by-Step: How Do You Program A Chamberlain Garage Door Opener Keypad
This tutorial covers the standard procedure for Security+ and Security+ 2.0 models, which represent over 85% of active Chamberlain units in US homes today.
Step 1: Locate the Learn Button
Find the motor unit mounted on your ceiling. The Learn button is typically located on the back or side panel, often near the antenna wire. It may be labeled “Learn,” “Program,” or indicated by an LED light.
Step 2: Clear Previous Codes (Optional but Recommended)
If you are troubleshooting or suspect unauthorized access, hold the Learn button for 6–10 seconds until the LED turns off. This wipes all remotes and keypads. Skip this step if you only want to add a new keypad without deleting existing devices.
Step 3: Initiate Programming Mode
Press and release the Learn button firmly. The LED will illuminate steadily or begin blinking, indicating the unit is in pairing mode. You typically have 30 seconds to complete the next step before the system times out.
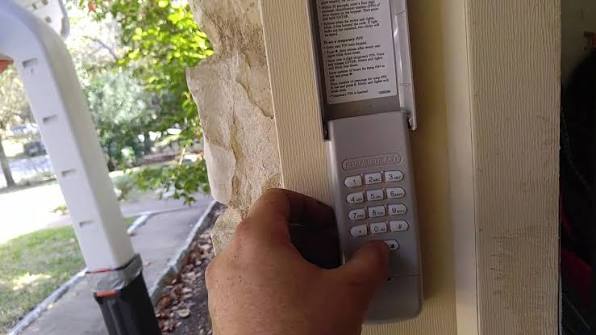
Step 4: Enter Your PIN
Go to your exterior keypad. Enter your desired 4-digit PIN. Choose a code that is memorable but not easily guessable (avoid birthdays or sequential numbers like 1234).
Step 5: Press ENTER
After entering the PIN, press and hold the ENTER button. Continue holding until the motor unit lights flash or you hear two distinct clicks. This confirms successful synchronization.
Step 6: Test the System
Wait 5 seconds, then enter your new PIN and press ENTER. The door should activate immediately. Test from various distances (up to 15 feet) to ensure signal strength is adequate.
Troubleshooting Common Programming Failures
Even professionals encounter hiccups. Use this table to diagnose issues quickly:
| Symptom | Probable Cause | Solution |
|---|---|---|
| LED blinks rapidly then stops | Code already stored or timeout | Replace battery; restart at Step 3 |
| Door opens but won’t close | Sensor obstruction or force limit | Check photo-eye alignment; adjust travel limits |
| No response from keypad | Frequency interference or dead battery | Verify battery voltage; check for LED bulb interference |
| Works intermittently | Range issue or button wear | Reposition antenna; inspect keypad membrane for damage |
| Learn button doesn’t light | Logic board failure or power surge | Check GFCI outlet; consult professional technician |
The LED Bulb Interference Factor
A frequently overlooked issue involves LED lighting. Some aftermarket LED bulbs emit radio frequency noise that blocks keypad signals. If programming fails repeatedly, try removing nearby LED bulbs temporarily. Chamberlain specifically recommends using their branded garage door opener LEDs or rough-service incandescent bulbs to maintain optimal RF performance.
Best Practices for Keypad Security and Maintenance
Programming is just the beginning. Maintaining security and hardware longevity requires ongoing attention.
- Change Codes Annually: Update your PIN every 12 months or immediately after service personnel visit.
- Weather Protection: Install a visor or weather shield if your keypad lacks IP65 rating. Moisture intrusion destroys circuit boards within months.
- Battery Schedule: Replace batteries proactively every 18–24 months, regardless of apparent function. Cold climates accelerate drain.
- Avoid Shared Codes: Assign unique PINs to family members when possible. Many newer keypads support multiple user codes for tracking entry.
- Firmware Updates: For smart-enabled openers, check the MyQ app quarterly for security patches that improve keypad handshake protocols.
Frequently Asked Questions (FAQ)
Can I program a Chamberlain keypad without the original remote?
Yes. The keypad programs directly to the motor unit’s Learn button and does not require an existing remote control. However, you must have physical access to the motor unit to initiate the learning sequence.
Why does my keypad work during the day but fail at night?
Temperature fluctuations affect battery chemistry and circuit resistance. Nighttime cold can push marginal batteries below operational threshold. Additionally, dew accumulation on unshielded keypads can create false contacts. Install a weather cover and use lithium batteries for extreme climates.
How many PINs can a Chamberlain keypad store?
Standard models store one primary PIN. Premium models (like the 940EV-P2) support up to four individual user codes plus a temporary guest code. Consult your specific model’s specification sheet for exact capacity.
Is it safe to program the keypad myself, or should I hire a pro?
DIY programming is completely safe and intended by the manufacturer. No high-voltage wiring is involved. Professional assistance is only necessary if the Learn button fails to illuminate, indicating potential logic board damage or electrical supply issues.
What happens if I enter the wrong PIN too many times?
Most Chamberlain keypads implement a lockout feature after 3–5 incorrect attempts. The keypad will become unresponsive for 30–60 seconds as a brute-force prevention measure. Simply wait for the timeout period and re-enter the correct code.
Can I use a universal keypad with my Chamberlain opener?
Many universal keypads claim Chamberlain compatibility, but success rates vary significantly. OEM Chamberlain keypads guarantee proper rolling-code synchronization. Third-party options may work for basic functions but often lack advanced security features or firmware update support.
Conclusion
Understanding how do you program a Chamberlain garage door opener keypad empowers you to maintain both convenience and security at your property. By following the systematic steps outlined above—from identifying your Learn button color to executing the precise ENTER sequence—you can achieve reliable operation in under five minutes. Remember that regular maintenance, including battery replacement and code rotation, extends your system’s lifespan and protects your home.
Your garage door is likely the largest moving object in your house and a primary entry point for daily life. Taking ownership of its programming eliminates dependency on service calls for minor resets and gives you peace of mind knowing your access system functions exactly as designed.
Found this guide helpful? Share it on Facebook, Pinterest, or Nextdoor to help neighbors avoid driveway lockouts. Have a unique Chamberlain model or troubleshooting tip? Drop a comment below—your experience could save someone else hours of frustration. Safe programming, and welcome home!
Leave a Reply