Introduction
There are few things more frustrating than standing in your driveway, punching numbers into a keypad that refuses to respond. If you are currently locked out or dealing with a malfunctioning entry system, you are likely asking, “How do I reset my LiftMaster garage door opener keypad?” You are not alone; this is one of the most common maintenance issues homeowners face, often caused by dead batteries, corrupted memory, or simple wear and tear.
The good news is that resetting your device is usually a quick, DIY-friendly process that takes less than five minutes. In this comprehensive guide, we will walk you through every method for restoring access, ensuring your home remains secure and convenient. Whether you have an older model or the latest Security+ 2.0 technology, we have the specific steps you need to get back inside safely.
Why Your Keypad Might Need a Reset
Before diving into the technical steps, it is helpful to understand why the reset is necessary. Understanding the root cause can prevent future failures and help you determine if a simple reset will suffice or if hardware replacement is needed.
- Battery Depletion: Even if the LED lights up, low voltage can prevent the signal from reaching the motor unit.
- Memory Corruption: Power surges or lightning strikes can scramble the logic board’s stored codes.
- Code Conflict: Changing the main remote code without updating the keypad causes synchronization failure.
- Physical Damage: Moisture ingress or button wear can create false inputs.
According to industry service data, nearly 60% of keypad service calls are resolved simply by clearing the memory and reprogramming, rather than replacing the unit. This highlights the importance of knowing the proper reset procedure before calling a technician.
How Do I Reset My LiftMaster Garage Door Opener Keypad? (Standard Method)
For the vast majority of LiftMaster models manufactured after 1998, the reset process involves the “Learn” button on the motor unit and the “Enter” button on the exterior keypad. Follow these precise steps to ensure success.
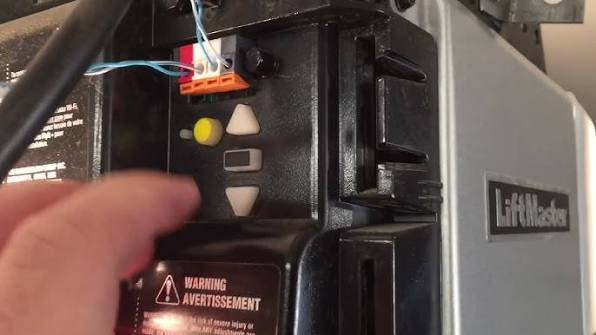
Step 1: Locate the Learn Button
Go to your garage door opener motor unit mounted on the ceiling. Look for the Learn button, typically located near the antenna wire or under the light lens. The color of this button matters:
- Yellow: Security+ 2.0 (Newer models)
- Purple, Orange, or Red: Security+ (Older models)
- Green: Pre-Security+ (Legacy models)
Step 2: Clear Existing Codes (Optional but Recommended)
If you want a complete factory reset to remove all old codes:
- Press and hold the Learn button on the motor unit for approximately 6–10 seconds.
- Release when the LED indicator next to the button turns off.
- Note: This erases all remotes and keypads. You will need to reprogram everything.
Step 3: Program the New PIN
- Go to your exterior keypad.
- Enter your desired 4-digit PIN.
- Immediately press and hold the ENTER button.
- Watch the motor unit lights. They should flash, or you will hear two distinct clicks.
- Release the ENTER button once the confirmation occurs.
Step 4: Test the System
Wait 5 seconds to allow the logic board to save the new code. Enter your new PIN and press ENTER. The door should activate immediately. If it does not, repeat Step 3, ensuring you hold the ENTER button firmly until the visual/audio confirmation is received.
⚠️ Safety Warning: Always keep hands and objects clear of moving door sections during testing. According to Wikipedia, modern openers are required to have photoelectric sensors and auto-reverse mechanisms, but mechanical failure can still occur. Never bypass safety sensors during troubleshooting.
Resetting Older Models Without a Learn Button
If your LiftMaster unit was manufactured before 1998, it may use DIP switches instead of a Learn button. These require a different approach.
| Feature | Modern (Learn Button) | Legacy (DIP Switch) |
|---|---|---|
| Reset Method | Hold Learn 6-10 sec | Match switch positions manually |
| Programming | Digital sync via ENTER | Physical switch alignment |
| Security Level | Rolling Code (High) | Fixed Code (Low) |
| Compatibility | Security+ / 2.0 Keyboards | Universal/Brand-specific only |
Steps for DIP Switch Models:
- Open the keypad cover and locate the bank of tiny switches.
- Open the motor unit cover to find the matching switch bank.
- Use a pen or small tool to set the keypad switches to the exact same pattern as the motor unit.
- Close both covers and test.
Expert Tip: If you own a DIP switch model, consider upgrading to a newer opener. Fixed-code systems are vulnerable to “code grabbing” theft, whereas modern rolling-code technology changes the signal billions of times per use.
Troubleshooting: What If the Reset Fails?
You followed the steps perfectly, but the keypad still won’t work. Don’t panic. Here is a systematic diagnostic checklist used by professional technicians.
1. Check Battery Orientation and Type
Not all 9V batteries are created equal. Some keypads require alkaline batteries specifically; lithium or rechargeable versions may provide insufficient amperage for the initial handshake. Ensure the terminals are clean and free of corrosion. A cotton swab dipped in white vinegar can remove oxidation.
2. Verify Signal Range
Interference from LED bulbs in the opener housing is a surprisingly common issue. Certain cheap LED bulbs emit radio frequency noise that blocks keypad signals.
- Test: Turn off the opener’s light bulb entirely and try resetting again.
- Fix: Replace with LiftMaster-approved LED bulbs or standard incandescent bulbs.
3. Inspect Wiring (For Hardwired Units)
If you have a wired keypad (rare but existing), check for frayed wires at the connection point behind the unit and at the motor terminal strip. A multimeter set to continuity mode can verify if the circuit is intact.
4. Logic Board Failure
If the Learn button LED doesn’t illuminate, or if the motor unit makes no sound during programming attempts, the internal capacitor or logic board may have failed. At this stage, professional repair or unit replacement is typically more cost-effective than component-level debugging.
FAQ: Common Questions About LiftMaster Keypad Resets
Q1: How often should I reset my garage door keypad?
You generally do not need to reset your keypad on a schedule. Only perform a reset when changing ownership of the home, losing a remote, experiencing malfunction, or after a significant power surge. Regular battery replacement (every 1–2 years) is sufficient maintenance for most households.
Q2: Can I reset the keypad without accessing the motor unit?
No. For security reasons, LiftMaster designs require physical access to the motor unit’s Learn button to authorize new devices. This prevents unauthorized individuals from adding their own keypads from outside your garage. The sole exception is some smart Wi-Fi enabled models that allow management via the myQ app, though initial pairing still requires the Learn button.
Q3: Will resetting the keypad erase my car’s built-in HomeLink system?
It depends on how you reset. If you hold the Learn button for 6+ seconds to wipe all memory, yes, HomeLink will be erased. If you simply program a new keypad code using the standard method (press Learn once, then enter keypad PIN), your existing HomeLink and remotes will remain unaffected.
Q4: My keypad works intermittently after resetting. What’s wrong?
Intermittent operation post-reset usually indicates either a failing battery that passes initial voltage tests but drops under load, or RF interference. Try replacing the battery with a premium alkaline brand first. If problems persist, check for nearby electronics (routers, baby monitors) operating on similar frequencies and relocate them.
Q5: Is there a universal reset code for LiftMaster keypads?
No. There is no master or universal reset code. Each system uses unique rolling codes or proprietary DIP configurations for security. Any website claiming to offer a “universal reset code” is providing inaccurate information. Always follow the manufacturer-specific procedures outlined above.
Q6: How long does the entire reset process take?
For a standard Security+ or Security+ 2.0 model, the actual programming sequence takes approximately 30–60 seconds. Including ladder setup, battery checks, and testing, plan for about 5–10 minutes total. Legacy DIP switch models may take 15–20 minutes due to manual switch alignment.
Conclusion
Knowing how do I reset my LiftMaster garage door opener keypad empowers you to maintain your home’s security and convenience without unnecessary service calls. Whether you’re dealing with a simple battery issue or need to reprogram after moving into a new home, the steps outlined above cover virtually every scenario you’ll encounter. Remember to prioritize safety, use quality batteries, and never force components beyond their design limits.
A properly functioning keypad isn’t just about convenience—it’s a critical layer of home security. Take a moment today to test your system and share this guide with friends or family members who might be struggling with their own garage door access issues. A quick social media share could save someone a frustrating evening locked outside!
Found this guide helpful? Share it on Facebook, X (Twitter), or Pinterest to help other homeowners regain access to their garages. Have a unique LiftMaster model not covered here? Drop a comment below—we’d love to help you troubleshoot!
Leave a Reply