Introduction
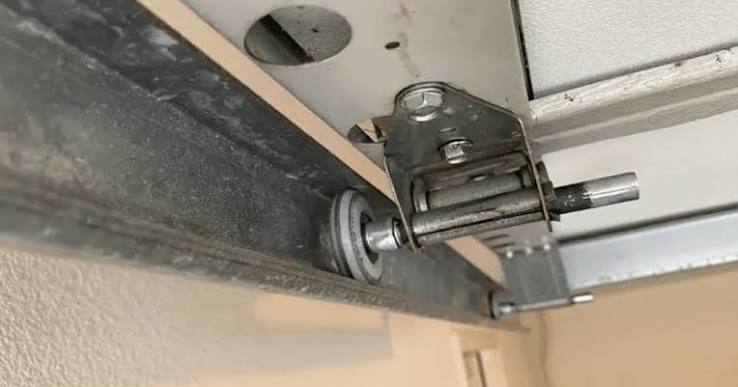
There are few things more stressful than pressing your remote and hearing a loud grind followed by silence, leaving you staring at a crooked panel. If you are currently asking yourself, “How do I put my garage door back on track?” please know that this is a common issue often caused by loose hardware or minor obstructions rather than catastrophic failure. While many situations require professional intervention due to safety risks, understanding the mechanics can help you assess whether a simple realignment is possible or if it is time to call an expert.
Why Does a Garage Door Come Off Track? Understanding the Mechanics
Before attempting any fix, it is vital to understand why the derailment occurred. A garage door operates on a delicate balance of tension and alignment. According to industry data from the International Door Association (IDA), over 70% of track issues stem from neglected maintenance rather than sudden impact.
Common culprits include:
- Loose Track Bolts: Over years of vibration, the brackets holding the steel tracks to the wall can loosen, creating gaps where rollers escape.
- Obstructions in the Track: Dirt, hardened grease, or small debris act as speed bumps that force rollers outward.
- Worn Rollers: Nylon rollers can crack, and steel rollers can develop flat spots, preventing smooth travel.
- Cable Issues: A frayed or snapped lifting cable creates uneven tension, yanking one side of the door off its path.
⚠️ Critical Safety Warning: Never attempt to work on a garage door with a broken torsion spring or snapped cable. These components store lethal amounts of kinetic energy. If springs or cables are involved, stop immediately and contact a certified technician. The steps below apply only to doors that have derailed due to loose tracks or roller misalignment while the spring system remains intact.
Step-by-Step: How Do I Put My Garage Door Back On Track Safely?
If you have confirmed the springs and cables are intact and the door simply slipped due to track alignment, follow this precise procedure. This tutorial assumes a standard sectional overhead door.
Tools You Will Need
- Adjustable wrench set and socket ratchet
- Rubber mallet (never use a metal hammer directly on steel tracks)
- C-clamps or locking pliers
- Level (4-foot minimum)
- Silicone-based garage door lubricant
- Safety glasses and heavy-duty work gloves
- Helper (garage doors weigh 150–300 lbs; never work alone)
Phase 1: Secure and Inspect
- Disconnect the Opener: Pull the emergency release cord to disengage the automatic opener. Manually lower the door until the derailed section is accessible at waist height.
- Clamp the Door: Place C-clamps on the track below the bottom roller on the side that is still on track. This prevents the door from crashing down unexpectedly.
- Identify the Derailment Point: Locate exactly where the roller left the track. Check for dents, bends, or foreign objects at this specific spot.
Phase 2: Realign the Track
- Loosen Track Brackets: Using your wrench, slightly loosen (do not remove) the bolts securing the track brackets near the derailment point. You need enough play to shift the track but not so much that it becomes unstable.
- Reposition the Roller: With your helper supporting the door’s weight, gently guide the derailed roller back toward the track opening. Use the rubber mallet to tap the track (not the roller) into position around the wheel.
- Verify Alignment: Place your level against the vertical track. It must be perfectly plumb. Even a ¼-inch deviation can cause re-derailment within days.
- Retighten Methodically: Starting from the top bracket and working downward, tighten each bolt to manufacturer torque specifications (typically 25–30 ft-lbs for residential doors). Alternating sides ensures even pressure.
Phase 3: Test and Lubricate
- Remove Clamps and Test Manually: Slowly raise and lower the door by hand through the full cycle. It should move smoothly with minimal resistance. Any binding indicates remaining misalignment.
- Lubricate Properly: Apply silicone-based lubricant to rollers, hinges, and the inside of the track. Avoid WD-40 or grease, which attract dirt and accelerate wear.
- Reconnect Opener: Only after confirming smooth manual operation should you re-engage the automatic opener. Run three complete cycles while observing for unusual sounds.
When to Call a Professional vs. DIY Repair
Not every off-track situation is a candidate for DIY. Use this comparison table to make an informed decision:
| Factor | DIY Appropriate | Professional Required |
|---|---|---|
| Cause | Loose bolts, minor debris | Broken spring/cable, bent track |
| Door Weight | Single-car (<200 lbs) | Double-car or custom wood (>250 lbs) |
| Track Condition | Straight, no visible damage | Dented, twisted, or separated joints |
| Experience Level | Comfortable with tools & helpers | Uncertain about spring tension systems |
| Time Available | 2–3 hours uninterrupted | Emergency or same-day resolution needed |
| Risk Tolerance | Understands safety protocols | Prefers warranty-backed service |
For deeper technical background on counterbalance mechanisms and safety standards, refer to the Garage Door Wikipedia entry, which provides excellent foundational engineering context.
Preventive Maintenance to Avoid Future Derailments
Once you’ve successfully answered “how do I put my garage door back on track,” prevent recurrence with this quarterly checklist:
- Tighten All Hardware: Vibration loosens bolts faster than any other factor. Spend 10 minutes every three months checking track brackets, hinge screws, and roller shaft nuts.
- Inspect Rollers: Replace nylon rollers showing cracks or chips. Steel rollers with grooves indicate track damage. Most professionals recommend replacing all rollers simultaneously every 7–10 years.
- Clean Tracks Quarterly: Wipe tracks with a damp cloth and mild degreaser. Remove accumulated grime before it hardens into obstruction points.
- Test Balance Monthly: Disconnect the opener and lift the door halfway. A properly balanced door stays in place. If it drifts up or down, spring adjustment is needed—call a pro.
- Check Weather Seals: Damaged bottom seals allow debris ingress. Replace cracked or torn seals promptly.
Frequently Asked Questions (FAQ)
Q1: Can I put my garage door back on track without disconnecting the opener?
A: Absolutely not. The opener’s motor can activate unexpectedly during repair, causing severe injury or further damage. Always pull the emergency release cord and unplug the unit before beginning any work. Manual control is non-negotiable for safety.
Q2: How much does professional garage door track realignment cost?
A: National averages range from $150 to $350 for labor and minor parts when springs and cables are intact. Costs increase significantly ($400–$800+) if track replacement, spring repair, or cable installation is required. Always obtain written estimates before authorizing work.
Q3: Is it normal for a garage door to come off track repeatedly after fixing it?
A: No. Recurring derailment indicates an unresolved root cause—typically bent tracks, worn rollers, or improper spring tension. Continuing DIY attempts on a recurring problem risks catastrophic failure. Professional diagnosis is essential after the second incident.
Q4: How long does it take to put a garage door back on track?
A: For experienced DIYers with proper tools and a helper, expect 2–3 hours including inspection, realignment, testing, and cleanup. First-timers should budget 4–5 hours. Rushing this process compromises safety and alignment quality.
Q5: Can I use WD-40 to lubricate my garage door track after realignment?
A: No. WD-40 is a solvent and water displacer, not a lubricant. It strips existing lubrication and attracts dust that accelerates wear. Always use silicone-based or lithium-based garage door lubricant specifically formulated for overhead door systems.
Q6: What are the signs my garage door is about to come off track?
A: Warning signs include grinding or scraping noises during operation, visible gaps between rollers and track, jerky movement instead of smooth travel, and the door appearing crooked when partially open. Address these symptoms immediately before complete derailment occurs.
Conclusion
Learning how do I put my garage door back on track empowers you to handle minor alignment issues safely while recognizing when professional expertise is non-negotiable. By following systematic inspection, secure clamping, precise realignment, and thorough testing, you can restore functionality without compromising safety. Remember that prevention through quarterly maintenance saves far more time and money than emergency repairs.
Found this guide helpful? Share it on Facebook, X (Twitter), or Pinterest to help fellow homeowners avoid costly mistakes! Tag us with your garage door repair wins—we’d love to celebrate your DIY success. Stay safe, stay proactive, and keep those doors rolling smoothly! 🏠🔧
Leave a Reply