Introduction
There is nothing quite as frustrating as waking up, hitting the remote, and hearing a loud bang followed by silence. Your garage door is stuck, your car is trapped, and your day is off to a chaotic start. If you are staring at a snapped metal coil and wondering, “How do I know what garage door springs I need?” you are not alone. This is one of the most common yet critical questions homeowners face when dealing with garage door maintenance.
Choosing the wrong spring isn’t just an inconvenience; it can be dangerous and damage your garage door opener. In this guide, we will walk you through the exact steps to identify the correct replacement, ensuring safety, longevity, and smooth operation for your home.
Why Identifying the Right Spring Matters
Before we dive into the measurements, it is crucial to understand why precision matters. Garage door springs are under extreme tension—enough to lift hundreds of pounds of steel and wood. According to industry standards, a typical residential garage door weighs between 130 and 350 pounds. The springs counterbalance this weight, making it easy for the opener (or your hands) to lift the door.
If you install a spring with the wrong tension or length:
- The door may slam shut, posing a severe safety risk to children and pets.
- The opener motor will burn out prematurely due to excessive strain.
- The cables may snap, causing further structural damage.
Therefore, knowing exactly what you need is not just about convenience; it is about home safety.
Step 1: Identify Your Spring Type
The first step in answering “how do I know what garage door springs I need” is identifying which system your door uses. There are two primary types: Torsion Springs and Extension Springs.
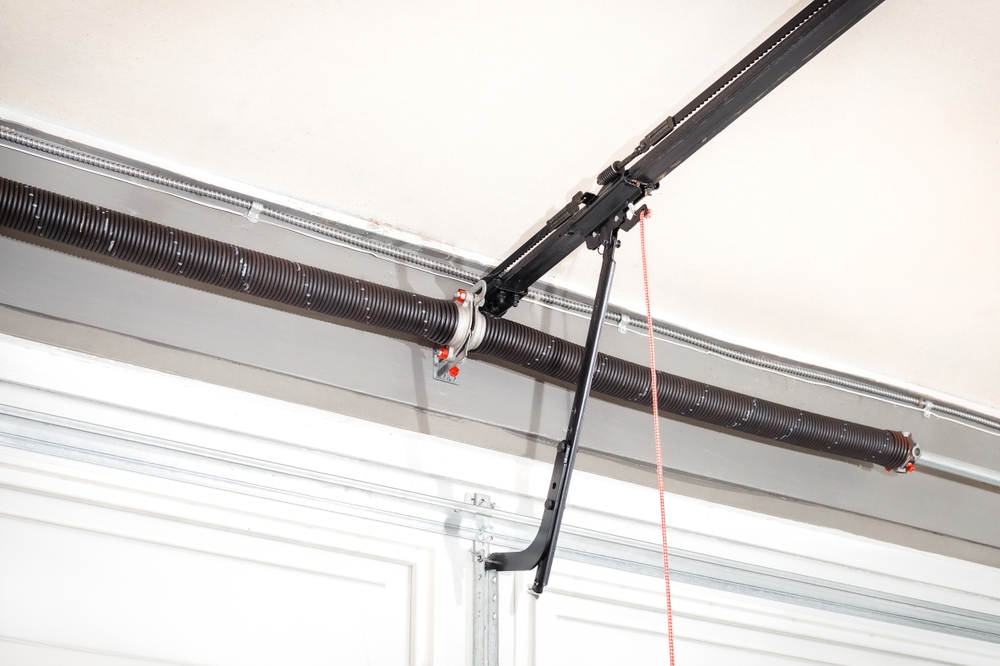
Torsion Springs
These are mounted horizontally above the closed garage door, on a metal shaft. They twist (torque) to store energy.
- Visual Cue: Look for a long metal bar running across the top of the door frame. You will see one or two tightly wound coils centered on this bar.
- Common Use: Heavier doors, double-car garages, and modern installations.
Extension Springs
These run parallel to the horizontal tracks on both sides of the door. They stretch out as the door closes and contract as it opens.
- Visual Cue: Look for long springs attached to pulleys and cables along the side walls of your garage.
- Common Use: Lighter doors, older homes, and single-car garages.
Pro Tip: If you are unsure, take a photo of your current setup before removing anything. This visual reference is invaluable when shopping for replacements.
Step 2: Measuring Torsion Springs (The Most Common Type)
If you have torsion springs, precision is non-negotiable. You need three specific measurements: Wire Size, Inside Diameter, and Length.
1. Wire Size (Thickness)
This is the most critical measurement. Even a slight variance can change the lifting capacity significantly.
- How to Measure: Use a caliper for accuracy. If you don’t have one, use a ruler. Measure the thickness of the wire itself, not the whole coil.
- Common Sizes: 0.218″, 0.225″, 0.250″, etc.
- Note: Paint can add thickness. Try to measure a spot where the paint has chipped off, or subtract approximately 0.005″ if measuring over paint.
2. Inside Diameter (ID)
This is the width of the open space inside the spring coil.
- How to Measure: Measure from the inside edge of the coil to the opposite inside edge.
- Standard Sizes: Most residential doors use either 2-inch or 2.25-inch inside diameters.
3. Length
Measure the length of the spring itself, excluding the cones (the pointed ends).
- How to Measure: Stretch the spring slightly to separate the coils if they are compressed, then measure from end to end of the coiled part.
- Standard Lengths: Usually between 24″ and 36″.
| Measurement | Tool Needed | Typical Range | Importance |
|---|---|---|---|
| Wire Size | Caliper/Ruler | 0.200″ – 0.262″ | Critical for weight balance |
| Inside Diameter | Ruler | 2″ or 2.25″ | Ensures fit on the shaft |
| Length | Tape Measure | 24″ – 36″ | Determines total torque capacity |
For more detailed technical specifications on spring mechanics, you can refer to general engineering principles on Wikipedia’s Hooke’s Law page, which explains the physics behind spring tension.
Step 3: Measuring Extension Springs
Extension springs are generally easier to measure but require attention to detail regarding their attachment points.
1. Length
Measure the length of the spring excluding the hooks or loops at the ends.
- State: Measure while the door is closed and the spring is relaxed (not stretched).
- Common Lengths: 24″, 26″, 28″, 30″, etc.
2. Wire Size
Similar to torsion springs, measure the thickness of the wire.
- Common Sizes: 0.218″, 0.225″, 0.250″.
3. Color Code (If Visible)
Many manufacturers paint extension springs with color codes to indicate their weight capacity.
- Example: A red stripe might indicate a 100-lb door, while a blue stripe indicates 130 lbs.
- Warning: Do not rely solely on color, as paint fades and standards vary by manufacturer. Always verify with physical measurements.
Step 4: Determine the Door Weight
Knowing the physical dimensions of the spring is only half the battle. You must match the spring to the weight of your door.
How to Weigh Your Door Safely
- Disconnect the garage door opener by pulling the release cord (usually a red rope).
- Lift the door manually to about waist height.
- Let go. If the door stays in place, it is well-balanced. If it falls, the springs are too weak. If it shoots up, they are too strong.
- For an exact weight, use a bathroom scale. Place the scale under the bottom edge of the door (with the door closed) and lift slightly until the weight registers. Note: This method requires caution and a helper.
General Weight Guidelines
- Single Steel Door: ~130–150 lbs
- Double Steel Door: ~200–250 lbs
- Wood/Insulated Doors: Can exceed 350 lbs
If you cannot weigh the door, check the label on the inside of the door sections or consult the original installation manual.
Step 5: Check the Cycle Life
Not all springs are created equal. When asking “how do I know what garage door springs I need,” consider how long you want them to last.
- Standard Cycle: 10,000 cycles (approx. 7–10 years for average use).
- High Cycle: 25,000+ cycles (approx. 20+ years).
Recommendation: If you plan to stay in your home for a long time, invest in high-cycle springs. They cost 20–30% more but save you from future repairs.
Safety Warning: Proceed with Caution
Garage door springs are under high tension. A slipping winding bar or a snapped cable can cause serious injury or death.
- Never attempt to adjust or replace torsion springs unless you have the proper tools (winding bars) and experience.
- Always wear safety glasses and heavy gloves.
- If in doubt, hire a professional. The cost of a service call is far less than the cost of an emergency room visit.
FAQ Section
Q1: Can I replace just one torsion spring?
A: It is highly recommended to replace both springs, even if only one is broken. Since both springs were installed at the same time and have undergone the same wear and tear, the second one is likely near failure. Replacing both ensures balanced lifting and saves you from another repair soon.
Q2: How often should garage door springs be replaced?
A: On average, torsion springs last between 7 to 10 years (or 10,000 cycles). However, climate plays a role. Humid or salty air can cause rust, shortening their lifespan. Inspect them annually for signs of wear or gaps in the coils.
Q3: What does a “gap” in my torsion spring mean?
A: A visible gap in the coils of a torsion spring is a clear sign that it has broken. Do not attempt to operate the door. The spring has lost its tension and can no longer support the door’s weight safely.
Q4: Are universal garage door springs available?
A: No. Garage door springs are highly specific to the weight and size of the door. Using a “universal” or mismatched spring can lead to immediate failure or damage to your garage door system. Always measure precisely.
Q5: Why is my garage door noisy after replacing the springs?
A: Noise usually indicates improper lubrication or incorrect tension. Ensure you have applied a silicone-based lubricant to the springs and rollers. If the noise persists, the tension may be uneven, requiring professional adjustment.
Conclusion
So, how do I know what garage door springs I need? By systematically identifying your spring type, measuring the wire size, inside diameter, and length with precision, and matching these specs to your door’s weight. While it may seem daunting, taking the time to get these details right ensures your garage door operates smoothly and safely for years to come.
Remember, safety is paramount. If you are uncomfortable handling high-tension components, there is no shame in calling a certified technician. Your peace of mind is worth the investment.
Found this guide helpful? Share it with your neighbors on Facebook or Pinterest to help them tackle their own DIY garage door projects safely!
Leave a Reply