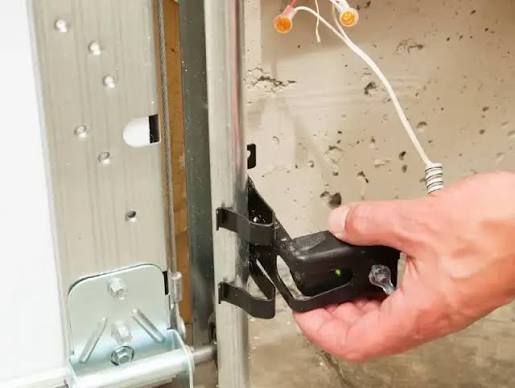
Is your garage door refusing to close, or does it reverse immediately after hitting the floor? You are not alone; this is one of the most common frustrations for homeowners. If you are wondering, “How do I align the sensors on my garage door,” you have come to the right place. This guide will walk you through the process safely and effectively, saving you the cost of a professional service call.
Garage door sensors are critical safety features designed to prevent accidents. When they are misaligned, your door interprets the broken beam as an obstruction—like a child or pet—and refuses to close. While it can feel technical, realigning them is a straightforward task that requires only a few minutes and basic tools. Let’s get your garage door working smoothly again.
Why Do Garage Door Sensors Become Misaligned?
Before diving into the fix, it helps to understand why this happens. Garage door sensors, also known as photo-eye sensors, sit on either side of the door near the floor. They emit an invisible infrared beam from one unit to the other. If the beam is interrupted, the door stops or reverses.
Misalignment usually occurs due to:
- Vibration: The constant shaking of the door opening and closing can loosen brackets over time.
- Accidental Impact: Bumping into the sensor with a car, bicycle, or lawn mower.
- Weather Changes: Extreme heat or cold can cause metal tracks and brackets to expand or contract slightly.
- Loose Screws: Standard wear and tear can loosen the mounting hardware.
According to the Consumer Product Safety Commission, garage door openers manufactured after 1993 are required to have these safety reversal systems. Ensuring they are aligned is not just about convenience; it is a vital safety compliance issue for your home.
Step-by-Step Guide: How Do I Align The Sensors On My Garage Door?
Follow these precise steps to realign your sensors. Patience is key here; small adjustments make a big difference.
Step 1: Inspect and Clean the Lenses
Dirt, spider webs, or dust can block the infrared beam, mimicking a misalignment issue.
- Grab a soft, dry microfiber cloth.
- Gently wipe the lens of both the sending unit (usually with an amber LED) and the receiving unit (usually with a green LED).
- Check for any physical obstructions like leaves, boxes, or tools between the two sensors.
Step 2: Check the Indicator Lights
Look at the LED lights on both sensors.
- Solid Light: Typically indicates proper alignment and power.
- Blinking Light: Usually indicates misalignment or an obstruction.
- No Light: Check the power source or wiring.
If one light is solid and the other is blinking or off, you definitely have an alignment issue.
Step 3: Loosen the Wing Nut or Screw
Most sensors are held in place by a wing nut or a single screw on the bracket.
- Use your fingers or a pair of pliers to slightly loosen the wing nut. Do not remove it completely.
- The sensor should be loose enough to move but tight enough to hold its position when you let go.
Step 4: Adjust the Sensor Position
This is the most critical step.
- Stand behind the receiving sensor (the one with the blinking light).
- Gently move the sensor head up, down, left, or right.
- Watch the LED light closely. You are looking for the moment the blinking stops and the light turns solid.
- Once the light is solid, hold the sensor firmly in that position.
Step 5: Tighten and Test
- While holding the sensor in the aligned position, tighten the wing nut or screw securely.
- Be careful not to overtighten, which might shift the sensor slightly.
- Step back and check if the light remains solid.
- Test the garage door using your wall button or remote. The door should close completely without reversing.
Common Mistakes to Avoid When Aligning Sensors
Even with simple instructions, errors can occur. Here are pitfalls to avoid:
| Mistake | Consequence | Solution |
|---|---|---|
| Overtightening Brackets | Shifts sensor out of alignment during tightening. | Tighten gradually while monitoring the LED. |
| Ignoring Sunlight Interference | Direct sunlight can blind the receiver. | Install sunshades or adjust timing if possible. |
| Forgetting to Clean Lenses | Dirt blocks the beam even if aligned. | Always clean lenses before adjusting. |
| Bending the Bracket | Permanent misalignment due to force. | Use gentle pressure; replace bracket if bent. |
What If The Sensors Are Aligned But The Door Still Won’t Close?
If you have successfully aligned the sensors (both lights are solid) but the door still refuses to close, consider these additional troubleshooting steps:
- Check the Wiring: Inspect the wires running from the sensors to the motor head. Look for cuts, fraying, or loose connections at the terminal screws.
- Inspect the Track: Ensure the garage door tracks are clean and lubricated. A binding door can trigger safety reversals.
- Reset the Opener: Unplug the garage door opener for 30 seconds, then plug it back in. This can clear minor electronic glitches.
- Check the Force Settings: If the door closes partway and reverses, the close-force setting may be too low. Consult your manual to adjust this dial slightly.
FAQ Section
1. How often should I check my garage door sensor alignment?
It is recommended to check your sensor alignment every six months as part of routine garage maintenance. However, if you notice the door reversing unexpectedly or the LED lights blinking, check them immediately.
2. Can bad weather affect garage door sensors?
Yes. Heavy rain, snow, or direct sunlight can interfere with the infrared beam. Moisture can cause short circuits, while intense sunlight can overwhelm the receiver. Installing weatherproof covers or sunshades can help mitigate these issues.
3. What do the different colored lights on my sensors mean?
While colors vary by manufacturer, generally:
- Green LED: Indicates the receiving sensor is getting power and aligned.
- Amber/Yellow LED: Indicates the sending sensor is transmitting the beam.
- Blinking Red/Orange: Typically signals misalignment or an obstructed beam. Always refer to your specific opener’s manual for exact color codes.
4. Is it safe to bypass the sensors to close the door?
No. Bypassing safety sensors is extremely dangerous and illegal in many jurisdictions. The sensors are designed to prevent injury or death from a closing door. Never disable them. If they are malfunctioning, repair or replace them immediately.
5. How much does it cost to replace garage door sensors?
If alignment fails and replacement is necessary, a pair of universal garage door sensors typically costs between $20 and $50. Professional installation may add $75–$150 to the total, but DIY replacement is straightforward if you are comfortable with basic wiring.
6. Why does my garage door close when I hold the wall button but not with the remote?
This usually indicates a safety feature override. Holding the wall button bypasses the sensor check for immediate closure (use with caution). If the remote doesn’t work, it confirms the sensors are detecting an “obstruction” (misalignment). Fix the alignment, and the remote will work normally again.
Conclusion
Learning how do I align the sensors on my garage door is a valuable skill that enhances both convenience and safety in your home. By following the steps outlined above—cleaning the lenses, checking the LEDs, and making gentle adjustments—you can resolve most alignment issues in under 15 minutes.
Remember, regular maintenance prevents bigger problems down the road. Keep your sensors clean, check their alignment periodically, and never ignore a blinking light. Your garage door is a heavy mechanical device, and its safety features are there to protect your family and property.
Did this guide help you fix your garage door? Share this article with friends or neighbors who might be struggling with the same issue. A quick fix today means a safer home tomorrow!
Leave a Reply