Introduction
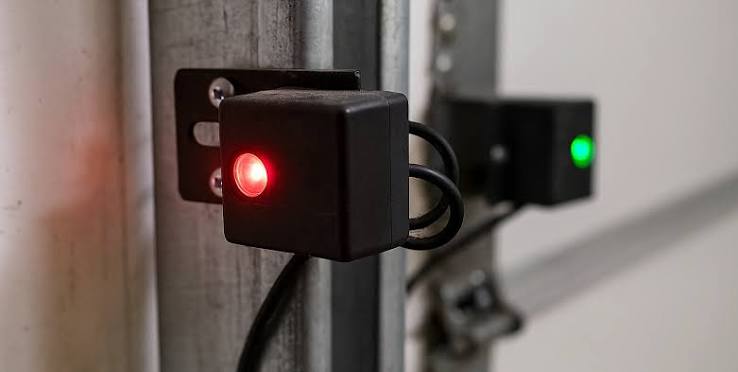
If you’ve ever stood in your driveway pressing the remote only to watch your Genie garage door opener refuse to close, you’re not alone. Seeing one sensor green and one sensor red is one of the most common — and frustrating — issues homeowners face with their Genie garage door systems. The good news? This problem is almost always fixable without calling a technician. In this comprehensive guide, we’ll walk you through exactly what those sensor lights mean, why one turns red, and how to get both sensors glowing green again so your garage door works safely and smoothly.
What Do the Green and Red Lights on Genie Garage Door Sensors Mean?
Before diving into fixes, it’s essential to understand what these lights are telling you. Genie garage door openers use a Safe-T-Beam® safety sensor system that consists of two units: a sending sensor and a receiving sensor. These are mounted on either side of your garage door opening, typically about 6 inches above the floor.
Here’s what each light color indicates:
| Light Color | Sensor Type | Meaning |
|---|---|---|
| Solid Green | Receiving Sensor | Properly aligned and receiving the infrared beam |
| Solid Red | Sending Sensor | Actively transmitting the infrared beam (normal) |
| Blinking Red | Either Sensor | Misalignment, obstruction, or wiring issue detected |
| No Light | Either Sensor | Power failure, disconnected wire, or dead sensor |
Important Note: On many Genie models, the sending sensor has a red LED and the receiving sensor has a green LED when everything is working correctly. So if you see one green and one red, your system may actually be functioning normally. The real problem arises when the green light starts blinking or goes out entirely.
According to Wikipedia’s article on garage door openers, modern photoelectric safety sensors became a federal requirement in the United States in 1993 under UL 325 standards, making them a critical component of every residential garage door system.
Why Is My Genie Garage Door Sensor Showing One Green and One Red Light?
There are several reasons you might notice this configuration. Let’s break down the most common causes:
1. Normal Operation (Yes, Really!)
As mentioned above, many Genie models are designed to show a red light on the sending sensor and a green light on the receiving sensor. If your garage door opens and closes without issue, there’s likely no problem at all.
2. Sensor Misalignment
This is the #1 cause of sensor-related failures. Even a slight bump from a car bumper, a lawnmower, or a child’s toy can knock one sensor out of alignment. When misaligned:
- The green light on the receiving sensor will blink or turn off
- The door will reverse immediately when trying to close
- You may hear a clicking sound from the motor unit
3. Dirty or Obstructed Lenses
Dust, spider webs, moisture, and debris can block the infrared beam between sensors. This is especially common in garages that aren’t climate-controlled.
4. Wiring Problems
Loose, frayed, or corroded wires connecting the sensors to the motor head can interrupt the signal. Older installations are particularly susceptible to this.
5. Sunlight Interference
Direct sunlight hitting the receiving sensor can overwhelm the infrared beam, causing intermittent failures — especially during certain times of day.
How to Fix Genie Garage Door Opener Sensors: Step-by-Step Guide
Follow these steps carefully to diagnose and resolve the issue.
Step 1: Identify Your Sensor Status
- Look at both sensors closely.
- Note which light is green, which is red, and whether either is blinking.
- Try closing the door using the wall button (not the remote) to confirm the behavior.
Step 2: Clean Both Sensor Lenses
- Use a soft, dry microfiber cloth to gently wipe each lens.
- Remove any cobwebs, dirt, or condensation.
- Avoid using harsh chemicals that could damage the lens coating.
Step 3: Check for Physical Obstructions
- Ensure nothing is blocking the path between the two sensors.
- Remove boxes, tools, bicycles, or any objects in the beam’s line of sight.
- Make sure the area within 6 inches above the floor is completely clear.
Step 4: Realign the Sensors
This is the most critical step. Here’s how to do it properly:
- Loosen the wing nut or bracket screw on the misaligned sensor just enough to allow movement.
- Slowly adjust the sensor until the green light on the receiving sensor becomes solid (not blinking).
- Most Genie sensors have a small LED indicator that glows brightest when perfectly aligned.
- Once aligned, tighten the bracket securely while holding the sensor in place.
- Test the door by pressing the close button.
Pro Tip: Have a helper stand near one sensor while you adjust the other. They can call out when the light turns solid green, saving you multiple trips back and forth.
Step 5: Inspect the Wiring
- Trace the wires from each sensor back to the motor head.
- Look for pinched, cut, or exposed wires.
- Check the terminal connections on the back of the motor unit — they should be snug and free of corrosion.
- If you find damaged wiring, replace it with 22-gauge bell wire, which is the standard for garage door sensor circuits.
Step 6: Shield from Sunlight
If the problem only occurs at certain times of day:
- Install a small cardboard tube or sun shield around the receiving sensor.
- Alternatively, reposition the sensor slightly to avoid direct sun exposure.
- Some homeowners use a piece of electrical tape to create a makeshift hood.
When to Replace Your Genie Garage Door Sensors
Sometimes cleaning and realignment aren’t enough. Consider replacing your sensors if:
- Neither light turns on after checking power and wiring
- The sensor housing is cracked or water-damaged
- The sensors are more than 10–15 years old and showing intermittent failures
- You’ve tried all troubleshooting steps and the problem persists
Replacement Genie Safe-T-Beam sensor kits typically cost between $25 and $50 and can be installed in under 30 minutes with basic tools.
Common Mistakes to Avoid
When troubleshooting your Genie garage door opener sensors, steer clear of these frequent errors:
- ❌ Forcing the door closed by holding the wall button — this bypasses safety features and is dangerous
- ❌ Taping over the sensors to “trick” the system — this creates a serious safety hazard
- ❌ Using mismatched sensors from different brands — they won’t communicate properly
- ❌ Ignoring flickering lights — intermittent issues often worsen over time
- ❌ Skipping the manual — your specific Genie model may have unique diagnostic codes
FAQ Section
Q1: Is it normal for my Genie garage door opener to have one green sensor and one red sensor?
A: Yes! On most Genie models, the sending sensor displays a solid red light and the receiving sensor shows a solid green light during normal operation. This simply means the infrared beam is being transmitted and received correctly. You only need to worry if the green light is blinking or off.
Q2: Why does my Genie garage door reverse when I try to close it?
A: The most common reason is that the safety sensors detect an obstruction or are misaligned. When the infrared beam between the two sensors is broken or weakened, the system automatically reverses the door as a safety precaution. Follow the realignment steps outlined above to resolve this.
Q3: Can I bypass the Genie garage door sensors temporarily?
A: While some Genie models allow you to hold the wall control button to force-close the door, this is not recommended as a permanent solution. Bypassing sensors removes a critical safety feature designed to prevent injury or property damage. Always fix the underlying issue instead.
Q4: How high should Genie garage door sensors be mounted?
A: Genie recommends mounting sensors no higher than 6 inches (15 cm) above the garage floor. This height ensures the beam can detect small children, pets, or objects that might be in the door’s path. Mounting them too high reduces their effectiveness and may violate safety codes.
Q5: What causes Genie sensor lights to blink?
A: Blinking lights typically indicate one of three things: (1) the sensors are misaligned, (2) something is obstructing the beam, or (3) there’s a wiring fault. Start by cleaning the lenses and checking alignment before investigating electrical connections.
Q6: How long do Genie garage door sensors last?
A: With proper maintenance, Genie Safe-T-Beam sensors can last 10 to 15 years or more. However, exposure to extreme temperatures, moisture, and physical impacts can shorten their lifespan. Regular cleaning and periodic alignment checks will help maximize their longevity.
Conclusion
Dealing with a Genie garage door opener one sensor green one sensor red situation doesn’t have to be stressful. In most cases, understanding what those lights mean is half the battle. Whether it’s a simple realignment, a quick lens cleaning, or a wiring check, the solutions are straightforward and well within the reach of any homeowner willing to spend 15–30 minutes on the task.
Remember: your garage door sensors exist to keep your family safe. Never ignore warning signs or attempt to permanently bypass the system. A properly functioning sensor setup gives you peace of mind every time that door goes up or comes down.
Found this guide helpful? Share it with friends, family, or neighbors who might be struggling with their own garage door sensor issues! Post it on Facebook, share it on X (Twitter), or pin it on Pinterest so others can save time and money on unnecessary service calls. Together, we can make home maintenance a little less intimidating for everyone. 🏠🔧
Leave a Reply