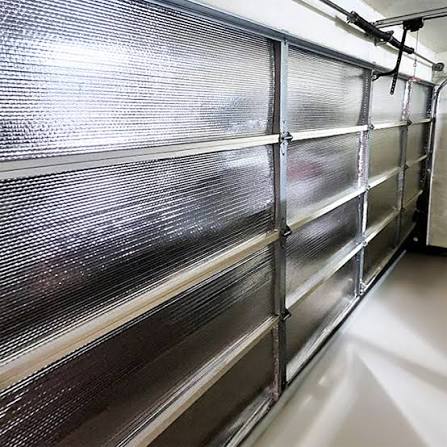
Is your garage freezing during the winter, making it unbearable to work in or store temperature-sensitive items? You are not alone, and the solution is much simpler than you might think. Installing Garage Door Insulation Kits To Keep The Cold Out can transform your chilly, drafty space into a comfortable, energy-efficient haven in just one afternoon.
Why Use Garage Door Insulation Kits To Keep The Cold Out?
Your garage door is likely the largest uninsulated surface in your entire home. During the winter, it acts as a massive thermal bridge, allowing freezing outdoor air to seep in and pushing your heated indoor air out.
According to the U.S. Department of Energy, proper insulation and weatherization can reduce heating and cooling costs by up to 15%. By sealing this gap, you are not just protecting your tools, vehicles, or workspace from freezing temperatures. You are also actively reducing the strain on your home’s HVAC system, which translates to lower utility bills and a smaller carbon footprint.
What Are the Best Types of Garage Door Insulation?
Not all insulation is created equal. Choosing the right material depends on your climate, budget, and DIY skill level. Here is a breakdown of the three most common options:
- Polystyrene (EPS) Boards: These are rigid, lightweight foam panels. They are affordable, easy to cut, and provide a solid R-value (thermal resistance).
- Polyurethane Foam: Often found in higher-end kits, this material offers a superior R-value per inch. It can come as rigid boards or spray foam, providing excellent air sealing.
- Reflective Foil (Radiant Barrier): This consists of foam core sandwiched between layers of reflective foil. It is highly effective at reflecting radiant heat and is very easy to install with adhesive backing.
Quick Comparison Table
| Material Type | Average R-Value | Installation Difficulty | Best For |
|---|---|---|---|
| Polystyrene (EPS) | R-3 to R-4 per inch | Easy | Budget-conscious DIYers |
| Polyurethane Board | R-6 to R-7 per inch | Moderate | Extreme cold climates |
| Reflective Foil | R-4 to R-8 (total) | Very Easy | Moderate climates & quick installs |
Step-by-Step Guide: How to Install Your Insulation Kit
Installing an insulation kit is a highly rewarding weekend project. Follow these concrete steps to ensure a professional, long-lasting result.
Step 1: Measure and Prep the Surface
Clean the interior of your garage door panels thoroughly with a mild degreaser and let it dry completely. Measure the width and height of each individual recessed panel. Most standard garage door panels are between 21 to 24 inches wide and 18 to 24 inches high.
Step 2: Cut the Insulation Material
Using a sharp utility knife and a straightedge, cut your insulation boards to fit each panel. Pro Tip: Always cut the board to leave a precise 1/4-inch gap around the edges. This allows for natural material expansion and contraction during temperature fluctuations without buckling.
Step 3: Apply the Adhesive
Do not rely solely on the kit’s pre-applied tape if you live in a high-wind or extreme-temperature area. Apply a high-strength construction adhesive rated for temperatures between -20°F and 150°F. Place 6-inch beads of adhesive in an “X” pattern across the back of each insulation panel.
Step 4: Secure and Seal the Seams
Press the panel firmly into the garage door recess. Hold it for 30 seconds to ensure a strong bond. Once all panels are installed, seal the outer edges and any minor gaps with heavy-duty aluminum foil tape. This prevents cold air drafts from sneaking behind the insulation.
Pros and Cons of DIY Garage Insulation
Before you buy, it is helpful to weigh the advantages and potential drawbacks of tackling this project yourself.
✅ The Pros:
- Cost-Effective: DIY kits typically cost between $50 and $150, a fraction of the cost of hiring a professional.
- Immediate Comfort: You will notice a temperature difference in the garage within hours of installation.
- Noise Reduction: Insulation acts as a sound dampener, making your garage door opener run much quieter.
❌ The Cons:
- Added Weight: Insulation adds 15 to 30 pounds to your door. You must check your garage door spring tension and opener capacity afterward.
- Aesthetic Limitations: The interior of your garage will look different, though most kits feature a clean, white vinyl or foil finish.
- Time Commitment: While not overly complex, measuring, cutting, and adhering takes about 2 to 3 hours for a standard two-car garage.
Expert Tips for Maximizing Energy Efficiency
Insulating the door is only half the battle. To truly winterize your garage, you must address the entire envelope of the space.
- Weatherstrip the Perimeter: Install a high-quality rubber bottom seal on the garage door. Check the side and top seals for cracks and replace them if they are brittle.
- Insulate the Walls and Ceiling: If your garage is attached to your home, insulating the walls and ceiling (especially the “bonus room” above) prevents cold from bleeding into your living spaces.
- Understand the Science: Understanding the fundamental science behind thermal insulation can help you make informed decisions about R-values, vapor barriers, and material choices for your specific climate zone.
Real-World Case Study: John, a homeowner in Chicago, installed a reflective foil insulation kit and upgraded his bottom weather seal last November. He reported a 12% drop in his overall winter heating bill by February, as his adjacent kitchen no longer felt like a walk-in refrigerator.
Frequently Asked Questions (FAQ)
Q1: Do garage door insulation kits really work?
Yes, they do. While they will not turn an unheated garage into a tropical paradise, they significantly reduce heat transfer, block cold drafts, and stabilize the ambient temperature, making the space much more usable.
Q2: What R-value should I look for in a garage door insulation kit?
For most moderate climates, an R-value of R-4 to R-8 is sufficient. If you live in an area with harsh, freezing winters (like the Midwest or Northeast), aim for a kit that provides at least an R-8 to R-12 rating for maximum thermal resistance.
Q3: Can I install a garage door insulation kit myself?
Absolutely. Most kits are explicitly designed for DIY installation. They require only basic tools like a tape measure, utility knife, and straightedge. No specialized construction experience is needed.
Q4: Will insulating my garage door void my warranty?
Generally, no. However, because insulation adds weight to the door, it is highly recommended to have a professional adjust the torsion springs after installation. Failing to rebalance the door could strain the opener, which might cause mechanical issues not covered by warranty.
Q5: How long does a garage door insulation kit last?
With proper installation and quality materials, a garage door insulation kit can last 10 to 15 years or more. The most common point of failure is the adhesive or tape peeling, which can be easily repaired with fresh foil tape.
Conclusion
Investing in Garage Door Insulation Kits To Keep The Cold Out is one of the most cost-effective home improvement projects you can undertake. It delivers immediate benefits: a warmer workspace, protected stored items, reduced energy bills, and a quieter garage door operation. By choosing the right material and following a careful, step-by-step installation process, you can winterize your garage like a pro.
Found this guide helpful? Share it with your friends and neighbors on Facebook, Twitter, or Pinterest to help them beat the winter chill too!
Leave a Reply