Have you ever stood in your driveway, remote in hand, wondering if you could save hundreds of dollars by installing that new garage door opener yourself? You are not alone. Many homeowners ask, “How difficult is it to install a garage door opener?” while weighing the pros and cons of DIY versus hiring a professional.
The short answer is: it is moderately difficult. It requires basic mechanical skills, patience, and a strong adherence to safety protocols. While it is not as simple as assembling flat-pack furniture, it is certainly manageable for a handy homeowner with the right guidance. In this guide, we will break down exactly what makes this project challenging, what tools you need, and when you should definitely call in the experts.
Understanding the Real Difficulty Level
Before you rush to the hardware store, it is crucial to understand what “moderate difficulty” actually means in this context. Installing a garage door opener is not just about hanging a motor on the ceiling. It involves electrical wiring, heavy lifting, and precise alignment of mechanical components.
According to industry standards, a typical installation takes between 4 to 6 hours for a first-time DIYer. For an experienced installer, it might take only 2 to 3 hours. The complexity increases if you are replacing an old unit versus installing one in a new construction where no prior infrastructure exists.
Key Factors Influencing Difficulty
- Type of Opener: Chain-drive openers are heavier and noisier but generally simpler to assemble. Belt-drive models are quieter and lighter but may have more delicate components. Smart openers require Wi-Fi setup and app configuration, adding a layer of digital complexity.
- Ceiling Height and Structure: If your garage has high ceilings or limited headroom, you may need special extension kits or jackshaft openers, which are significantly harder to install.
- Existing Wiring: If there is no existing electrical outlet near the motor mount location, you will need to run new wiring, which may require a licensed electrician depending on local codes.
What Tools and Skills Do You Need?
One of the biggest hurdles for beginners is realizing they do not have the right tools. Unlike hanging a picture frame, installing a garage door opener requires specific equipment to ensure safety and functionality.
Essential Tool Checklist
| Tool | Purpose |
|---|---|
| Power Drill & Bits | For drilling pilot holes and driving lag screws into ceiling joists. |
| Socket Set & Wrenches | For tightening bolts on the rail and motor assembly. |
| Stepladder (6-8 ft) | Must be sturdy and stable for working overhead. |
| Level | Critical for ensuring the rail is perfectly aligned. |
| Wire Strippers/Cutters | For connecting the motor to the power source and sensors. |
| Clamps or Vise Grips | To hold the rail in place while you secure it to the bracket. |
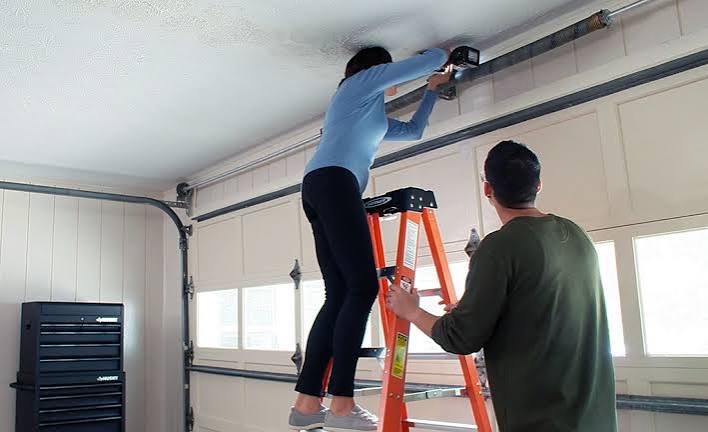
| Helper | Highly Recommended. The rail assembly is long and awkward to handle alone. |
Required Skill Set
You do not need to be a master carpenter, but you should be comfortable with:
- Basic Electrical Work: Connecting wires to terminals and understanding polarity.
- Reading Technical Manuals: Manufacturer instructions vary widely. Ability to follow diagrams is key.
- Physical Strength: Lifting a motor unit (30–50 lbs) and holding a 10-foot rail overhead requires stamina.
For more detailed technical specifications on garage door systems, you can refer to general engineering principles outlined on Wikipedia.
Step-by-Step Installation Overview
While every brand (LiftMaster, Chamberlain, Genie) has unique steps, the core process remains consistent. Here is a simplified roadmap to help you gauge the effort involved.
1. Preparation and Safety First
Disconnect the power to the garage. If you are replacing an old opener, unplug it and disconnect the trolley from the door. Never work on a live circuit. Clear the area below the installation site to prevent injury if something falls.
2. Assemble the Rail
Lay out the rail sections on the floor. Connect them using the provided bolts. Attach the trolley and the belt or chain. This step is easier on the ground than overhead. Ensure the chain/belt is tensioned according to the manual—usually, it should have about 1/4 inch of slack.
3. Mount the Header Bracket
This bracket attaches to the wall above the garage door. It must be secured into solid wood framing, not just drywall. Use a level to ensure it is perfectly horizontal. An uneven bracket will cause the door to bind later.
4. Install the Motor Unit
With the help of a friend, lift the motor unit and attach it to the header bracket. Then, secure the other end of the rail to the ceiling joists using angle iron brackets. Crucial: Ensure the motor is centered over the door. Misalignment causes premature wear on gears.
5. Electrical Connections
Connect the power cord to the motor. Run the low-voltage wires for the safety sensors and the wall control button. Sensor wires are typically thin and can be stapled along the wall trim. Keep wires away from moving parts.
6. Programming and Testing
Plug in the unit. Program the remote controls and keypad. Test the safety reversal system by placing a 2×4 piece of wood on the floor under the door. When the door closes, it must reverse upon hitting the object. If it does not, adjust the sensitivity settings immediately.
Common Challenges and How to Overcome Them
Even with careful planning, things can go wrong. Here are the most frequent issues DIYers face.
Issue 1: The Door Is Too Heavy
If your garage door is made of solid wood or is unusually large, the standard opener may struggle.
- Solution: Check the opener’s lifting capacity (measured in horsepower). For heavy doors, opt for a 3/4 HP or 1 HP model. You may also need to reinforce the door’s springs, which is a job for professionals due to high tension risks.
Issue 2: Wi-Fi Connectivity Issues
Smart openers often fail to connect to home networks during setup.
- Solution: Ensure your garage has a strong Wi-Fi signal. You may need a Wi-Fi extender. Also, verify that your router is broadcasting on the 2.4 GHz band, as many smart home devices do not support 5 GHz.
Issue 3: Noisy Operation
A newly installed opener should be relatively quiet. Excessive grinding or squeaking indicates a problem.
- Solution: Check the rail alignment. Lubricate the chain or screw drive with a silicone-based lubricant (not grease). Ensure all bolts are tightened securely.
When Should You Hire a Professional?
Knowing when to quit is a vital skill. While saving money is appealing, some scenarios demand professional intervention.
- Broken Springs: If your garage door springs are damaged, do not attempt to fix them yourself. Torsion springs store immense energy and can cause severe injury or death if they snap. Always hire a certified technician for spring repairs.
- No Electrical Outlet: If you need to install a new circuit or move an outlet, local building codes may require a licensed electrician.
- Complex Door Systems: If you have a custom-made door, a side-hinged door, or a door with unusual dimensions, standard kits may not fit.
FAQ Section
1. How long does it take to install a garage door opener?
For a DIY beginner, expect to spend 4 to 6 hours. This includes unpacking, assembly, installation, and testing. Professionals can complete the job in 2 to 3 hours.
2. Can I install a garage door opener by myself?
Technically, yes, but it is strongly recommended to have a helper. The rail assembly is long and cumbersome, and holding the motor unit in place while drilling is nearly impossible alone. A second person ensures safety and accuracy.
3. Do I need a permit to install a garage door opener?
In most US jurisdictions, replacing an existing opener does not require a permit. However, if you are installing new electrical wiring or modifying the structure, check with your local building department. Rules vary by city and county.
4. What is the hardest part of installing a garage door opener?
Most users find aligning the rail and securing the motor unit to the ceiling joists the most challenging part. It requires precise measurement and physical effort to hold components in place while fastening them.
5. Is it cheaper to install a garage door opener myself?
Yes. Professional installation costs between $150 and $300 on top of the unit price. By doing it yourself, you save this labor cost. However, factor in the value of your time and the risk of potential errors.
Conclusion
So, how difficult is it to install a garage door opener? It is a manageable weekend project for someone with basic DIY skills, the right tools, and a helper. It is not overly complex, but it demands respect for safety procedures and attention to detail.
By following the manufacturer’s instructions meticulously and taking your time with alignment and electrical connections, you can successfully install your own opener and enjoy the convenience of automated access. Remember, if you encounter broken springs or complex electrical issues, do not hesitate to call a professional. Your safety is worth more than the savings.
Did you find this guide helpful? Share it with your friends on social media who might be considering their own DIY garage upgrade!
Leave a Reply