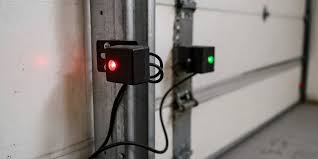
Have you ever stood in your driveway, staring at your garage door opener, confused by the tiny LED lights on the sensors? You might notice one light is solid green while the other is amber, or perhaps both are blinking red, leaving you wondering: do both garage door sensors need to be green for the door to operate correctly? Understanding these indicator lights is crucial for maintaining the safety and functionality of your automatic garage door system.
In this guide, we will demystify the meaning behind those colored lights, explain why they behave differently, and provide step-by-step troubleshooting tips to get your garage door back on track. Whether you are a new homeowner or just curious about how your safety sensors work, this article will give you the clarity you need.
Understanding the Two Types of Sensor Lights
To answer the question accurately, we first need to understand that garage door safety sensors come in pairs: a sending unit and a receiving unit. They are not identical twins; they have distinct roles, which is reflected in their LED indicators.
The Sending Unit (Transmitter)
The sending unit is responsible for emitting an invisible infrared beam across the garage door opening. On most major brands like LiftMaster, Chamberlain, and Craftsman, this unit typically has a green LED. This light indicates that the sensor is powered on and actively transmitting the beam. As long as this light is solid green, the transmitter is doing its job.
The Receiving Unit (Receiver)
The receiving unit’s job is to detect the infrared beam sent by the other sensor. If it receives the beam, it tells the garage door opener that the path is clear. This unit usually has an amber or yellow LED. When this light is solid, it means the receiver is successfully “seeing” the beam from the sender.
So, to directly answer the main question: No, both garage door sensors do not need to be green. In fact, in a properly aligned and functioning system, you should typically see one green light and one amber/yellow light.
| Sensor Type | Typical LED Color | Function | Status Indicator |
|---|---|---|---|
| Sending Unit | Green | Emits infrared beam | Solid Green = Power On & Transmitting |
| Receiving Unit | Amber/Yellow | Detects infrared beam | Solid Amber = Beam Received (Aligned) |
If you see two green lights, it might indicate a wiring issue, a mismatched sensor pair, or a specific brand variation, but the standard configuration is one of each.
What Does It Mean If One Light Is Blinking?
If your garage door refuses to close, the first thing you should check is the status of the sensor lights. A blinking light is the most common indicator of a problem. Here is what different blinking patterns usually mean:
- Blinking Amber/Yellow Light: This is the most frequent issue. It means the receiving sensor is not detecting the infrared beam. This could be due to misalignment, an obstruction blocking the beam, or dirty lenses.
- Blinking Green Light: This is less common but can indicate a power issue, a faulty wire connection, or a problem with the sending unit itself. In some newer models, a blinking green light might indicate a learning mode or a specific error code.
- Both Lights Off: If neither sensor has a lit LED, the issue is likely with the power supply. Check the wiring connections at the motor head and ensure the opener is plugged in.
According to general maintenance guidelines, keeping the sensor lenses clean is the first step in troubleshooting. Dust, spider webs, or dirt can block the infrared signal, causing the receiver to blink even if the sensors are perfectly aligned.
Step-by-Step Guide to Aligning Your Garage Door Sensors
If your receiving sensor (amber light) is blinking, your sensors are likely misaligned. Follow these steps to realign them properly. This process is straightforward and requires no special tools.
- Check for Obstructions: Before touching the sensors, ensure nothing is blocking the path between them. Boxes, bikes, or even tall grass can interrupt the beam.
- Clean the Lenses: Use a soft, dry cloth to gently wipe the lenses of both sensors. Avoid using harsh chemicals that might damage the plastic.
- Loosen the Wing Nut: Each sensor is held in place by a wing nut or a bracket screw. Loosen it just enough so you can move the sensor by hand, but not so much that it flops around.
- Adjust the Receiving Sensor: Slowly adjust the receiving sensor (the one with the amber light) until the light turns solid. You may need to move it up, down, left, or right. Have a helper watch the light while you make small adjustments.
- Tighten the Bracket: Once the amber light is solid, carefully tighten the wing nut while holding the sensor in place. Be careful not to shift the sensor while tightening.
- Test the Door: Press the wall button to close the garage door. If it closes smoothly, you have successfully aligned the sensors.
Pro Tip: If you struggle to keep the sensor steady while tightening, use a pair of pliers to hold the bracket in place. Even a millimeter of movement can cause the light to blink again.
Common Reasons Why Sensors Fail to Stay Aligned
Even after you align your sensors, they might fall out of alignment again. This is a frustrating but common issue. Here are the primary reasons why this happens:
- Loose Brackets: Over time, vibration from the garage door opening and closing can loosen the mounting brackets. Ensure all screws are tight.
- Bent Tracks: If the metal track holding the sensor is bent, the sensor will never stay in the correct position. You may need to replace the bracket or straighten the track.
- Sunlight Interference: Direct sunlight hitting the receiving sensor can sometimes overwhelm the infrared receiver, causing it to malfunction. This is more common in the late afternoon. Installing a shade or adjusting the angle slightly can help.
- Faulty Wiring: Frayed or pinched wires can cause intermittent power loss, leading to blinking lights. Inspect the wires running from the sensors to the motor head for any visible damage.
For more detailed information on how infrared technology works in safety devices, you can refer to the general principles outlined on Wikipedia’s page on Infrared. Understanding the basic physics can help you appreciate why precise alignment is so critical.
When to Replace Your Garage Door Sensors
Sometimes, troubleshooting isn’t enough. If you have cleaned, aligned, and checked the wiring, but the lights still blink or the door won’t close, it may be time to replace the sensors. Here are signs that replacement is necessary:
- Physical Damage: Cracks in the housing or broken lenses.
- Persistent Blinking: The lights blink despite perfect alignment and clean lenses.
- Age: Sensors older than 10–15 years may have degraded components.
- Incompatible Replacements: If you recently replaced one sensor and the lights are both green or both off, you may have mismatched units. Always replace sensors in pairs to ensure compatibility.
Replacing sensors is a cost-effective repair compared to replacing the entire opener. Most universal sensor kits are affordable and easy to install.
FAQ Section
1. Can I paint my garage door sensors?
No, you should never paint the sensors. The paint can block the infrared beam or cover the LED lights, making it impossible to diagnose issues. If you want to camouflage them, consider buying sensors in a color that matches your garage trim.
2. Why is my garage door closing but then immediately reopening?
This is often a sign that the sensors are misaligned or blocked. The door starts to close, but the safety mechanism detects an interruption in the beam and reverses the door to prevent injury. Check your sensor lights first.
3. Do all garage door brands use green and amber lights?
While green and amber are the industry standard for most major brands like LiftMaster and Chamberlain, some brands may use different colors. For example, some older models or specific brands might use red and green. Always consult your owner’s manual for the specific color codes for your model.
4. Can bad weather affect my garage door sensors?
Yes, heavy rain, snow, or fog can sometimes interfere with the infrared beam. However, modern sensors are designed to be weather-resistant. If your sensors fail only during storms, ensure they are securely mounted and not vibrating excessively.
5. Is it safe to bypass the sensors to close the door?
It is strongly discouraged. The sensors are a critical safety feature designed to prevent the door from closing on people, pets, or objects. Bypassing them can lead to serious injury or property damage. If your sensors are faulty, repair or replace them instead of bypassing them.
Conclusion
Understanding your garage door sensors doesn’t have to be complicated. To recap, do both garage door sensors need to be green? The answer is no. A healthy system typically displays one solid green light (sender) and one solid amber light (receiver). If you see blinking lights, it’s a call to action to check for alignment issues, obstructions, or dirt.
By following the simple troubleshooting steps outlined above, you can save time and money on unnecessary service calls. Regular maintenance, such as cleaning the lenses and checking the alignment, will ensure your garage door operates safely and efficiently for years to come.
If you found this guide helpful, please share it with your friends and neighbors on social media. Helping others understand their home safety systems creates a safer community for everyone!
Leave a Reply