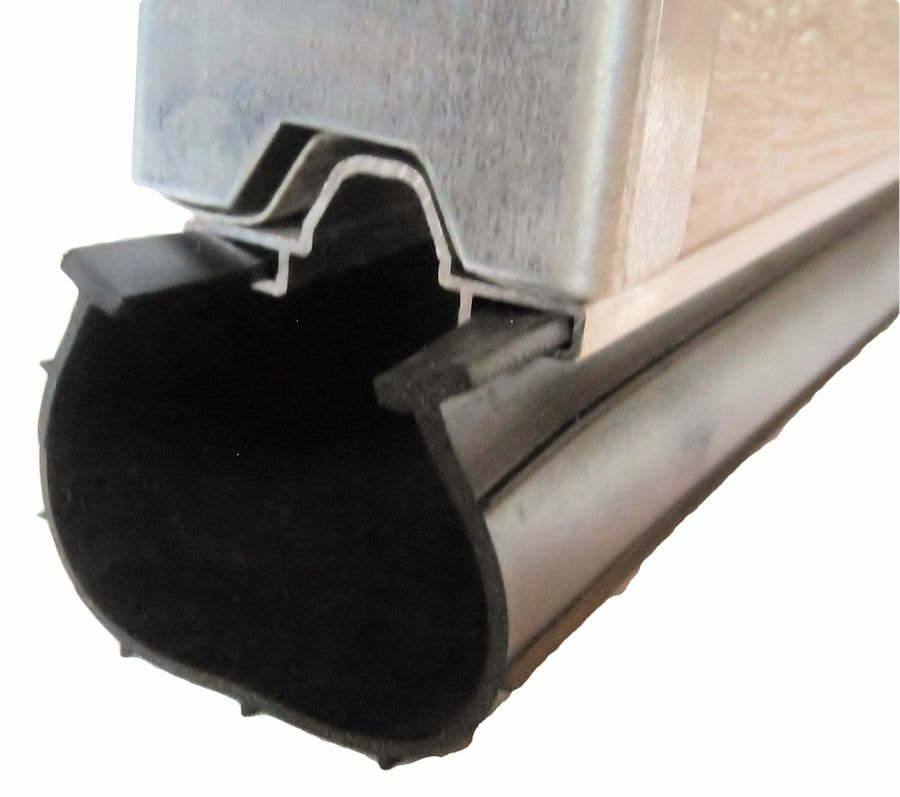
Have you noticed cold drafts sneaking into your garage, or perhaps small insects finding their way under the door? It is a frustrating issue that many homeowners face, but the good news is that it is usually an easy fix. If you are asking yourself, “Can you replace the bottom seal on a garage door?” the answer is a resounding yes, and you can likely do it yourself in under an hour.
Replacing the bottom seal, also known as the weatherstrip or threshold seal, is one of the most cost-effective home maintenance tasks you can perform. It not only improves energy efficiency but also keeps out water, debris, and pests. In this comprehensive guide, we will walk you through everything you need to know, from choosing the right material to installing it like a pro.
Why Replacing Your Garage Door Bottom Seal Matters
Before we dive into the “how-to,” let’s understand the “why.” Many homeowners ignore the rubber strip at the bottom of their garage door until it is completely shredded. However, this small component plays a massive role in your home’s comfort and security.
Energy Efficiency and Cost Savings
A damaged seal allows conditioned air to escape in the summer and cold air to enter in the winter. According to the U.S. Department of Energy, proper sealing and insulation can save you up to 15% on heating and cooling costs. While the garage might not be your primary living space, an unsealed garage acts as a thermal bridge, affecting adjacent rooms and increasing your overall utility bills.
Pest and Water Protection
The bottom seal is your first line of defense against:
- Water Intrusion: Prevents rainwater from flooding your garage during storms.
- Pests: Blocks entry points for mice, rats, spiders, and ants.
- Debris: Keeps leaves, dirt, and snow from accumulating inside.
If your current seal is cracked, brittle, or has gaps at the corners, it is time for a replacement. Ignoring it can lead to costly water damage or pest infestations down the line.
How to Choose the Right Replacement Seal
Not all garage door seals are created equal. Choosing the wrong type can lead to premature wear or poor performance. Here is what you need to consider before heading to the hardware store.
Material Types: Vinyl vs. Rubber
| Feature | Vinyl Seals | Rubber (EPDM) Seals |
|---|---|---|
| Durability | Moderate | High |
| Flexibility | Stiffens in cold | Remains flexible in extreme temps |
| Cost | Lower ($10–$20) | Higher ($20–$40) |
| Best For | Mild climates | Extreme heat or cold regions |
For most US homeowners, EPDM rubber is the recommended choice due to its superior resistance to UV rays and temperature fluctuations. It lasts longer and maintains a tight seal even in freezing winters.
Measuring Correctly
Accuracy is key. Follow these steps to measure your door:
- Width: Measure the exact width of your garage door opening. Standard single doors are 8–9 feet, while double doors are 16–18 feet. Always buy a seal slightly longer than needed so you can trim it.
- Thickness: Check the channel where the old seal sits. Most seals fit into a standard aluminum retainer at the bottom of the door. Measure the gap to ensure the new seal’s bulb or fin will fit snugly.
Step-by-Step Guide: How to Replace the Bottom Seal
Now that you have your materials, let’s get to work. This process requires minimal tools and no specialized skills.
Tools Needed:
- New garage door bottom seal
- Tape measure
- Utility knife or scissors
- Flathead screwdriver (optional)
- Soapy water (in a spray bottle)
Step 1: Remove the Old Seal
Start by opening your garage door halfway to give yourself room to work. Locate the ends of the existing seal. In most cases, the seal is pushed into an aluminum channel at the bottom of the door.
- Pull firmly on one end of the old seal. It should slide out of the channel.
- If it is stuck due to rust or dirt, use a flathead screwdriver to gently pry it loose.
- Once one end is free, pull the entire length out. Dispose of the old seal properly.
Step 2: Clean the Channel
This step is often skipped but is crucial for a long-lasting installation. Dirt, rust, and old adhesive can prevent the new seal from seating correctly.
- Wipe down the aluminum channel with a damp cloth.
- If there is significant buildup, use a wire brush to clean it out.
- Ensure the channel is completely dry before proceeding.
Step 3: Prepare the New Seal
Take your new seal and lay it flat on the ground for a few hours if it has been coiled in packaging. This helps remove kinks and makes it easier to install. If you are in a cold environment, bring the seal indoors to warm it up; cold rubber is stiff and difficult to insert.
Step 4: Install the New Seal
- Start at one corner of the door. Insert the end of the new seal into the aluminum channel.
- Push the seal into the channel using your thumbs. Work your way across the door, pushing about 6–12 inches at a time.
- Pro Tip: Spray a little soapy water into the channel or on the seal’s edge. This acts as a lubricant, allowing the seal to slide in smoothly without tearing.
- Continue until you reach the other end. Ensure the seal is seated evenly along the entire length.
Step 5: Trim the Excess
If your seal is longer than the door width, use a utility knife to trim the excess. Make a clean, straight cut to ensure a neat finish. Test the door by closing it slowly. The seal should compress slightly against the concrete floor, creating a tight barrier.
Common Mistakes to Avoid
Even though this is a simple DIY project, errors can happen. Here are the most common pitfalls:
- Buying the Wrong Size: Always measure twice. A seal that is too short will leave gaps, while one that is too thick may jam the door.
- Ignoring the Corners: Ensure the seal extends all the way to the edges. Gaps at the corners are prime entry points for pests.
- Forcing It: If the seal won’t go in, do not force it. Check for obstructions in the channel or use more lubricant. Forcing it can tear the rubber.
- Skipping Cleaning: Installing a new seal over dirty channels reduces its lifespan and effectiveness.
When to Call a Professional
While replacing the bottom seal is a straightforward task, there are scenarios where professional help is advisable. If your garage door’s bottom aluminum retainer is bent, corroded, or damaged, simply replacing the rubber seal will not solve the problem. The retainer itself may need repair or replacement.
Additionally, if your garage door is unbalanced or makes unusual noises when closing, it may indicate deeper mechanical issues. In such cases, consult a certified technician. You can read more about general garage door safety standards on Wikipedia to understand the broader mechanics involved.
FAQ Section
Q1: How often should I replace my garage door bottom seal?
A: Typically, every 3–5 years. However, this depends on your climate and usage. If you live in an area with extreme temperatures or high UV exposure, you may need to replace it more frequently. Inspect it annually for cracks or brittleness.
Q2: Can I replace the seal without removing the door?
A: Yes, absolutely. You do not need to remove the garage door from its tracks. Simply open the door halfway to access the bottom channel comfortably. This makes it a very beginner-friendly DIY project.
Q3: What if the seal doesn’t fit tightly after installation?
A: First, check if the seal is fully seated in the channel. If it is still loose, you may have purchased the wrong thickness. Alternatively, you can use a silicone-based adhesive to secure it, though this makes future replacements harder. Ideally, choose a seal with the correct bulb size for your channel.
Q4: Is there a difference between T-style and U-style seals?
A: Yes. T-style seals have a flat base that fits into a slot, while U-style (or bulb) seals wrap around the bottom edge of the door. Identify which type your door currently uses before buying a replacement. Most modern doors use T-style inserts.
Q5: Can I use a universal seal for any garage door?
A: No. While some seals are marketed as “universal,” they often require trimming and may not fit perfectly. It is best to buy a seal specifically designed for your door’s brand or measure your existing seal’s profile carefully to match it.
Conclusion
So, can you replace the bottom seal on a garage door? Definitely. It is a simple, affordable, and highly effective DIY project that enhances your home’s energy efficiency, cleanliness, and pest control. By following the steps outlined above, you can complete the job in under an hour and enjoy a tighter, more secure garage immediately.
Don’t let a worn-out seal compromise your home’s comfort. Take action today, save money on energy bills, and keep those pests where they belong—outside!
Did you find this guide helpful? Share it with your friends on social media who might be struggling with drafty garages!
Leave a Reply