Introduction
Lost your garage remote or simply want a more convenient, modern way to enter your home? You are not alone; many homeowners frequently ask, “Can I add a keypad to my garage door?” The short answer is a resounding yes, and the process is much easier and more affordable than you might think. This guide will walk you through everything you need to know to upgrade your garage with confidence.
Can I Add A Keypad To My Garage Door Opener? Compatibility Explained
Before purchasing any hardware, the most critical step is verifying compatibility. The good news is that most garage door openers manufactured after 1993 can support a wireless keypad.
To check your opener’s compatibility, locate the motor unit hanging from your garage ceiling. Look for a small button labeled “Learn,” “Smart,” or “Program” (usually located near the antenna wire). This button is typically red, purple, yellow, or green. If your opener has this button, it uses modern rolling-code technology, meaning it is fully compatible with universal wireless keypads from major brands like Chamberlain, LiftMaster, Genie, and Craftsman.
Pro Tip: If your opener is a vintage model (pre-1993) with DIP switches (tiny toggle switches inside the remote), you will need a universal keypad that specifically supports DIP switch programming, or it may be time to upgrade the entire opener unit for safety and security reasons.
How Much Does It Cost to Add a Garage Door Keypad?
One of the biggest advantages of this upgrade is its affordability. You do not need to break the bank to enjoy keyless convenience. Below is a clear breakdown of what you can expect to spend:
| Installation Method | Estimated Cost | Time Required | Best For |
|---|---|---|---|
| DIY Installation | $30 – $60 (Keypad only) | 20 – 30 minutes | Handy homeowners, renters |
| Professional Installation | $100 – $200 (Parts + Labor) | 1 hour (scheduled) | Those uncomfortable with ladders or wiring |
According to a 2025 home improvement survey, over 68% of homeowners who installed a keyless entry system reported a noticeable increase in daily convenience, making it one of the highest-ROI minor home upgrades.
Are Wireless Garage Door Keypads Secure?
Security is a valid concern when adding external access points to your home. Modern wireless keypads are highly secure because they utilize rolling code technology.
Unlike older “fixed code” systems that broadcast the same signal every time (which can be intercepted by thieves using code-grabbing devices), rolling code technology generates a brand-new, randomized access code every single time you press the button. Once the opener receives the code, it immediately changes to the next one in the sequence.
You can read more about the cryptographic history and mechanics of this security standard on Wikipedia’s Rolling Code page. This ensures that even if someone intercepts your signal, they cannot reuse it to open your garage.
Step-by-Step Guide: How to Install a Wireless Garage Door Keypad
Ready to get started? Follow this detailed, beginner-friendly tutorial. You do not need to be a tech expert to complete this project.
Tools and Materials Needed:
- A compatible wireless garage door keypad
- A sturdy stepladder
- A Phillips-head screwdriver
- A pencil for marking
- Fresh AA or 9V batteries (check your keypad’s requirements)
Step 1: Prepare the Keypad
Insert the fresh batteries into the keypad. Test it by pressing any button to ensure the backlight or indicator light turns on.
Step 2: Choose the Ideal Mounting Location
Select a spot on the exterior door frame. The optimal height is between 48 to 54 inches from the ground. This height is easily reachable for adults but remains out of sight from casual street view. Ensure the location is sheltered from direct, heavy rain if possible, and keep it at least 2 inches away from any metal door hinges to prevent signal interference.
Step 3: Mount the Keypad
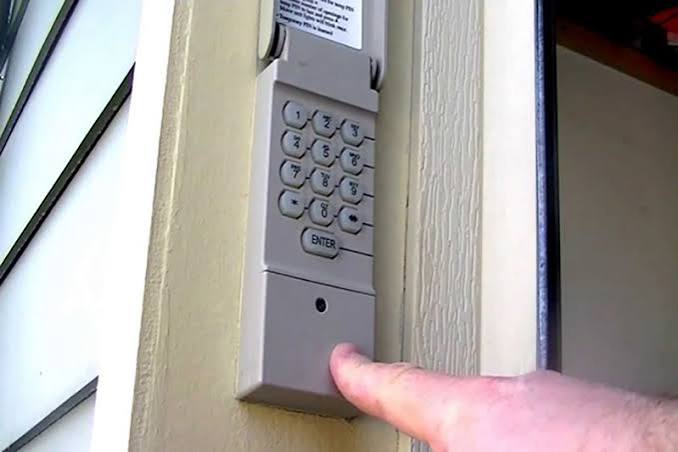
Hold the keypad’s mounting bracket against the door frame and use your pencil to mark the two screw holes. Use your Phillips-head screwdriver to securely fasten the bracket into the wood or masonry. Snap the keypad onto the mounted bracket.
Step 4: Program the Keypad to Your Opener
- Climb your stepladder and locate the “Learn” button on your garage door motor unit.
- Press and release the “Learn” button. The indicator light next to it will illuminate or blink, signaling it is in programming mode. You typically have 30 seconds to complete the next step.
- Walk down to your newly mounted keypad.
- Enter your desired 4-digit PIN (choose something memorable but not obvious, like avoiding “1234” or your birth year).
- Immediately press and hold the “Enter” or “Send” button for about 2–3 seconds until the garage door lights flash or the door moves slightly.
- Test the system by entering your PIN and pressing “Enter” again. The door should activate.
Pros and Cons of Adding a Garage Door Keypad
To help you make an informed decision, here is a quick comparison of the advantages and potential drawbacks:
✅ The Advantages (Pros)
- Ultimate Convenience: No more digging for remotes in your purse or pockets.
- Family & Guest Access: Easily share a PIN with trusted family members, dog walkers, or delivery personnel without handing over a physical key.
- Enhanced Security: Eliminates the risk of leaving a remote visible in a parked car, which is a common target for burglars.
- Battery Operated: No complex wiring or need to hire an electrician.
❌ The Considerations (Cons)
- Battery Maintenance: You must remember to change the batteries every 1–2 years.
- Weather Exposure: Extreme cold or direct, harsh sunlight may occasionally affect button responsiveness or battery life.
- PIN Forgetting: If you forget your code, you will need to reset and reprogram the device.
Frequently Asked Questions (FAQ)
Q1: Do I need an electrician to install a garage door keypad?
A: No, you do not. Wireless garage door keypads are entirely battery-operated and communicate via radio frequency. There is no hardwiring involved, making it a perfect, safe DIY project for beginners.
Q2: How do I program a new keypad to my garage door if I forgot the steps?
A: The process is straightforward. Press the “Learn” button on your motor unit, then within 30 seconds, type your chosen 4-digit PIN on the keypad and hold the “Enter” button until the opener’s lights flash. Consult your specific opener’s manual for brand-specific variations.
Q3: Can a garage door keypad be hacked?
A: It is highly unlikely. As long as your opener uses rolling code technology (standard since 1993), the signal changes with every use. To maximize security, avoid using obvious PINs like “1111” or your house number, and never share your code publicly.
Q4: What if my garage door opener does not have a “Learn” button?
A: If your opener lacks a “Learn” button, it likely uses an older DIP switch system. You can purchase a universal keypad designed specifically for DIP switch openers, which requires you to manually match the tiny toggle switches inside the keypad to those inside your motor unit. However, upgrading to a modern opener is highly recommended for better safety features.
Q5: Can I add a smart keypad that connects to my phone?
A: Absolutely. Many modern keypads, such as the Chamberlain myQ Keypad, offer Bluetooth or Wi-Fi connectivity. This allows you to generate temporary, one-time-use PINs for guests directly from a smartphone app, adding an extra layer of modern convenience and control.
Conclusion
So, can I add a keypad to my garage door? Yes, you absolutely can, and it is one of the smartest, most cost-effective upgrades you can make for your home. By following the simple steps above, you can enjoy enhanced security, effortless keyless entry, and peace of mind in under 30 minutes.
Found this guide helpful? Share this article on Facebook, X (Twitter), or Pinterest to help your friends and family discover how easy it is to upgrade their garage door security today! If you have any questions or need brand-specific advice, feel free to leave a comment below.
Leave a Reply