Introduction
Is your garage turning into an icebox in winter or a sauna in summer? You are not alone. Many homeowners struggle with extreme temperatures in their garages, which can affect stored items, workspace comfort, and even home energy bills. If you have been asking yourself, “What can I use to insulate my garage door,” you are looking for a practical solution to stabilize that space. This guide will walk you through the best materials, installation tips, and expert advice to help you make the right choice for your home.
Why Insulating Your Garage Door Matters
Before diving into materials, it is essential to understand why this upgrade is worth your time and money. The garage door is often the largest moving part of your home’s exterior envelope. Without proper insulation, it acts as a thermal bridge, allowing heat to escape in winter and enter in summer.
According to the U.S. Department of Energy, proper insulation can significantly reduce heating and cooling costs. While the garage itself might not be conditioned space, an insulated door helps regulate the temperature of adjacent rooms, such as bedrooms or living areas located above or next to the garage. Furthermore, insulation adds structural rigidity to the door, reduces noise from outside traffic, and protects sensitive tools or vehicles from humidity and temperature swings.
Top Materials: What Can I Use To Insulate My Garage Door?
When considering what can I use to insulate my garage door, you generally have three primary options. Each has distinct advantages regarding cost, R-value (thermal resistance), and ease of installation.
1. Reflective Foam Insulation (Polystyrene or Polyethylene)
This is the most popular choice for DIYers. It typically comes in pre-cut panels or rolls with a reflective foil facing.
- Pros: Lightweight, easy to cut, moisture-resistant, and affordable.
- Cons: Lower R-value compared to rigid foam boards; may require adhesive for secure fitting.
- Best For: Standard sectional garage doors where weight is a concern.
2. Rigid Foam Board (Polyurethane or Polystyrene)
Rigid foam boards offer superior thermal performance. These are thick, dense panels that provide excellent insulation.
- Pros: High R-value per inch, durable, and provides significant sound dampening.
- Cons: Heavier than reflective foam; requires precise cutting; may need stronger adhesive.
- Best For: Homeowners in extreme climates who prioritize maximum energy efficiency.
3. Fiberglass Batt Insulation
While common in walls, fiberglass batts are less ideal for garage doors unless the door has specific cavities designed for them.
- Pros: Very high R-value, inexpensive material cost.
- Cons: Heavy, absorbs moisture (leading to mold), difficult to install securely on a moving door, and poses health risks during installation if not handled properly.
- Best For: Rarely recommended for standard residential garage doors due to weight and moisture issues.
Comparison Table: Choosing the Right Material
| Feature | Reflective Foam | Rigid Foam Board | Fiberglass Batts |
|---|---|---|---|
| R-Value | Low to Medium (R-3 to R-8) | High (R-6 to R-12+) | Very High (R-13+) |
| Weight | Light | Medium | Heavy |
| Moisture Resistance | Excellent | Good | Poor |
| Ease of Install | Easy | Moderate | Difficult |
| Cost | $ | $$ | $ |
Step-by-Step Guide: How to Install Garage Door Insulation
Installing insulation is a manageable weekend project. Here is how to do it safely and effectively.
Step 1: Measure Your Door Panels
Accuracy is key. Measure the width and height of each individual panel on your garage door. Do not measure the entire door at once, as sections vary. Write down these dimensions. Most kits come in standard sizes, but you may need to trim them.
Step 2: Clean the Door Surface
Use a mild detergent and water to clean the interior surface of the garage door panels. Remove any dirt, grease, or old adhesive. Allow the surface to dry completely. A clean surface ensures the adhesive bonds properly.
Step 3: Cut the Insulation Material
If using pre-cut kits, skip this step. If using rolls or boards, use a utility knife and a straight edge to cut the material to your measured dimensions. For rigid foam, score the board deeply and snap it along the line for a clean edge.
Step 4: Apply Adhesive
Use a high-strength construction adhesive or the double-sided tape provided in your kit. Apply the adhesive to the back of the insulation panel or directly onto the garage door panel. Follow the manufacturer’s instructions for drying time before pressing the panel into place.
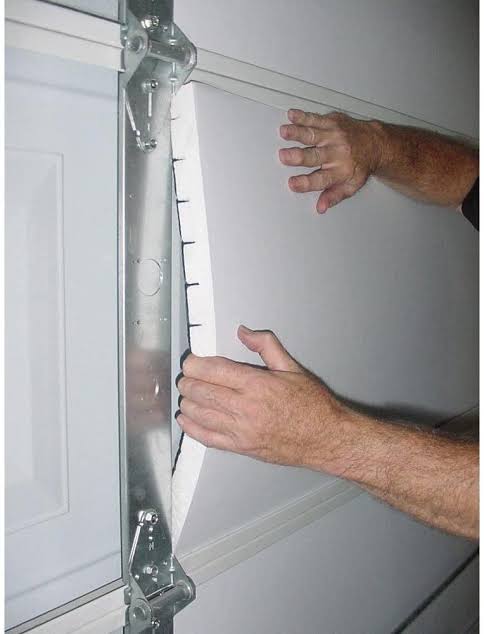
Step 5: Insert and Secure Panels
Press the insulation firmly into the panel recess. Ensure there are no gaps around the edges. If using a kit with retaining clips, install them according to the instructions to hold the panel securely. Repeat for all panels.
Step 6: Seal Gaps
Use weatherstripping around the edges of the door to seal any remaining gaps. This prevents air leakage, which is crucial for maintaining the thermal barrier.
Expert Tips for Maximum Efficiency
To get the most out of your insulation, consider these professional insights:
- Check the Weight Limit: Garage door openers have weight limits. Adding heavy insulation like rigid foam may require adjusting the spring tension or upgrading the opener motor. Consult a professional if you are unsure.
- Ventilation Matters: Insulating the door does not mean sealing the garage completely. Ensure adequate ventilation to prevent moisture buildup, which can lead to rust or mold.
- Seal the Perimeter: Insulation is only as good as its seals. Check the weatherstripping along the sides and bottom of the door. Replace worn-out strips to maximize energy savings.
For more detailed information on thermal resistance values and building science principles, you can refer to the comprehensive guide on Insulation available on Wikipedia.
Frequently Asked Questions (FAQ)
Q1: What is the best R-value for garage door insulation?
A: For most residential garages, an R-value between R-8 and R-12 is sufficient. If you live in an extremely cold climate or use your garage as a workshop, aim for R-12 or higher. Keep in mind that higher R-values often mean thicker and heavier materials.
Q2: Will insulating my garage door lower my energy bills?
A: Yes, but the impact depends on your home’s layout. If your garage is attached to your house and shares walls with living spaces, insulating the door can reduce heat transfer, leading to noticeable savings. If your garage is detached, the impact on home energy bills will be minimal, though it will still protect stored items.
Q3: Can I insulate a single-panel garage door?
A: Yes, but the process differs. Single-panel doors swing out rather than folding up. You must ensure the insulation does not interfere with the hinges or tracks. Flexible reflective foam is often easier to work with on single-panel doors than rigid boards.
Q4: How long does garage door insulation last?
A: Properly installed insulation can last 10–20 years or more. Reflective foam may degrade faster if exposed to direct sunlight or physical damage. Rigid foam is more durable but can crack if the door is impacted. Regular inspection and maintenance of seals will extend its lifespan.
Q5: Is it better to buy a pre-insulated door or add insulation myself?
A: Pre-insulated doors offer superior integration and often have higher R-values because the insulation is sandwiched between steel layers. However, they are significantly more expensive and require professional installation. DIY insulation is a cost-effective alternative that provides substantial benefits for a fraction of the price.
Conclusion
So, what can I use to insulate my garage door? The answer depends on your budget, climate, and DIY comfort level. For most homeowners, reflective foam kits offer the best balance of cost, ease of installation, and performance. If you need maximum thermal protection, rigid foam boards are the superior choice.
By taking this step, you are not just improving comfort; you are protecting your belongings, reducing noise, and potentially lowering energy costs. Don’t let another season pass with an inefficient garage door.
Did you find this guide helpful? Share it with your friends on social media who might be struggling with a cold or hot garage! Let’s help everyone create a more comfortable and efficient home.
Leave a Reply