Introduction
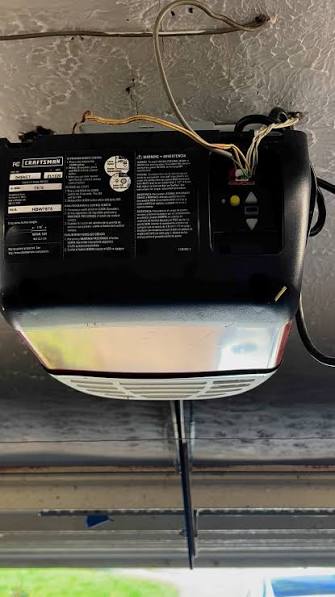
There is nothing quite as frustrating as rushing out the door in the morning, hitting the remote, and watching your garage door refuse to budge while those up and down arrows blinking on Chamberlain garage door opener mock your urgency. It is a common panic-inducing moment for many homeowners, but take a deep breath—this is rarely a sign of a catastrophic mechanical failure. In most cases, it is a simple safety feature triggered by misalignment or a minor setting adjustment that you can fix yourself in under ten minutes.
In this guide, we will break down exactly why those lights are flashing, how to interpret the specific blink patterns, and provide step-by-step solutions to get your door operating smoothly again. We will focus on practical, safe, and effective troubleshooting methods that align with manufacturer guidelines and expert repair standards.
Why Are the Arrows Blinking? Understanding the Safety System
Before we dive into the fixes, it is crucial to understand why Chamberlain designed the system this way. The blinking arrows are not random; they are diagnostic codes. Your garage door opener is equipped with sophisticated safety mechanisms to prevent injury and property damage. When the system detects an anomaly—such as an obstruction, a misaligned sensor, or a limit switch error—it enters a “lockout” mode, indicated by the flashing lights.
According to general safety standards for automatic garage doors, these systems must reverse or stop if an obstruction is detected. You can read more about the historical development of these safety regulations on Wikipedia’s page on Garage Door Openers, which highlights how modern sensors have significantly reduced accidents over the past few decades.
The two arrow buttons on your wall console typically represent the Travel Limit Settings. When they blink, it usually means the opener has lost its reference point for where “open” and “closed” actually are, or the safety eyes (sensors) are not communicating properly.
Check the Safety Sensors (The Most Common Culprit)
The number one reason for blinking arrows is an issue with the photo-eye sensors located near the floor on either side of the garage door opening. These sensors project an invisible beam across the door; if the beam is broken, the door will not close, and the lights will blink.
Step 1: Inspect the LED Lights
Look at the small LED lights on the sensor units.
- Sending Unit: Usually has a steady amber or yellow light.
- Receiving Unit: Should have a steady green light.
- The Problem: If the receiving unit’s light is blinking or off, the beam is blocked or misaligned.
Step 2: Clean the Lenses
Dirt, spider webs, or dust can obscure the lens. Use a soft, dry cloth to gently wipe both sensor lenses. Avoid using harsh chemicals that might leave a residue.
Step 3: Realign the Sensors
If the lights are still not steady, the brackets may have been bumped.
- Loosen the wing nut on the sensor bracket slightly.
- Adjust the sensor head until the LED light turns solid green.
- Tighten the wing nut carefully without moving the sensor.
- Test the door.
Pro Tip: Even a slight misalignment of a few millimeters can break the beam. Ensure both sensors are at the exact same height from the ground.
Resetting the Travel Limits
If your sensors are aligned and showing solid lights, but the arrows are still blinking, the issue likely lies with the travel limit settings. This happens if the door was manually operated during a power outage, or if the motor has drifted from its programmed positions.
The “Up” arrow represents the open position, and the “Down” arrow represents the closed position. When they blink, the opener is asking you to re-teach it where the stops are.
How to Reset Travel Limits on Modern Chamberlain Models:
- Clear the Memory: Locate the “Learn” button on the motor unit (usually yellow, purple, or red). Press and hold it until the indicator light next to it goes out. This clears all remote codes and limit settings. Note: You will need to reprogram your remotes after this.
- Enter Programming Mode: Press and hold the “Up” arrow button on the wall console until the door starts to move. Release the button once the door is fully open.
- Set the Down Limit: Press and hold the “Down” arrow button. The door will close. Once it touches the floor firmly, release the button.
- Confirm: The lights should stop blinking. Test the door using the remote.
If your model uses a different programming sequence (common in older models), consult your specific manual, as the button combinations can vary between the Belt Drive, Chain Drive, and Screw Drive series.
Adjusting Force Settings
Sometimes, the arrows blink because the door is encountering too much resistance. The opener has “force settings” that determine how much power is used to open and close the door. If the door is heavy, or if the tracks are dirty, the motor may sense an obstruction and reverse, causing the lights to flash.
Signs of Force Issues:
- The door starts to close but reverses immediately upon touching the floor.
- The door struggles to open halfway and stops.
Adjustment Steps:
- Locate the force adjustment dials on the motor unit. They are usually labeled “Open Force” and “Close Force.”
- Use a small screwdriver to turn the dial slightly clockwise to increase force, or counter-clockwise to decrease it.
- Caution: Do not increase the force excessively. The door must still reverse if it hits a legitimate obstruction (like a box or a pet). Test the safety reversal feature by placing a 2×4 piece of wood on the floor under the center of the door. When closing, the door should hit the wood and reverse immediately.
Power Cycle and Logic Board Reset
Electronic devices, including garage door openers, can suffer from temporary glitches in their logic boards. A simple power cycle can clear these errors.
- Unplug the garage door opener from the power outlet.
- If you have a battery backup unit, disconnect the battery as well.
- Wait for 60 seconds. This allows any residual charge in the capacitors to dissipate.
- Plug the unit back in.
- Listen for the startup chime or look for the lights to stabilize.
If the arrows continue to blink after a power cycle, the issue is likely mechanical or sensor-related, as discussed above.
Comparison: Blinking Patterns and Meanings
Not all blinks are created equal. While the continuous blinking of both arrows usually indicates a limit or sensor issue, some models use specific blink counts to diagnose problems.
| Blink Pattern | Likely Cause | Recommended Action |
|---|---|---|
| Continuous Blinking | Sensor Misalignment or Limit Error | Check sensor LEDs; Reset travel limits. |
| 10 Blinks then Stop | Wire Break or Short | Inspect wiring from sensors to motor head. |
| Fast Flashing | Lock Feature Activated | Check if the “Lock” button on the remote was pressed. |
| No Lights | Power Failure | Check outlet, circuit breaker, and power cord. |
Note: Always refer to your specific model’s manual for exact blink codes, as Chamberlain updates firmware and hardware designs regularly.
FAQ Section
Q1: Can I bypass the sensors to make the door close? A: While it is technically possible to bypass sensors by holding down the wall button, it is highly discouraged and dangerous. The sensors are a critical safety feature required by law. Bypassing them risks severe injury to pets, children, or property. Always fix the alignment instead.
Q2: Why do the arrows blink only when it rains? A: Moisture can cause short circuits in the sensor wires or the logic board. Check the outdoor sensor housing for cracks where water might be entering. Also, inspect the wiring for exposed copper that could be corroding due to humidity.
Q3: My door opens fine but blinks when closing. What is wrong? A: This is almost always a sensor issue. The sending eye is working (door opens), but the receiving eye isn’t getting the beam when the door moves (possibly due to vibration shifting the bracket). Realign the sensors carefully.
Q4: How often should I maintain my Chamberlain opener? A: Experts recommend a bi-annual checkup. Lubricate the chain or screw drive, tighten hardware, and test the safety sensors every six months to prevent unexpected failures.
Q5: Is it expensive to replace the logic board if resetting doesn’t work? A: Replacement logic boards typically cost between $50 and $150, depending on the model. However, labor costs for a professional technician can add $100–$200. Attempting the troubleshooting steps in this article first can save you significant money.
Conclusion
Dealing with the up and down arrows blinking on Chamberlain garage door opener can feel daunting, but it is rarely a disaster. By systematically checking your safety sensors, resetting your travel limits, and ensuring your force settings are balanced, you can resolve the issue in most cases without calling a professional. Remember, these blinking lights are your opener’s way of communicating that it wants to operate safely.
Take a moment to inspect your sensors today—it might just save you from being locked out tomorrow. If you found this guide helpful, please share it with your neighbors or on social media to help others troubleshoot their garage door woes. A well-maintained garage door is a safe garage door!
Leave a Reply