Have you ever woken up to the loud bang of a broken garage door spring, leaving your car trapped inside? It is a frustrating and potentially dangerous situation that many homeowners face. If you are ready to tackle the repair yourself, knowing how to tell what size garage door spring you need is the most critical step to ensuring your door operates safely and smoothly again.
Replacing a garage door spring is not a task to be taken lightly. These components are under extreme tension and hold the weight of your entire door. Getting the size wrong can lead to immediate failure, damage to your garage door opener, or even serious injury. In this guide, we will walk you through the precise methods to identify your spring type and measure it correctly, so you can order the exact replacement part with confidence.
Identifying Your Spring Type: Torsion vs. Extension
Before you can measure anything, you must know what kind of spring system your garage door uses. There are two primary types, and they are measured differently. Using the wrong measurement method will result in ordering the incorrect part.
1. Torsion Springs
Torsion springs are mounted horizontally above the closed garage door, on a metal shaft (torsion bar). They twist (torque) to lift the door. These are common in modern homes and heavier doors because they provide smoother operation and last longer.
- Location: Above the door opening.
- Appearance: One or two tightly wound coils on a central bar.
- Safety Note: These are under high tension. Never attempt to loosen or adjust them without proper winding bars and safety knowledge.
2. Extension Springs
Extension springs run parallel to the horizontal tracks on both sides of the door. They stretch (extend) to counterbalance the door’s weight. These are often found in older homes or lighter single-car garage doors.
- Location: Alongside the upper horizontal tracks.
- Appearance: Long, stretched-out coils with safety cables running through them.
- Safety Note: Always ensure safety cables are installed. If an extension spring breaks without a cable, it can fly across the garage with lethal force.
How To Measure Torsion Springs Accurately
If you have determined that you have torsion springs, you need four specific measurements. Do not guess these numbers; even a small error can make the spring incompatible.
Step 1: Measure the Wire Size
This is the thickness of the steel wire used to make the spring. It is usually the most difficult measurement to get right because standard tape measures are not precise enough.
- Tool Needed: A caliper is highly recommended. If you do not have one, use a ruler with fine markings.
- Method: Measure the diameter of the wire itself, not the whole coil.
- Common Sizes: 0.207″, 0.218″, 0.225″, 0.234″, 0.250″.
- Tip: If using a ruler, measure 10 or 20 coils together, then divide by the number of coils to get an average wire size. This reduces error.
Step 2: Measure the Inside Diameter (ID)
This is the width of the hollow center of the spring.
- Method: Place your ruler or caliper across the inside of the coil.
- Common Sizes: 1-3/4″, 2″, 2-1/4″, 2-5/8″.
- Note: Do not measure the outside diameter. The industry standard is based on the inside diameter.
Step 3: Count the Number of Coils
You must count the total number of quarter turns or full coils.
- Method: Start at one end and count every full 360-degree rotation. Include partial coils at the ends.
- Precision: Be exact. A difference of half a coil can change the spring’s lifting power significantly.
- Standard Counts: Often between 7 and 10 full coils, but this varies widely.
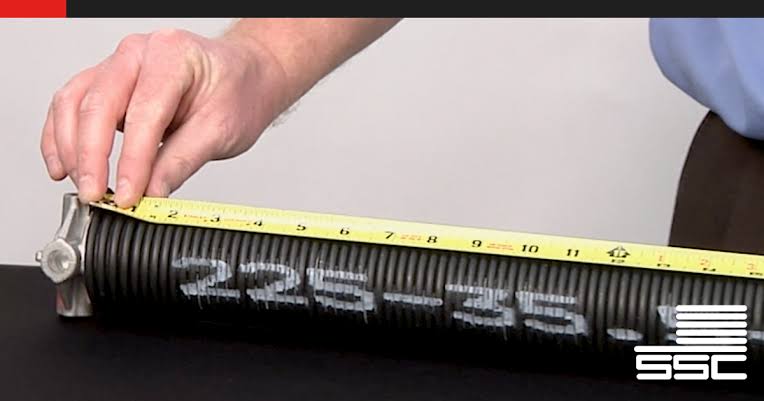
Step 4: Determine the Length
Measure the length of the spring when it is relaxed (not under tension).
- Method: Measure from one end of the coil to the other, excluding the cones or fittings at the ends.
- Common Lengths: 24″, 26″, 28″, 30″, 32″.
- Important: If you have two springs, they should generally be the same length and wire size unless specified otherwise by the manufacturer.
How To Measure Extension Springs Accurately
Measuring extension springs is slightly different because they are designed to stretch. You must measure them in their relaxed state.
Step 1: Measure the Length (Excluding Hooks)
- Method: Lay the spring flat on the ground. Measure the length of the coiled body only.
- Exclusion: Do not include the hooks, loops, or clips at the ends in your measurement.
- Common Lengths: 24″, 26″, 28″, 30″.
Step 2: Identify the Wire Size
Similar to torsion springs, you need the thickness of the wire.
- Method: Use a caliper or ruler to measure the diameter of the wire.
- Common Sizes: 0.225″, 0.250″, 0.281″.
Step 3: Check the Outer Diameter
- Method: Measure the width of the spring from outside edge to outside edge.
- Common Sizes: 1-1/2″, 1-3/4″, 2″.
Step 4: Note the Color Code (If Visible)
Many extension springs have a color code painted on them or on the safety cable clip. This color corresponds to a specific weight capacity.
- Action: Take a photo of the color. While you should still measure physically, the color can serve as a helpful cross-reference when ordering.
Understanding Weight Capacity and Door Balance
Knowing the physical dimensions is only half the battle. The spring must also match the weight of your garage door. A spring that is too weak will cause the opener to strain and fail prematurely. A spring that is too strong can slam the door shut or damage the tracks.
| Door Material | Estimated Weight (Single Car) | Estimated Weight (Double Car) | Recommended Spring Type |
|---|---|---|---|
| Steel (Single Layer) | 130–150 lbs | 250–300 lbs | Extension or Light Torsion |
| Steel (Insulated) | 180–220 lbs | 350–400 lbs | Standard Torsion |
| Wood | 200–250 lbs | 400–500 lbs | Heavy-Duty Torsion |
| Aluminum/Glass | 100–130 lbs | 200–250 lbs | Light Torsion or Extension |
To find the exact weight, you can disconnect the opener and manually lift the door. It should feel nearly weightless if balanced correctly. If it feels heavy, your springs are likely undersized or worn out. For more detailed technical specifications on door weights, you can refer to general construction standards on Wikipedia.
Common Mistakes to Avoid When Sizing Springs
Even experienced DIYers can make errors. Here are the most frequent pitfalls:
- Measuring Under Tension: Always measure torsion springs when they are relaxed. Measuring them while they are wound will give you an incorrect length.
- Ignoring the Cones: When measuring torsion spring length, do not include the metal cones at the ends. Measure only the coiled wire.
- Assuming Symmetry: If you have two torsion springs, check both. Sometimes, one may have been replaced previously with a different size, causing imbalance.
- Rounding Up Wire Size: Wire size is precise. Do not round 0.225″ up to 0.250″. This small difference changes the torque significantly.
FAQ Section
Q: Can I just replace one torsion spring if I have two?
A: It is highly recommended to replace both springs at the same time. If one has broken due to age and fatigue, the other is likely close to failing as well. Replacing both ensures balanced lifting and prevents another service call in the near future.
Q: What happens if I install the wrong size spring?
A: An incorrect spring can cause severe issues. A spring that is too weak will force your garage door opener to work harder, leading to motor burnout. A spring that is too strong can cause the door to slam open or shut, damaging the tracks, rollers, and potentially causing injury.
Q: How long do garage door springs typically last?
A: Most standard garage door springs are rated for 10,000 cycles. One cycle is opening and closing the door once. For an average family, this translates to about 7–10 years. High-cycle springs rated for 25,000+ cycles are available and last significantly longer.
Q: Is it dangerous to measure the springs myself?
A: Measuring is generally safe if the spring is not under active tension adjustment. However, never attempt to unwind or wind a torsion spring without proper tools (winding bars) and training. If you are unsure, consult a professional. Safety glasses and gloves are always recommended when inspecting garage door hardware.
Q: Where can I find the model number on my spring?
A: Some manufacturers stamp the wire size, length, and inside diameter directly onto the spring. Look for black ink markings on the coils. If the markings are faded or absent, you must rely on manual measurement as described in this guide.
Conclusion
Learning how to tell what size garage door spring you need empowers you to take control of your home maintenance. By carefully identifying your spring type, using precise tools to measure wire size, diameter, and length, and understanding your door’s weight requirements, you can ensure a successful replacement.
Remember, safety is paramount. If at any point you feel uncomfortable handling these high-tension components, do not hesitate to call a certified garage door technician. A properly sized spring will restore smooth, quiet operation to your garage door and extend the life of your opener.
Did you find this guide helpful? Share it with your neighbors or on social media to help others tackle their garage door repairs with confidence!
Leave a Reply